
Please complete all previous assignment before starting this assignment.
The following tasks are to acquaint yourself with the Moog Grandmother synthesizer. You're essentially going to be re-doing what we did in class. For each step, make sure you understand how each dial is changing the sound, and take note of any questions I can answer in class next week (and/or refer to the manual to see if you can figure it out yourself). We will not be making anything very original here, the point is to get comfortable with the instrument. Next week, we will be more creative.
Please refer to the Synthesis Notes shown in class.
Basic
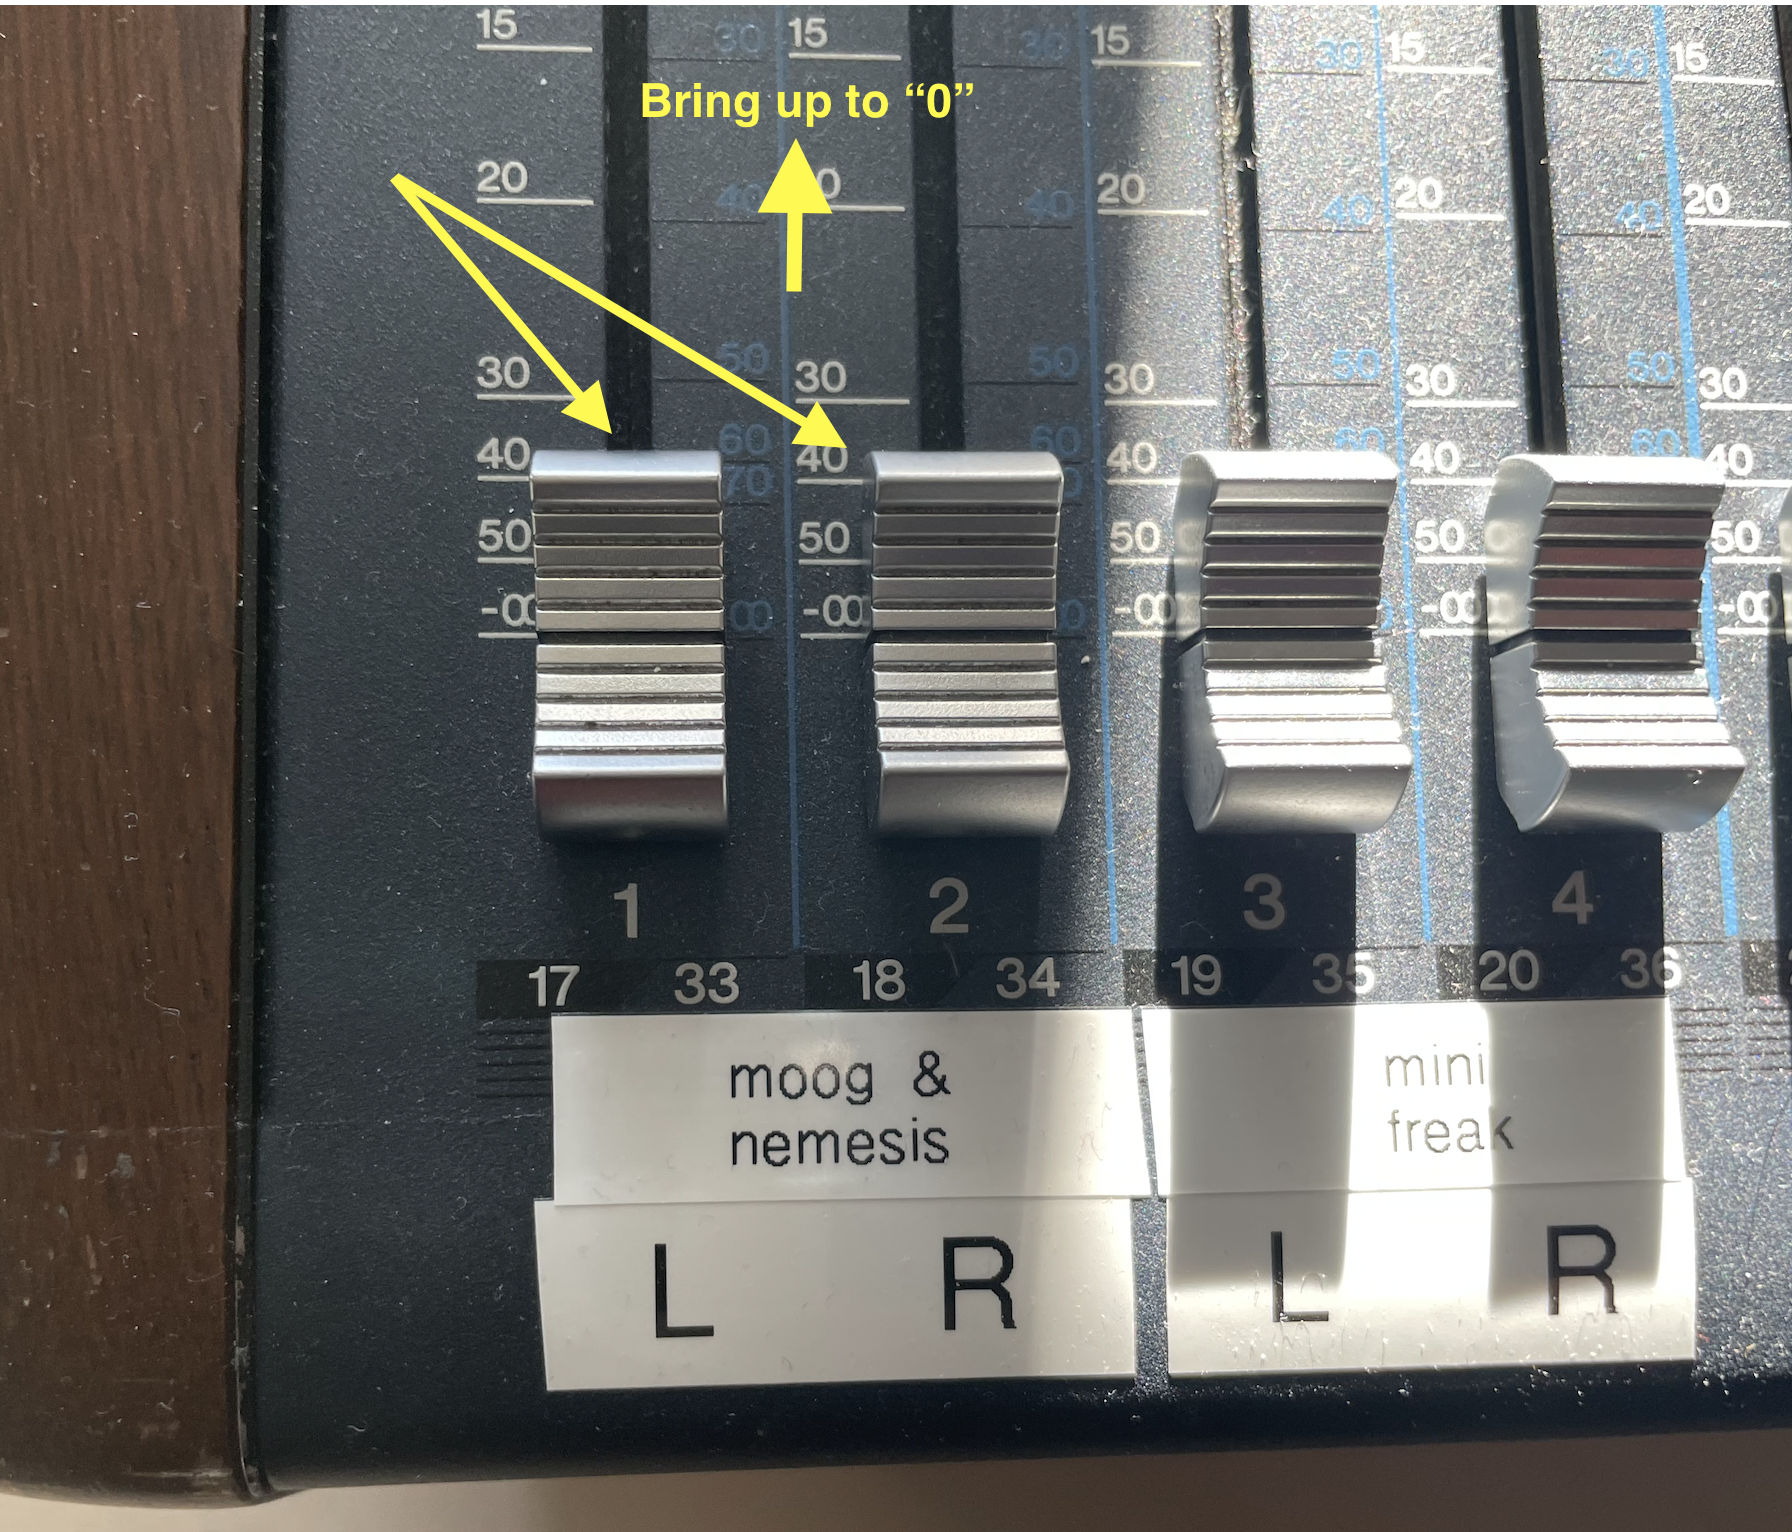
• Turn on the Moog (at the back), and the Nemesis pedal, and bring up the "Moog & Nemesis" faders on the blue Yamaha mixer to the left of the computer.
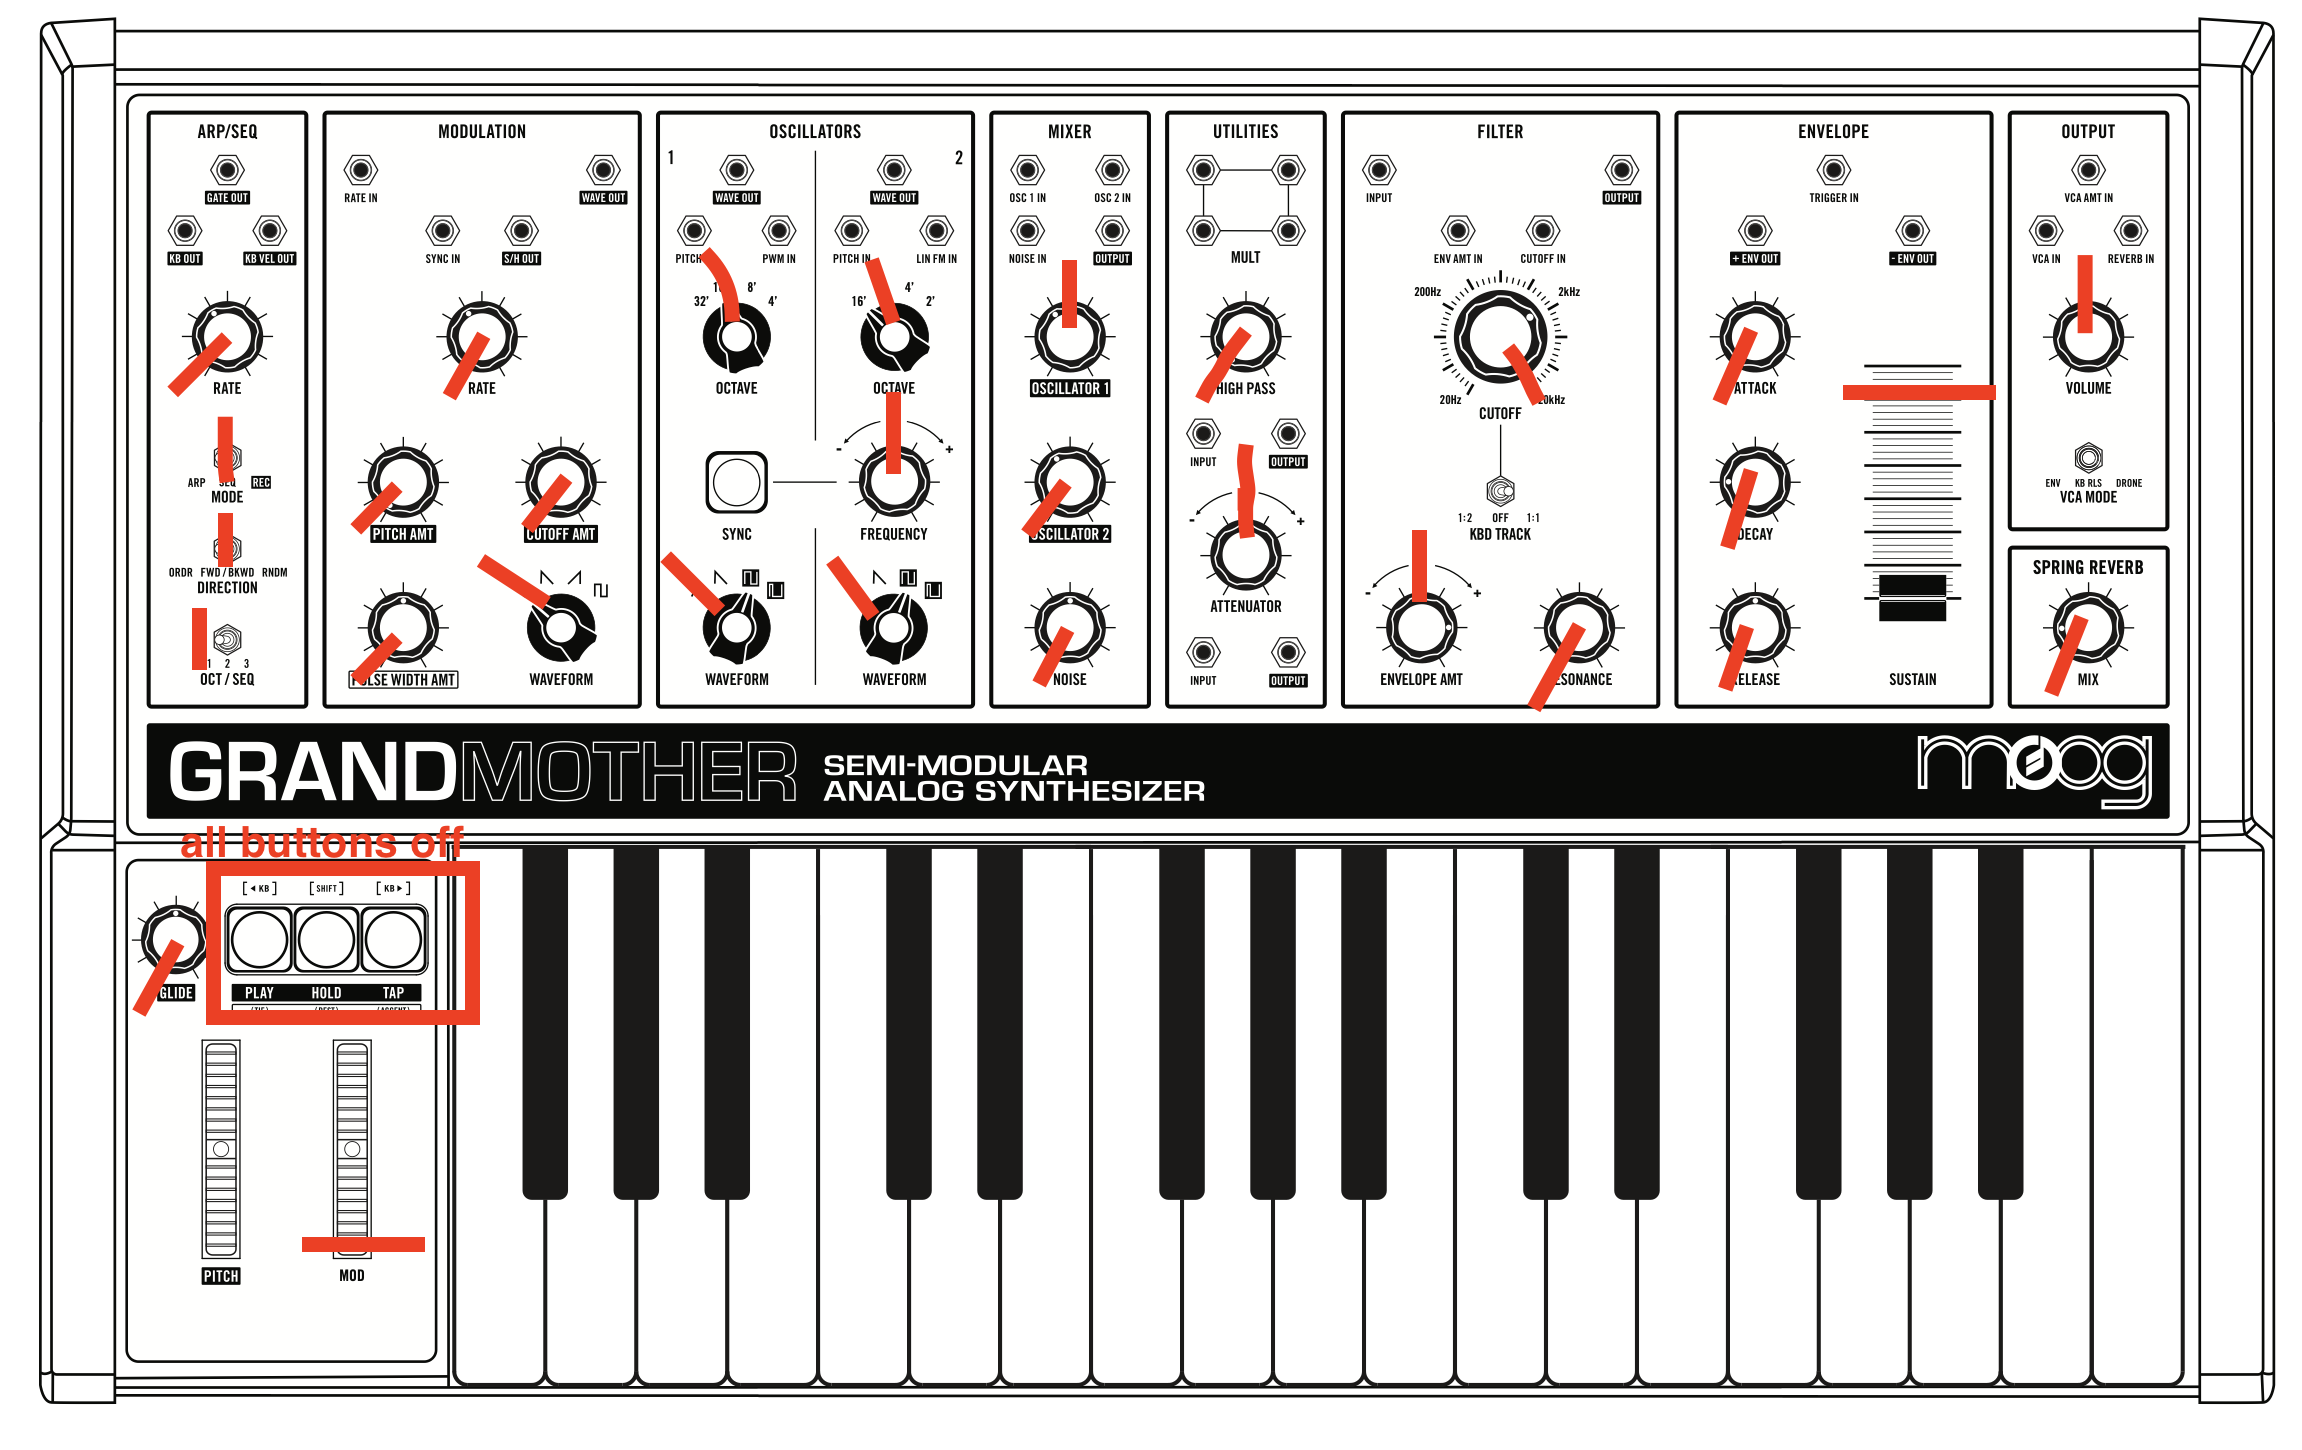
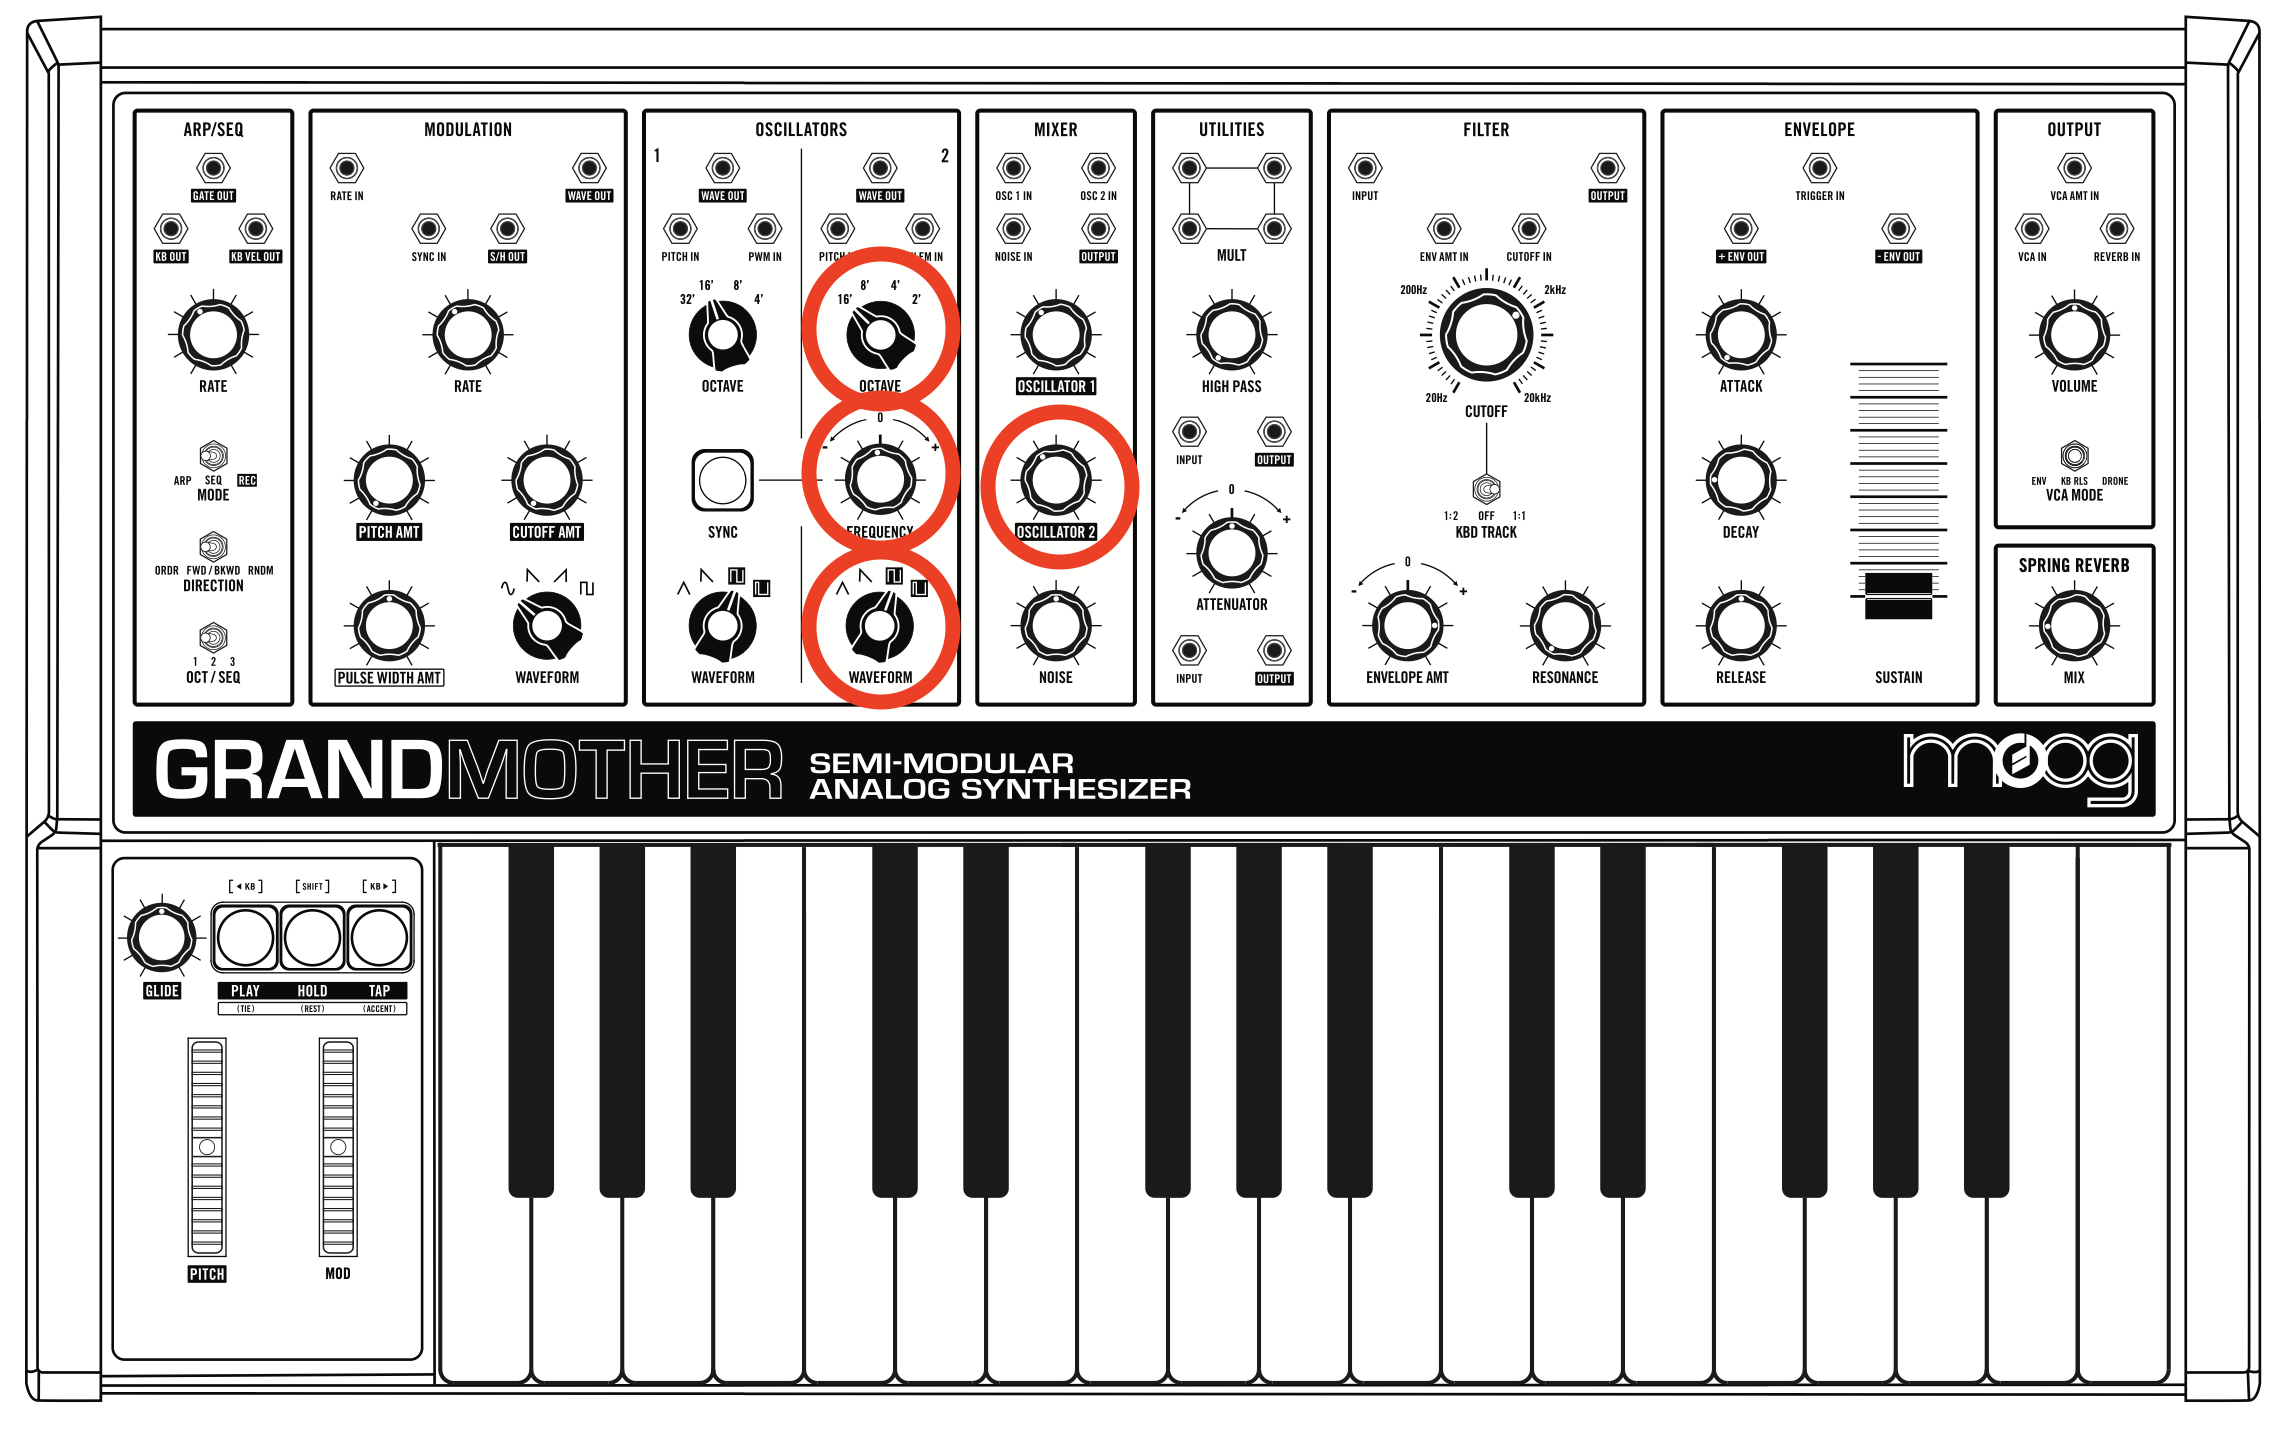
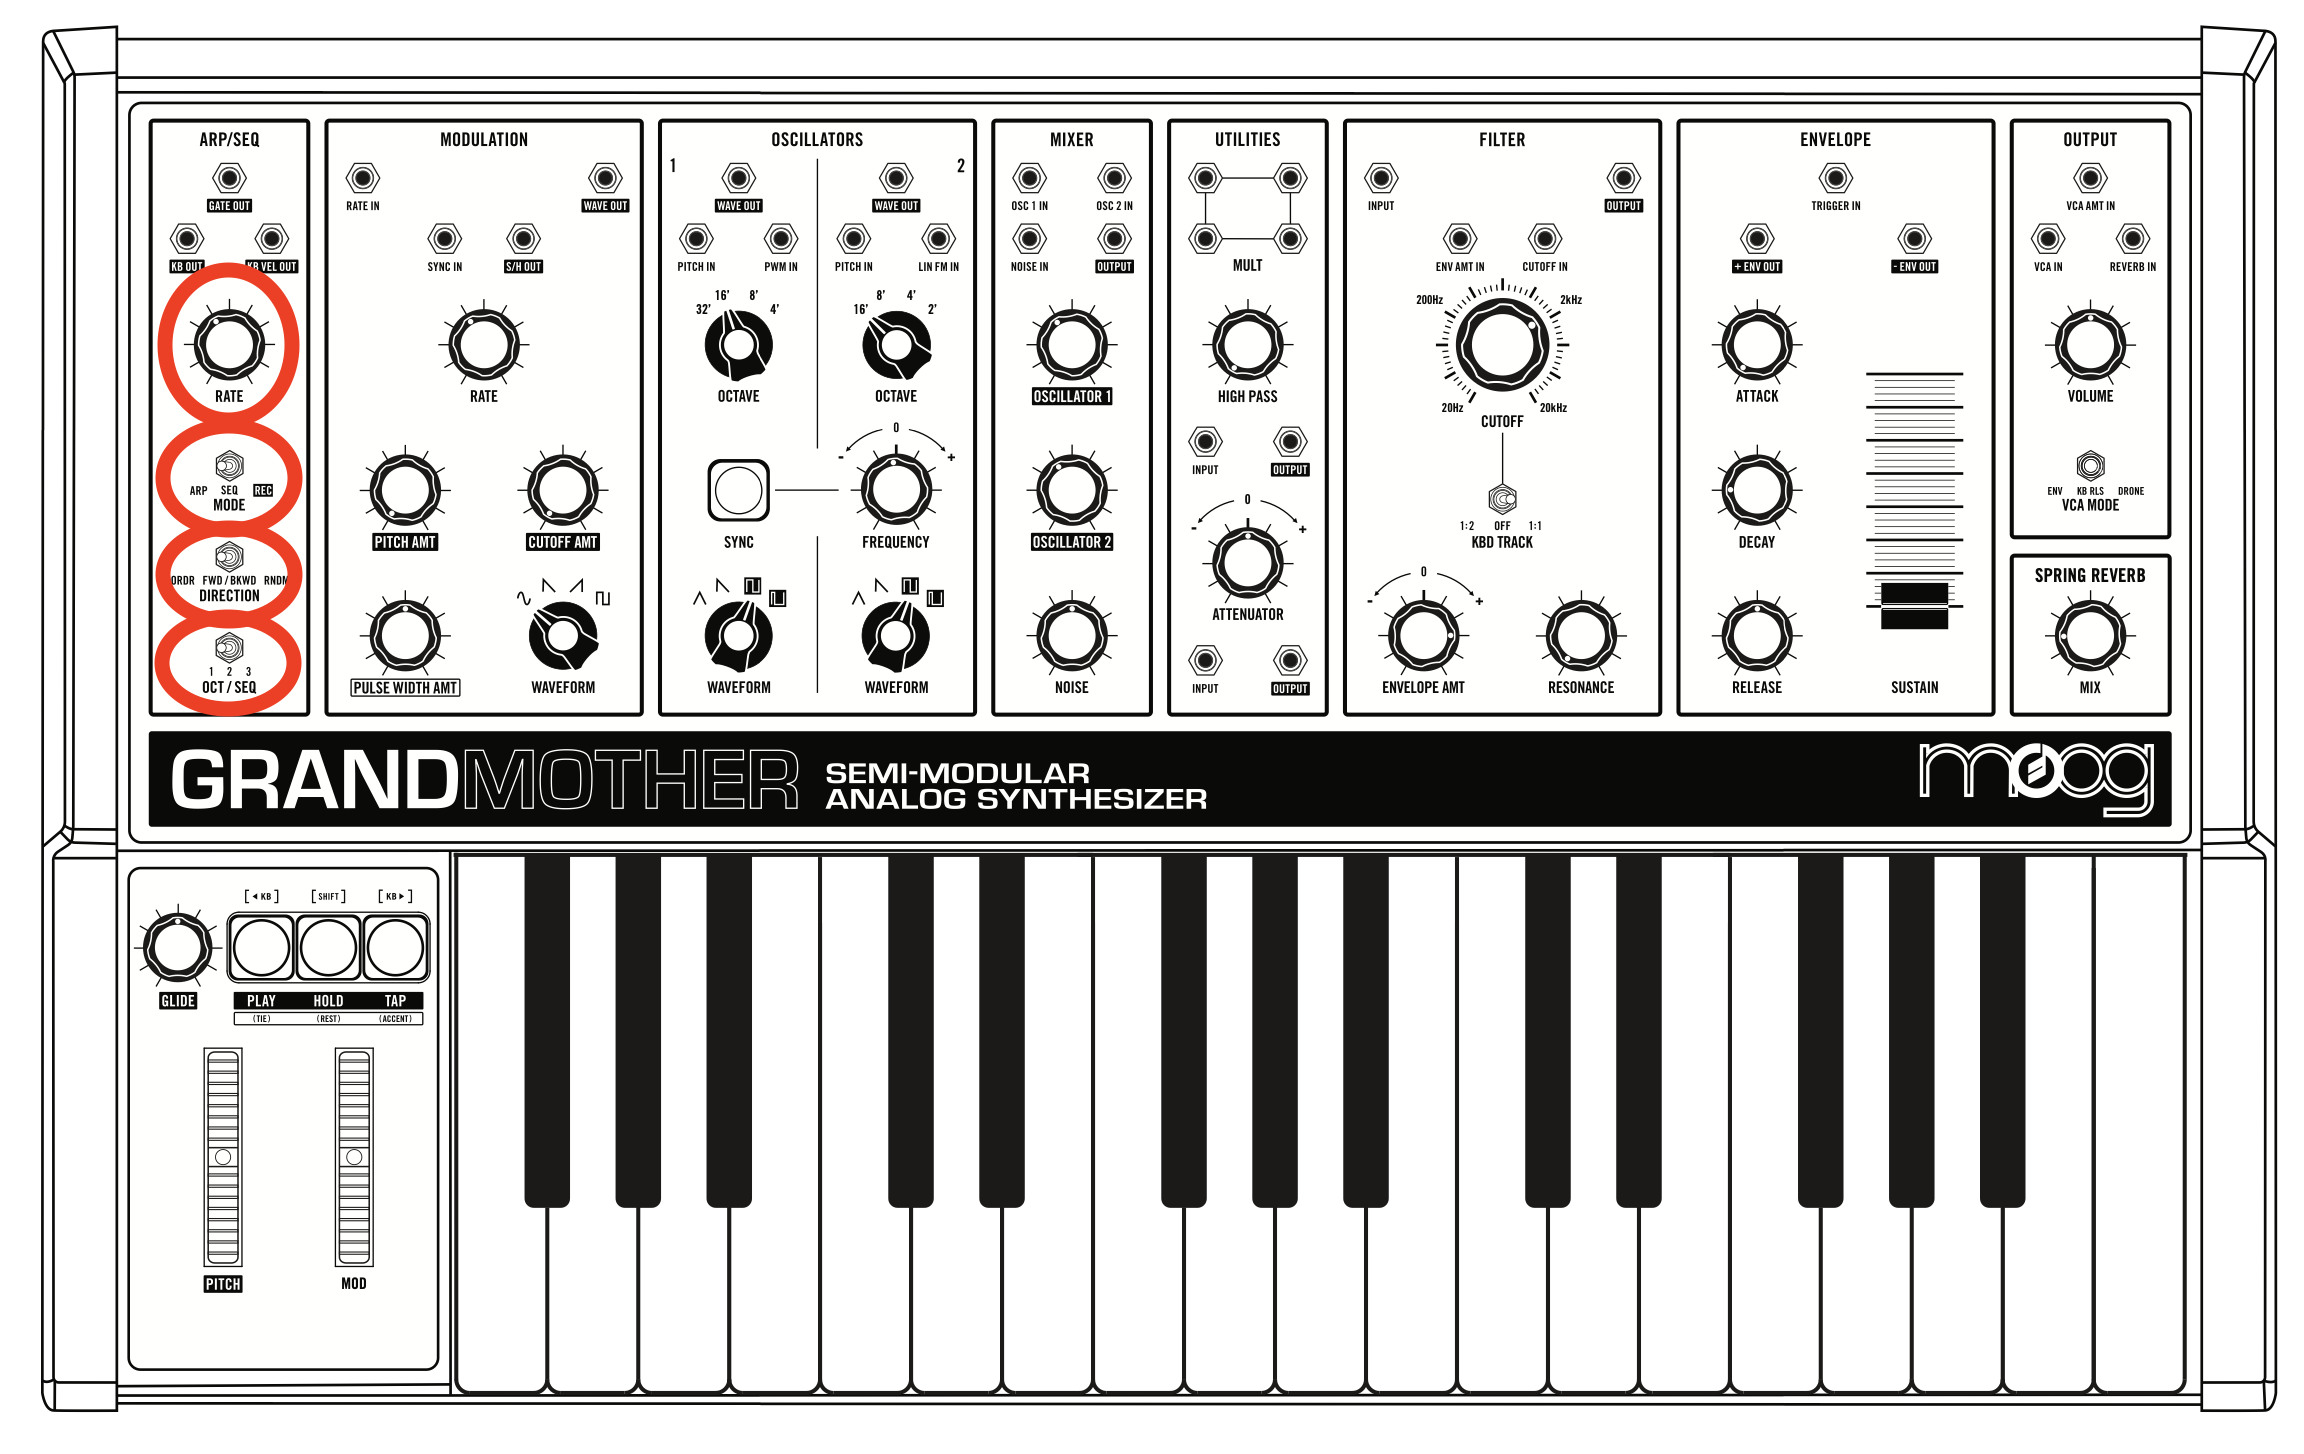
• Reset the synth. Turn all the knobs according to the red lines below.
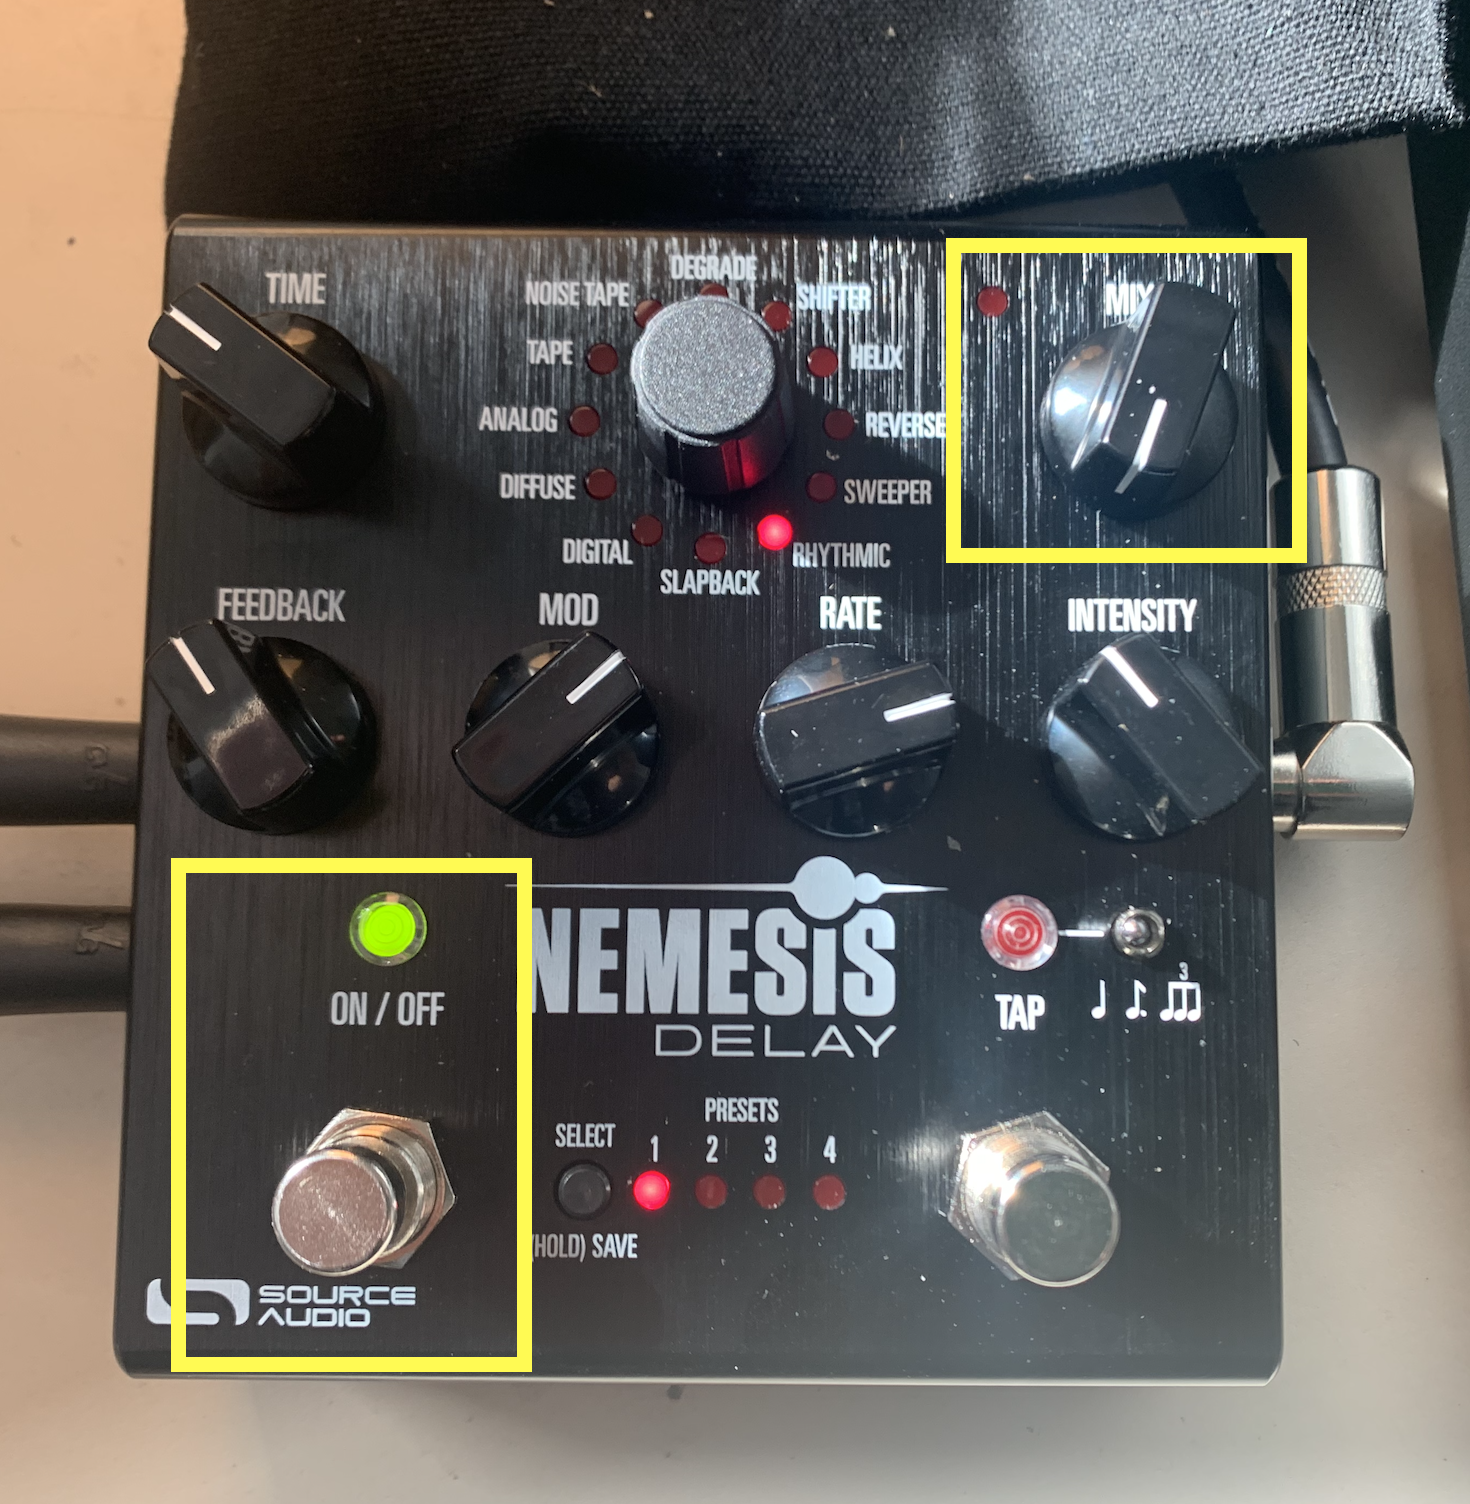
• Reset the Nemesis pedal: make sure the left button is pressed, which will turn on a green light, and set the MIX dial all the way down.
• Play some notes. You should hear something close to a pure sine tone, but with more upper partials.
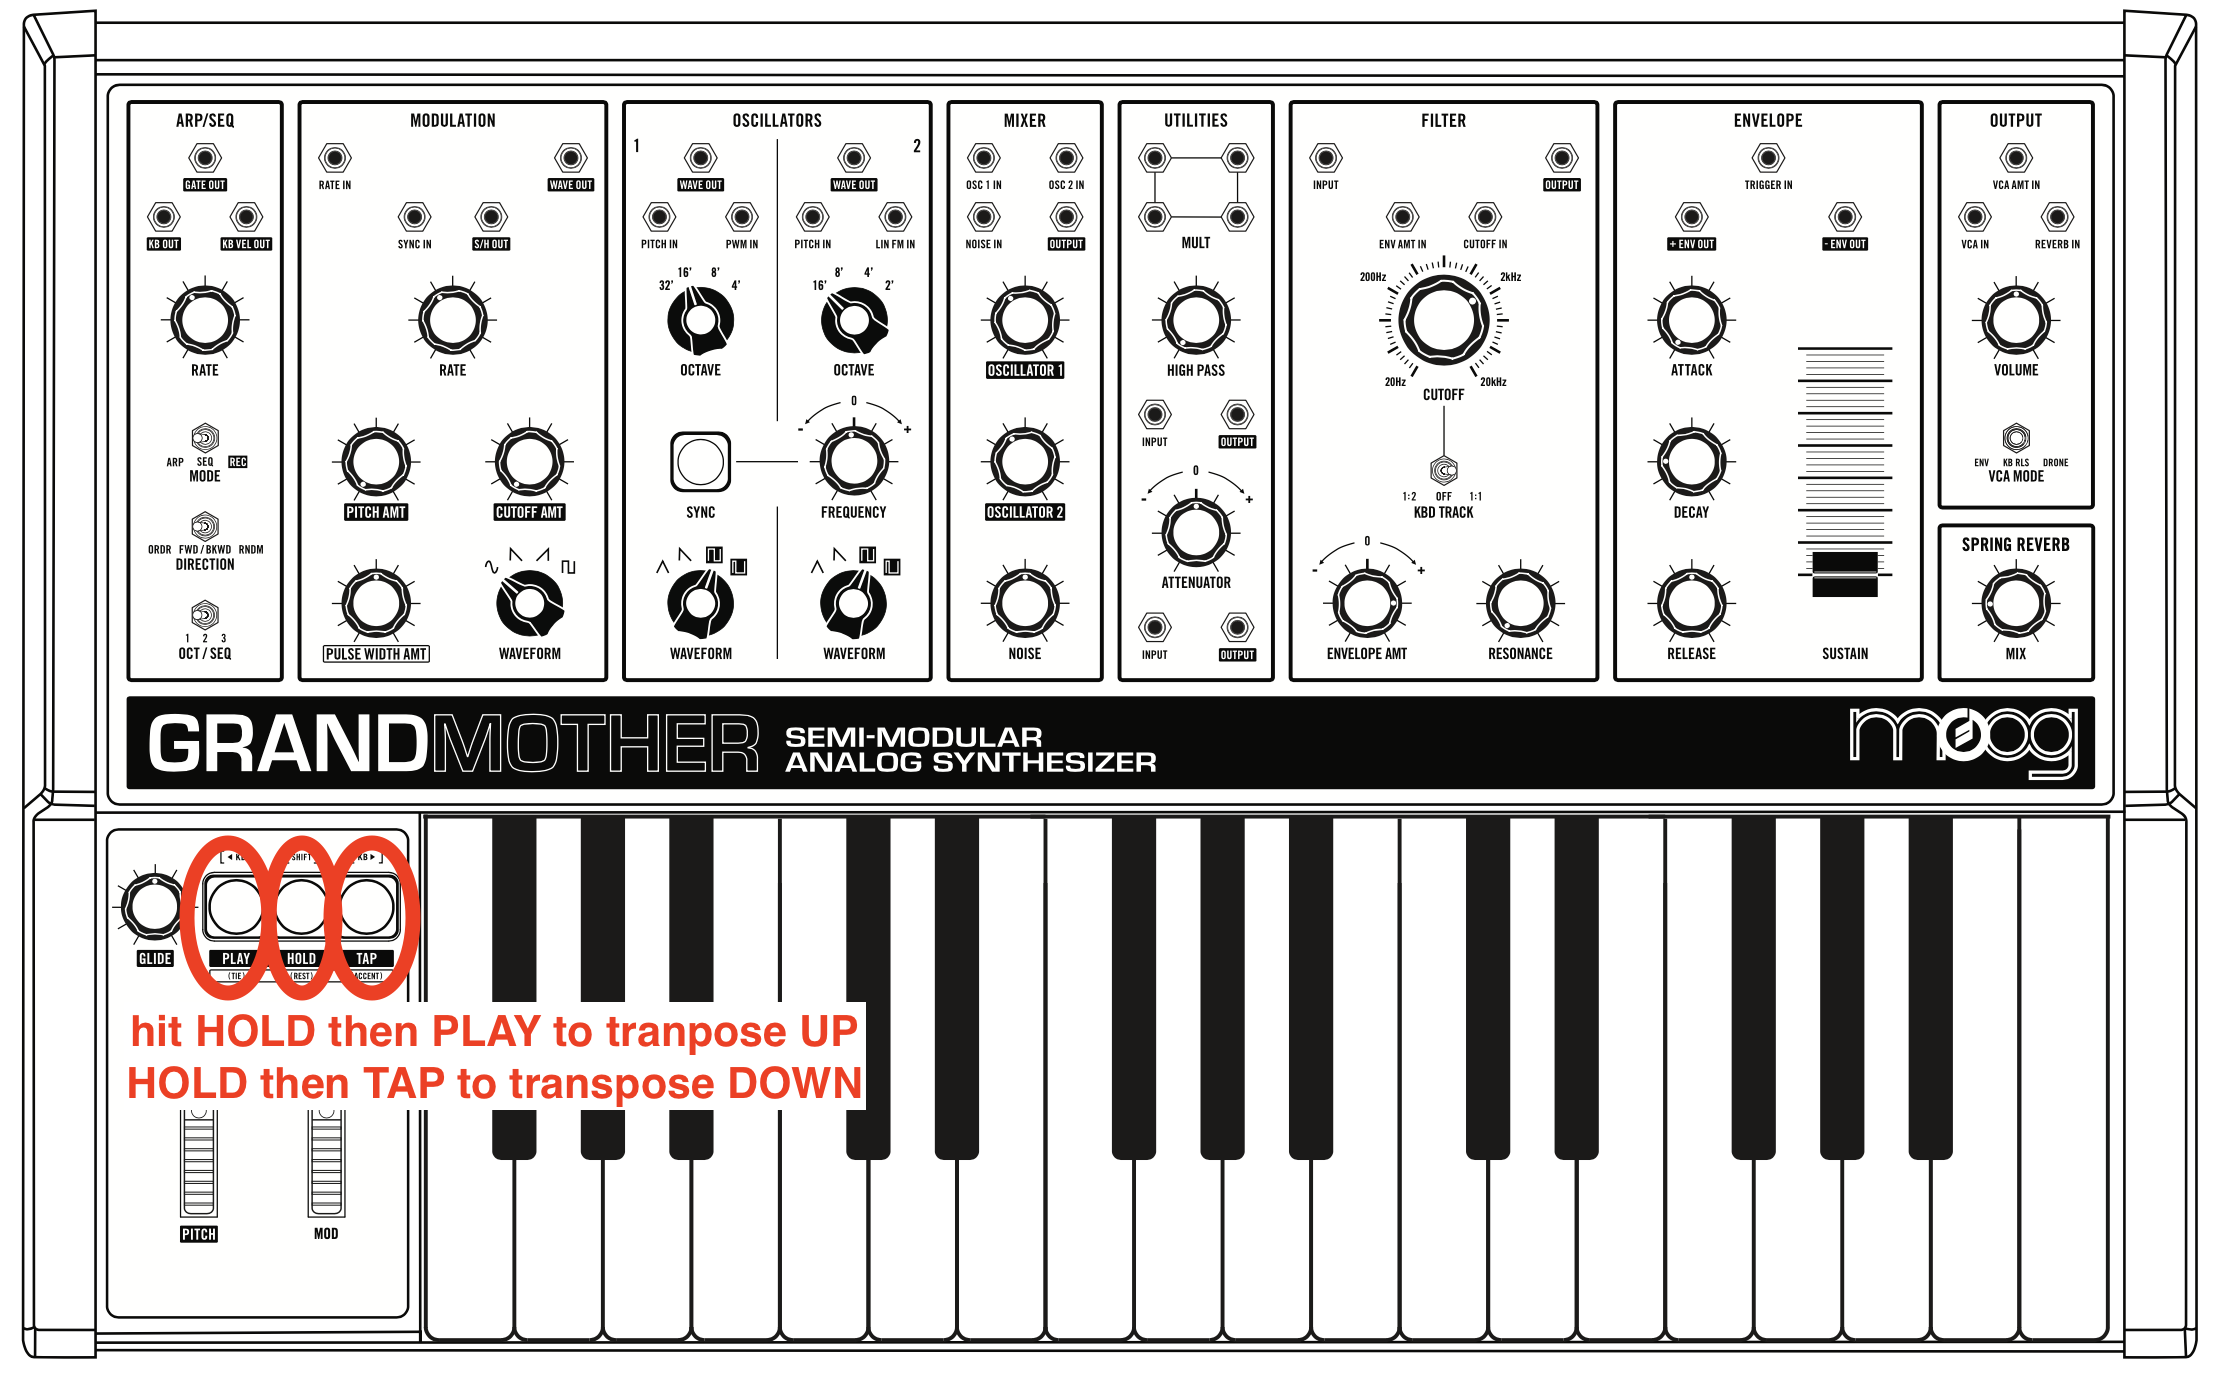
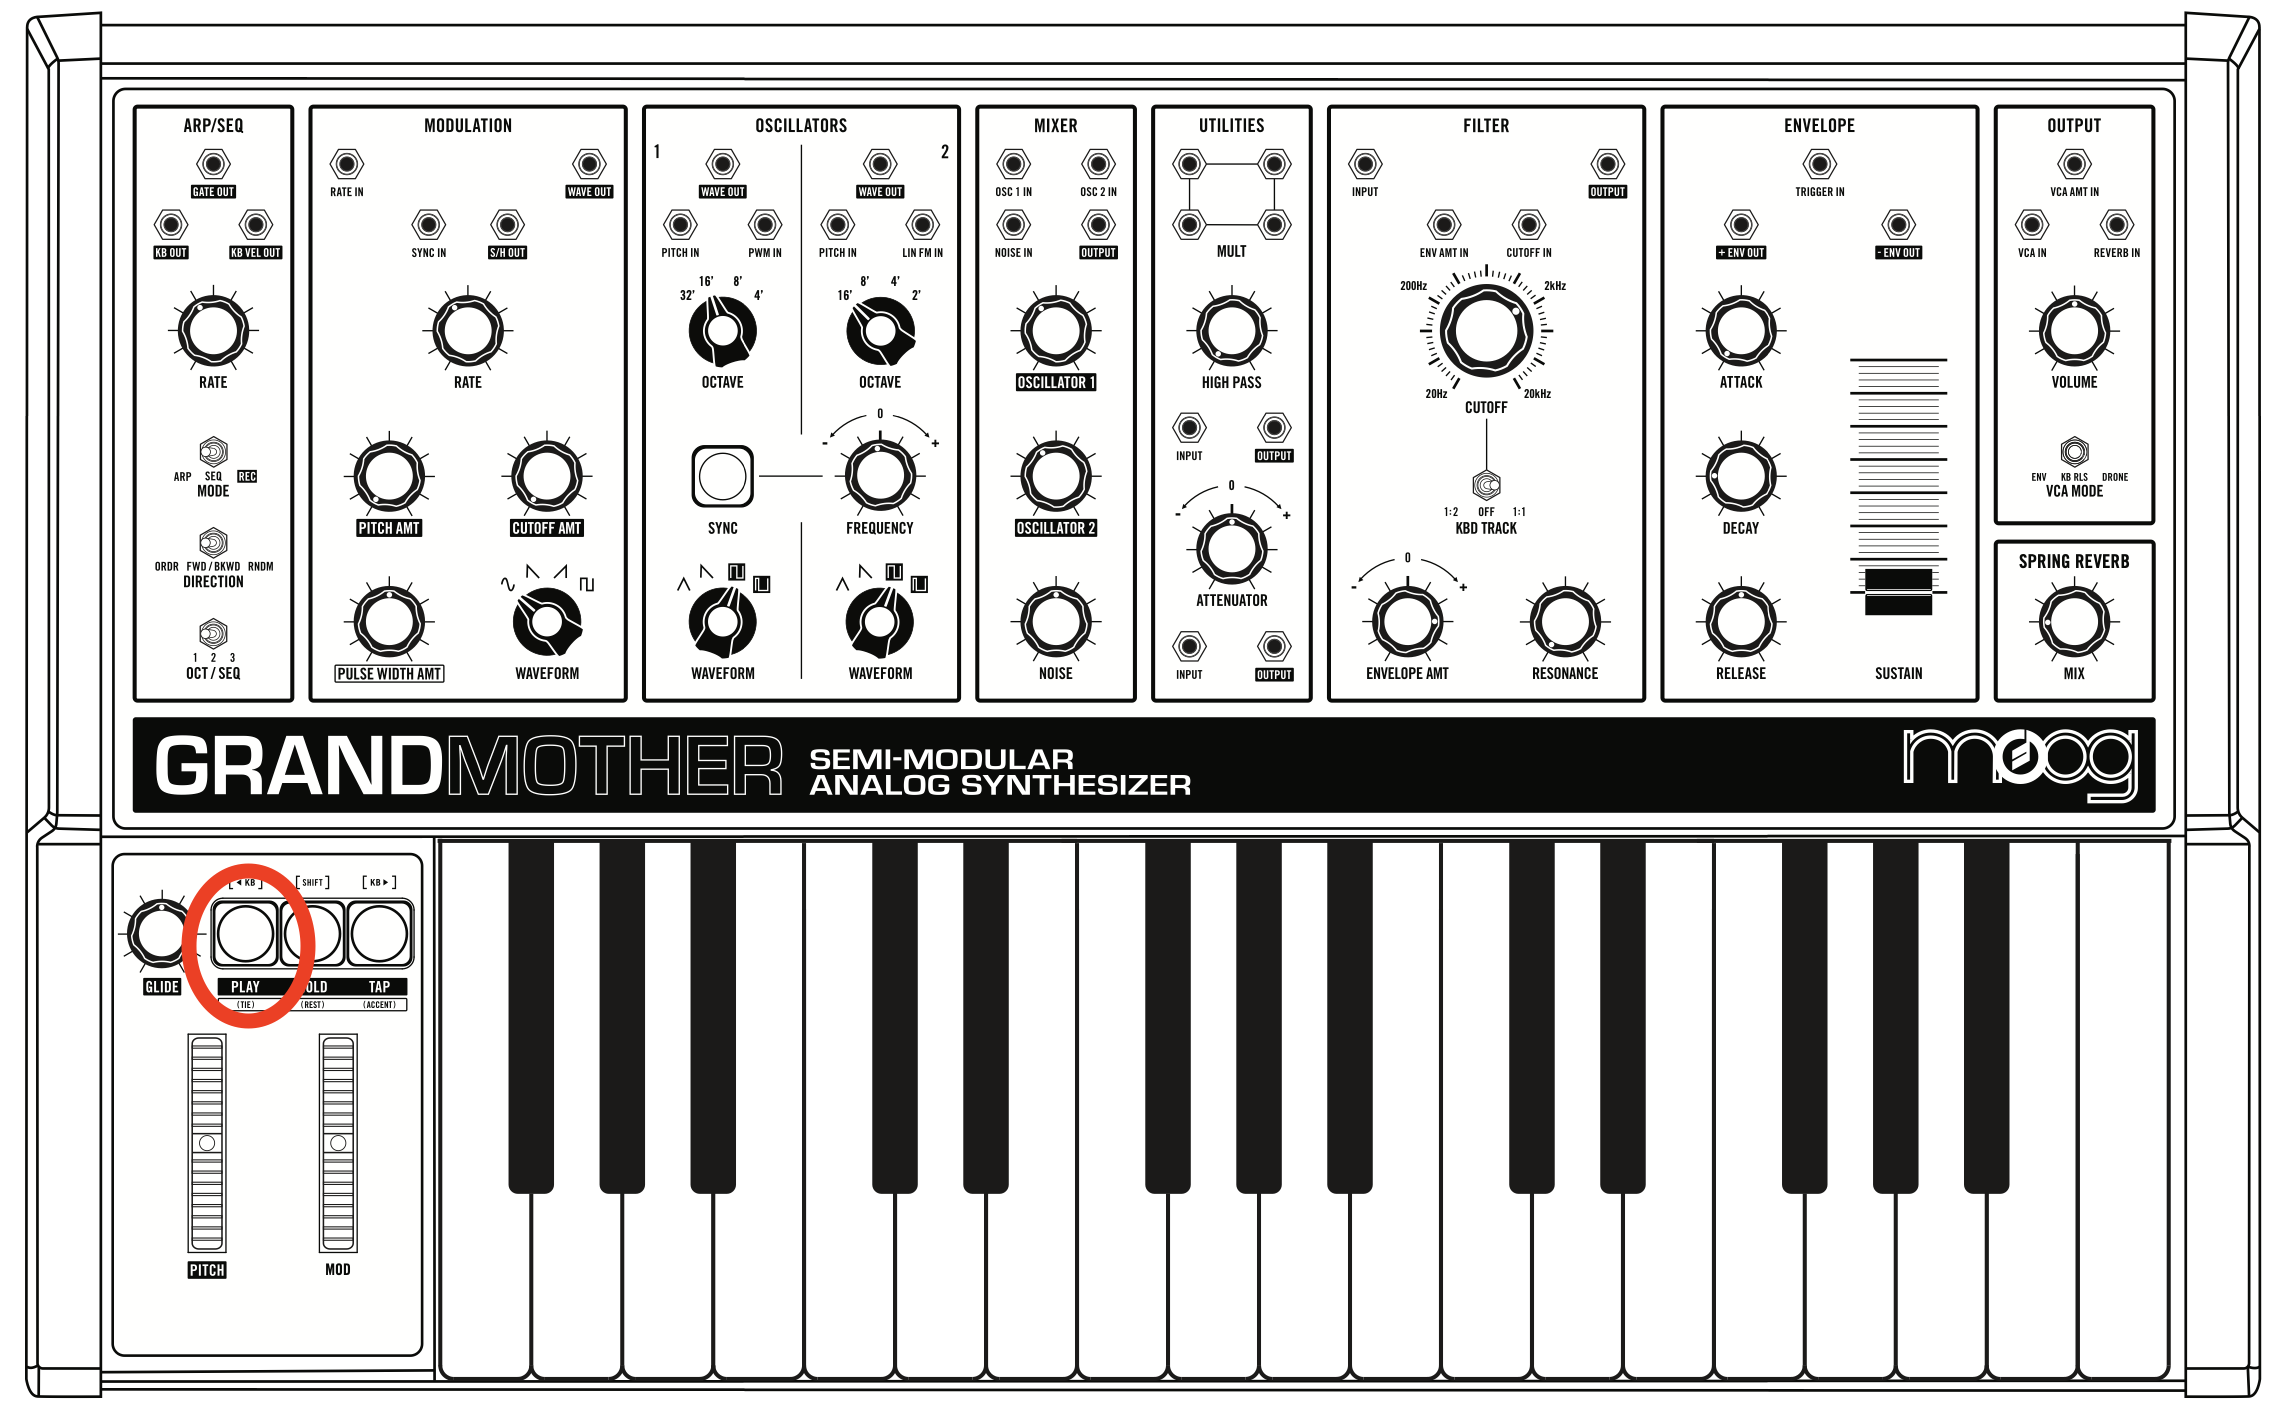
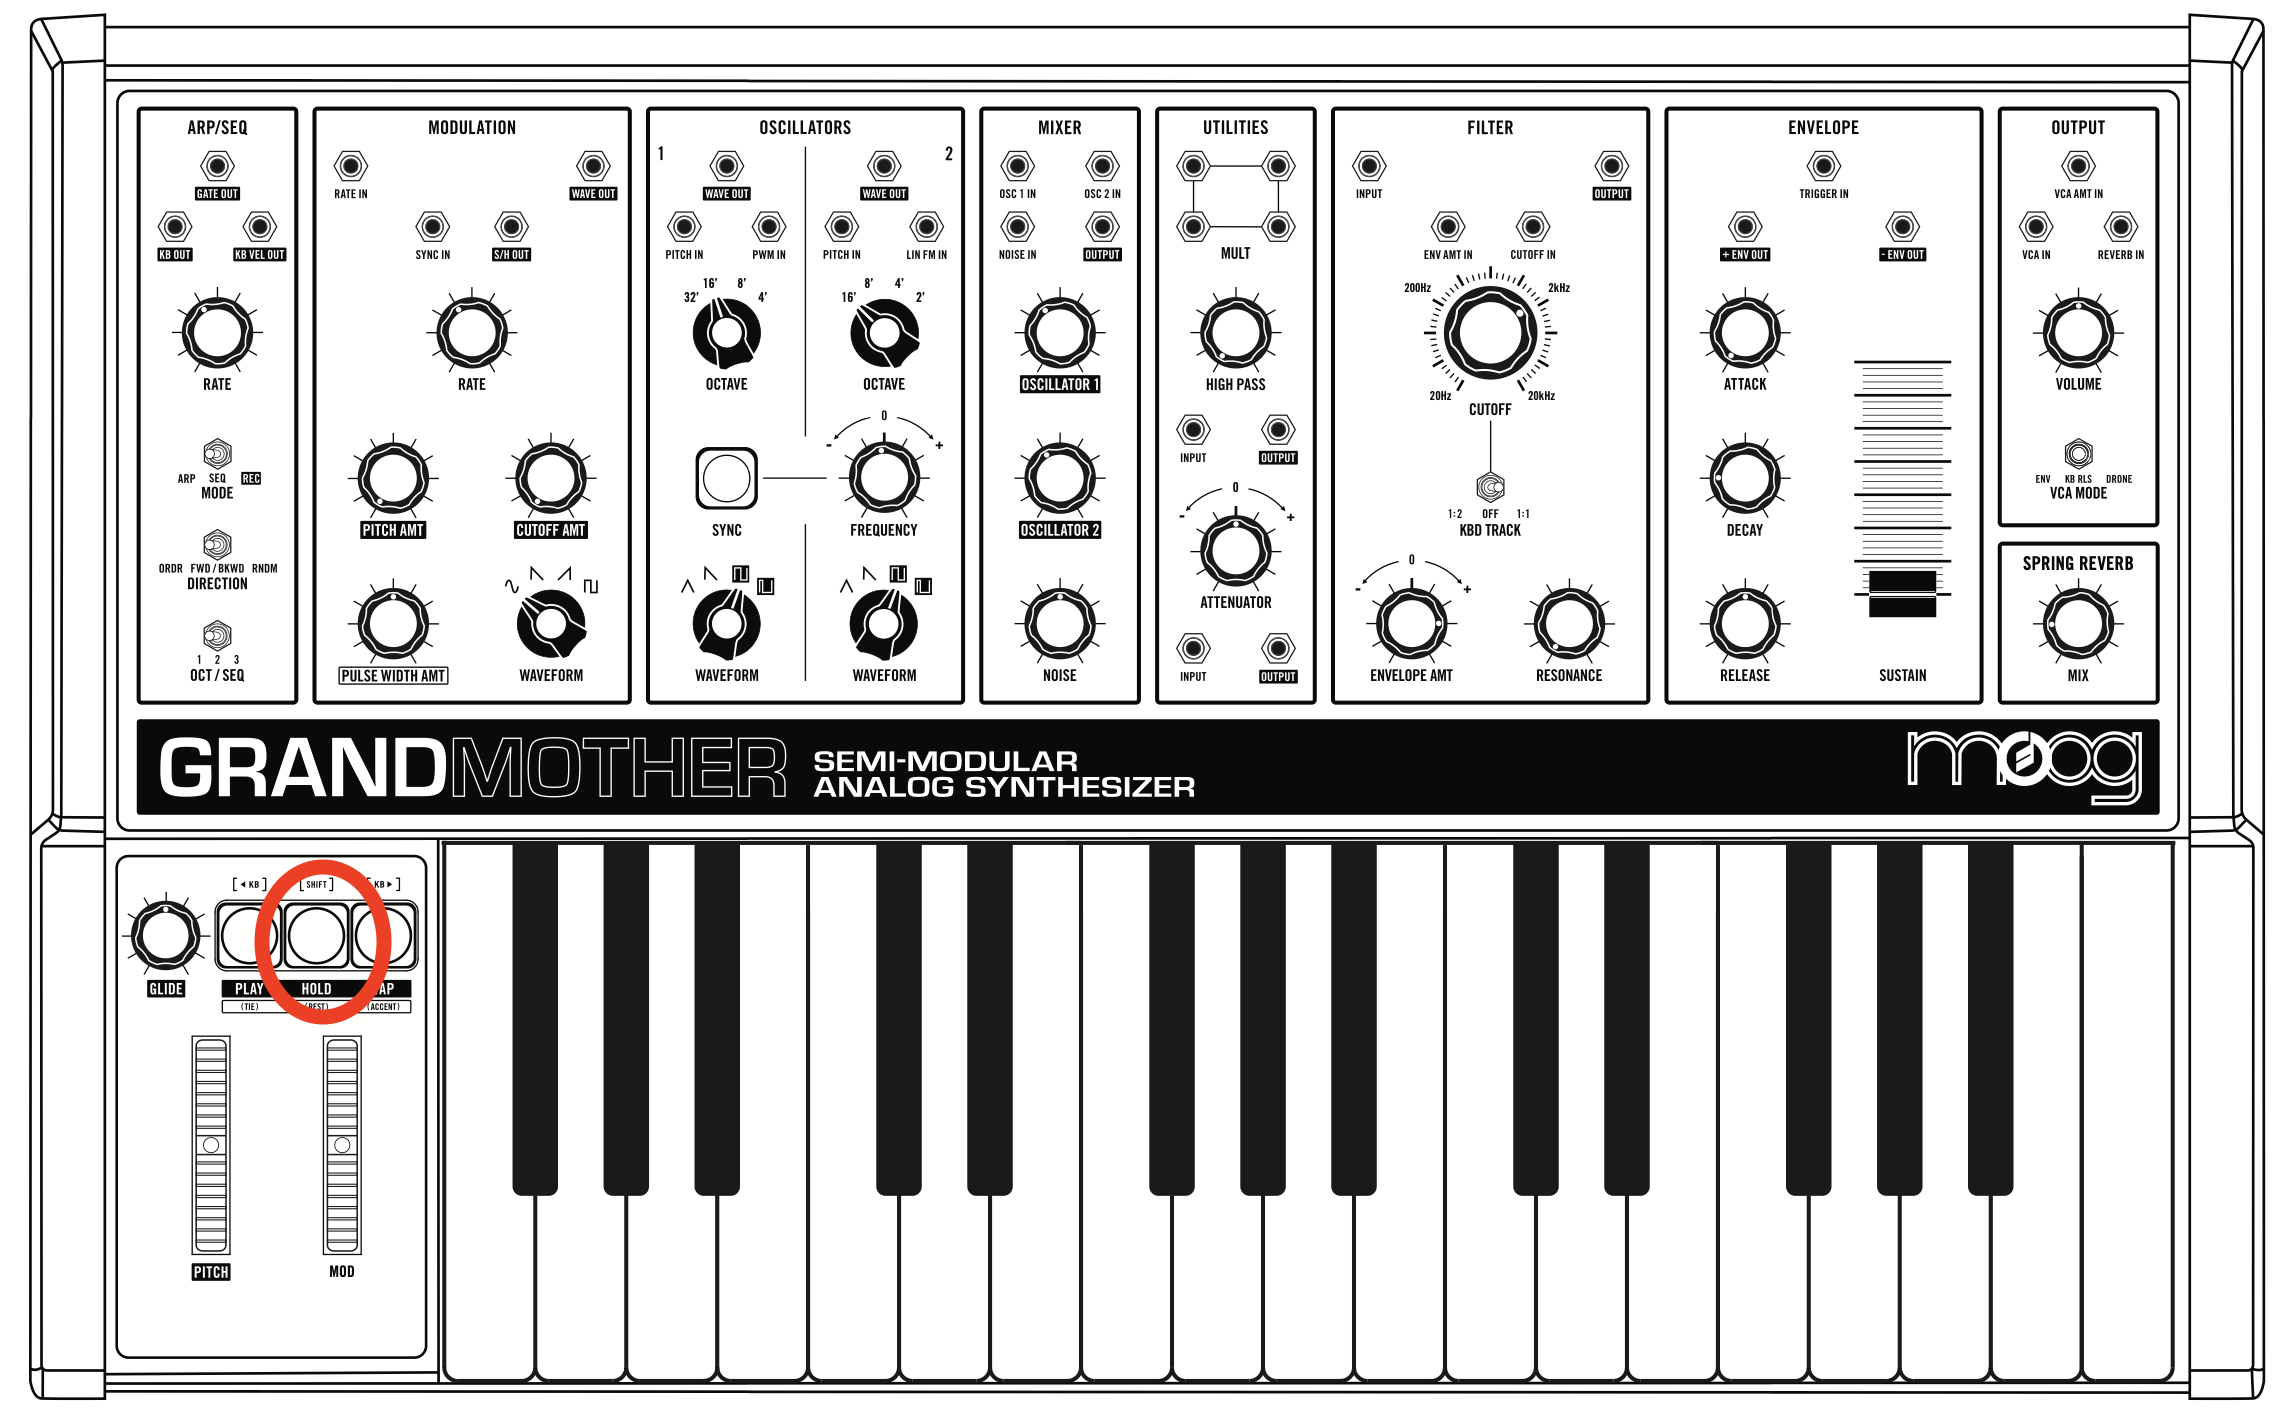
• Try changing the octave of the keyboard by pressing the HOLD then PLAY buttons quickly one after the other. This transposes the keyboard down one octave. Pressing HOLD then TAP transposes up one octave.
• Experiment with the following dials in the OSCILLATOR 1 section: OCTAVE, and WAVEFORM. In the MIXER section, try the OSCILLATOR1 dial.

• Bring up the OSCILLATOR2 dial in the MIXER section to about 3 O'clock, and experiment with following dials in the OSCILLATOR 2 section: OCTAVE, FREQUENCY, and WAVEFORM.
• Select a SAWTOOTH wave for both oscillators, make sure both oscillators have a different frequency by adjusting the FREQUENCY dial of OSCILLATOR 2, and then press the SYNC button. What does it do?

• In the MIXER section, turn off the OSCILLATOR1 and OSCILLATOR2 dials. Then, turn up the NOISE dial. What does it do?
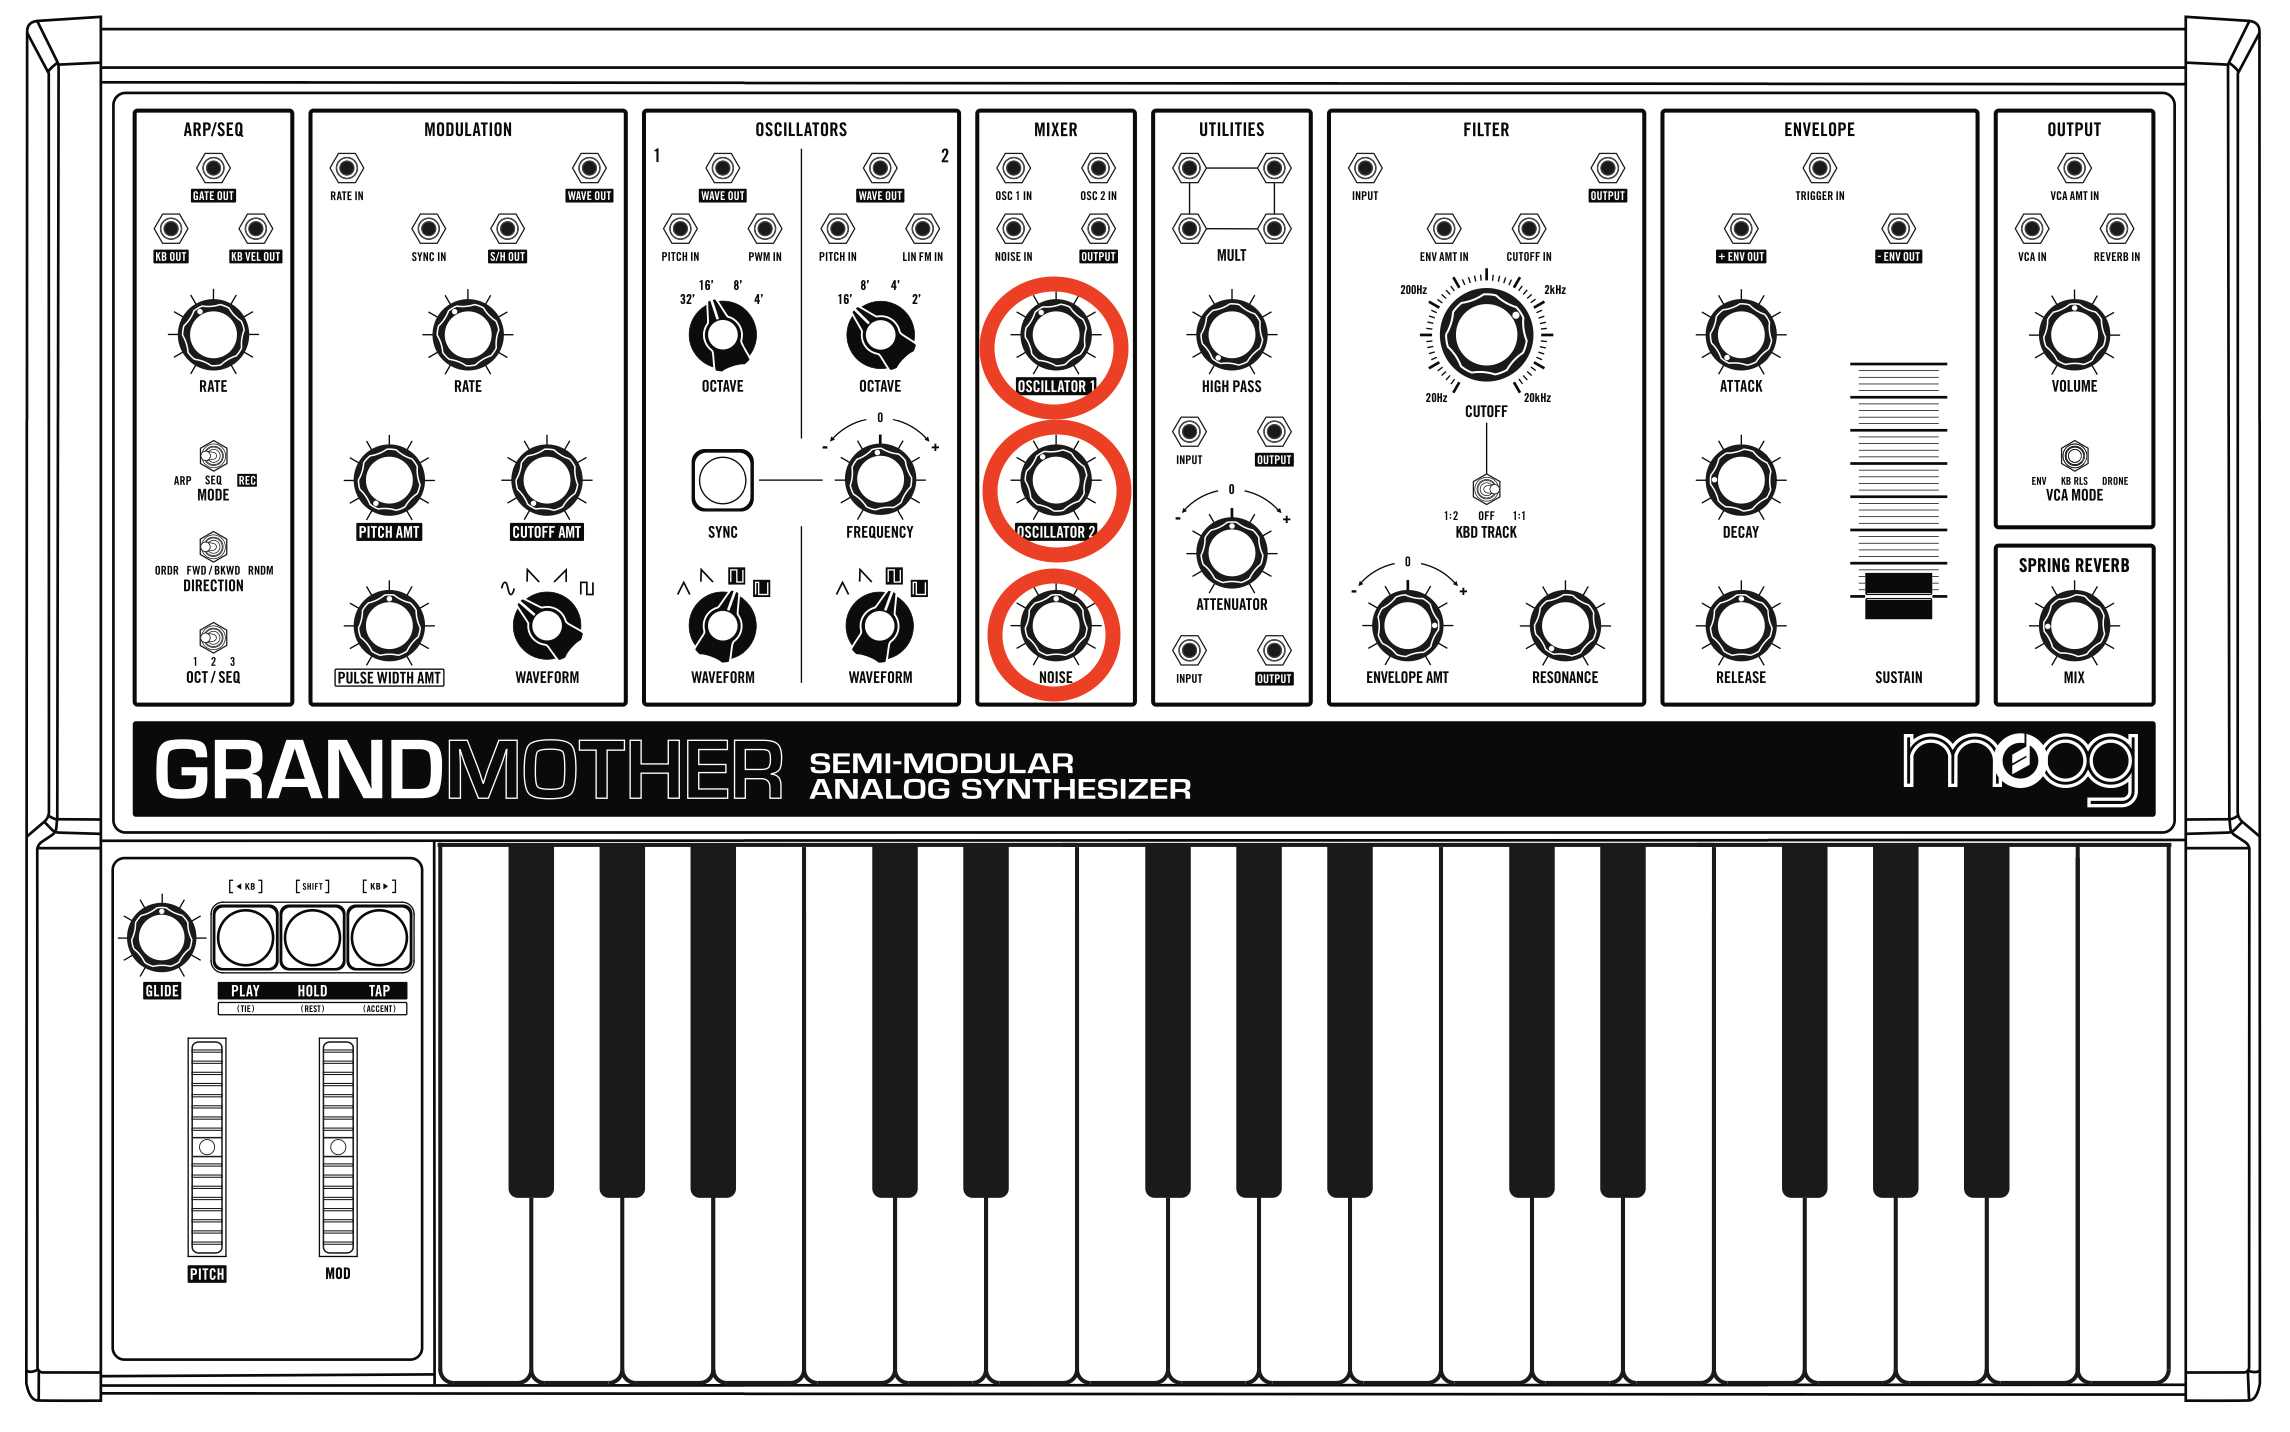
• Turn down the NOISE, and turn back up the OSCILLATOR1 and OSCILLATOR2 dials.
• In the ENVELOPE section, experiment with the following dials: ATTACK, DECAY, RELEASE, and SUSTAIN.
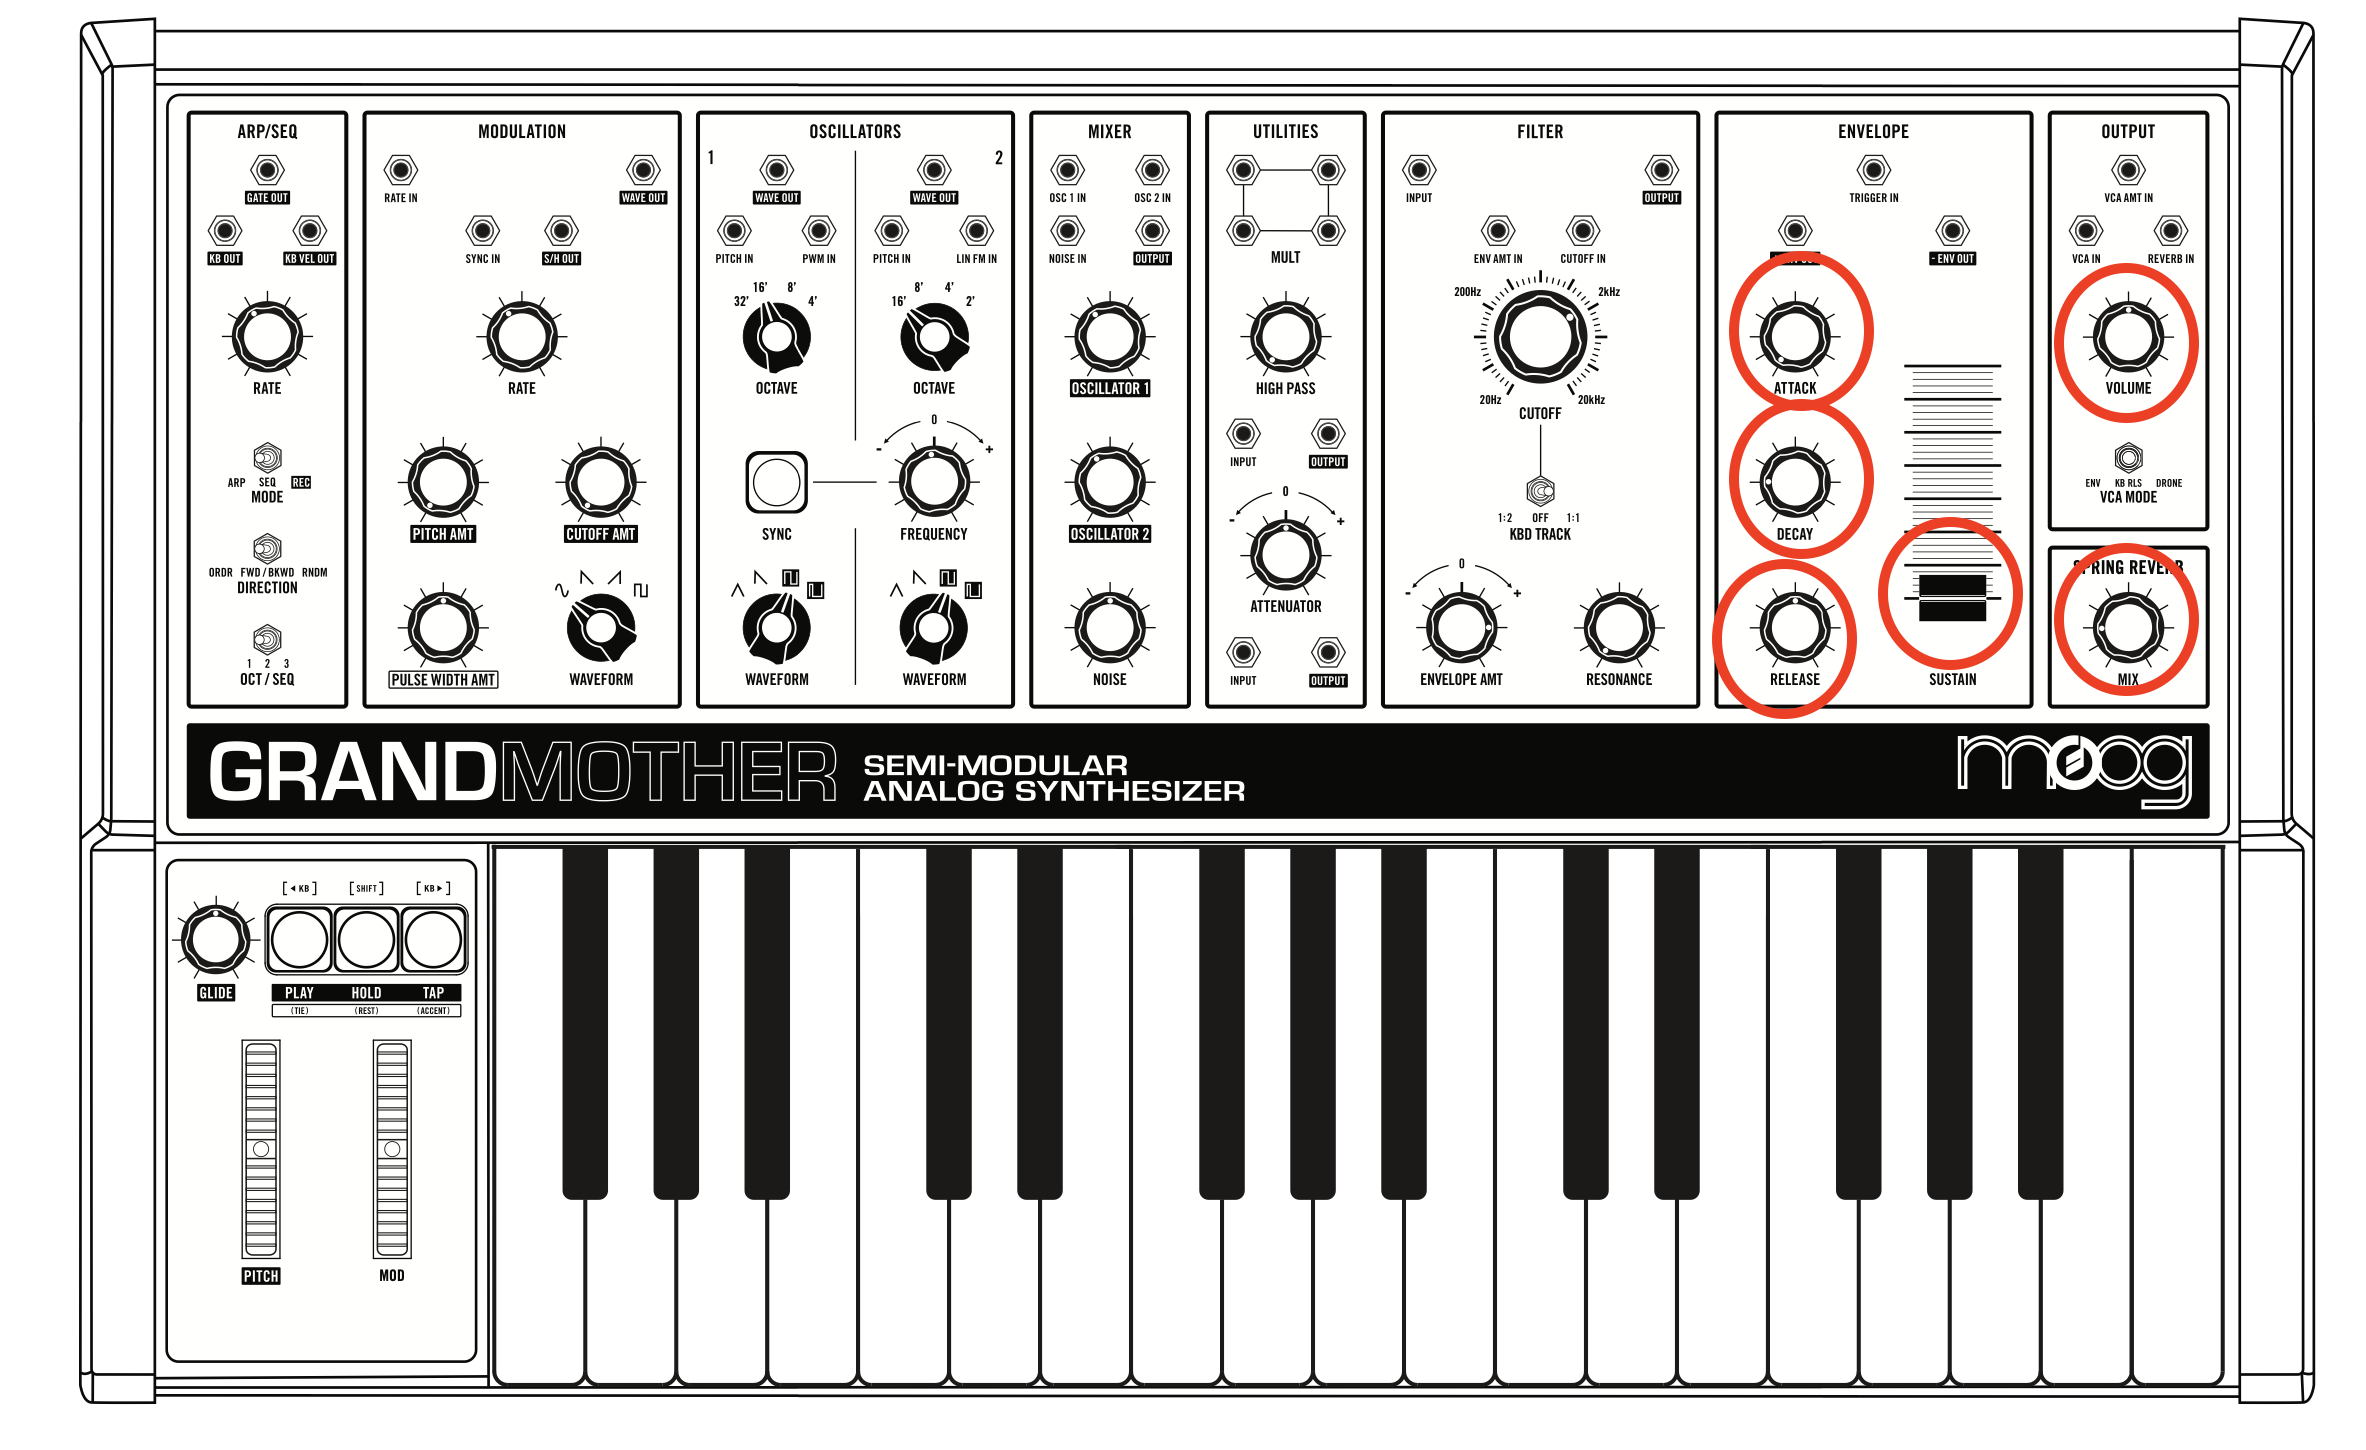
• In the OUTPUT section, try the VOLUME, and REVERB.
• In the Try the VCA switch. How is each mode different?

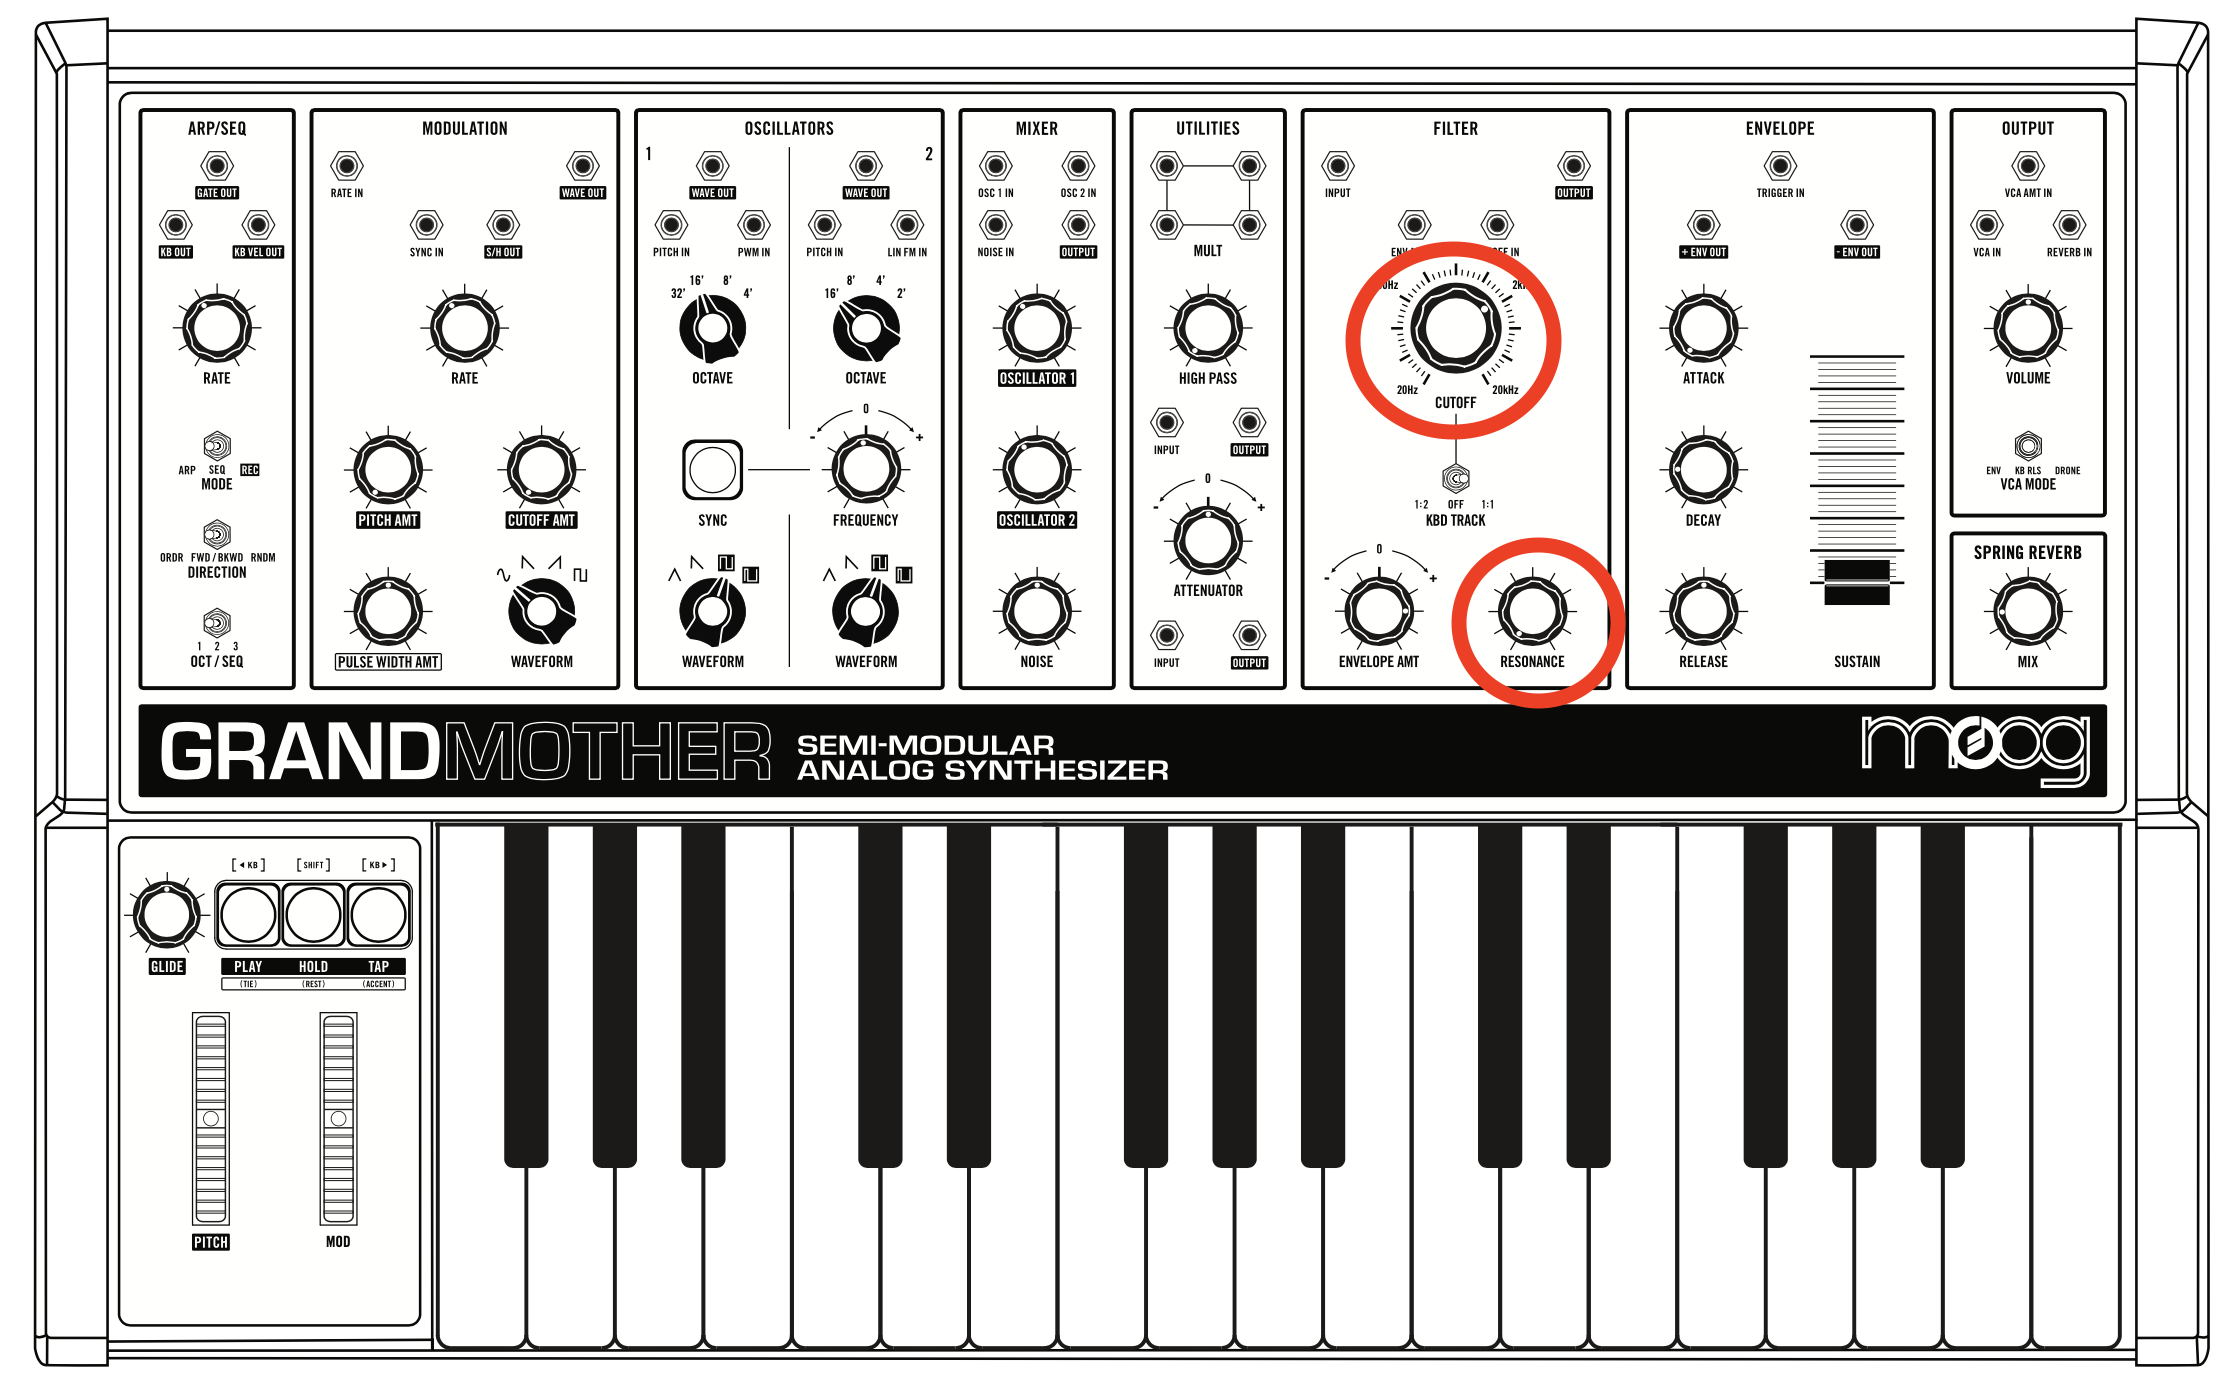
• Experiment with the following dials from the FILTER section: CUTOFF and RESONANCE (this will make most sense if you use a SAWTOOTH or SQUARE waveform for OSCILLATOR 1 and OSCILLATOR 2. Try flipping the VCA switch to DRONE while playing with the filter knobs.
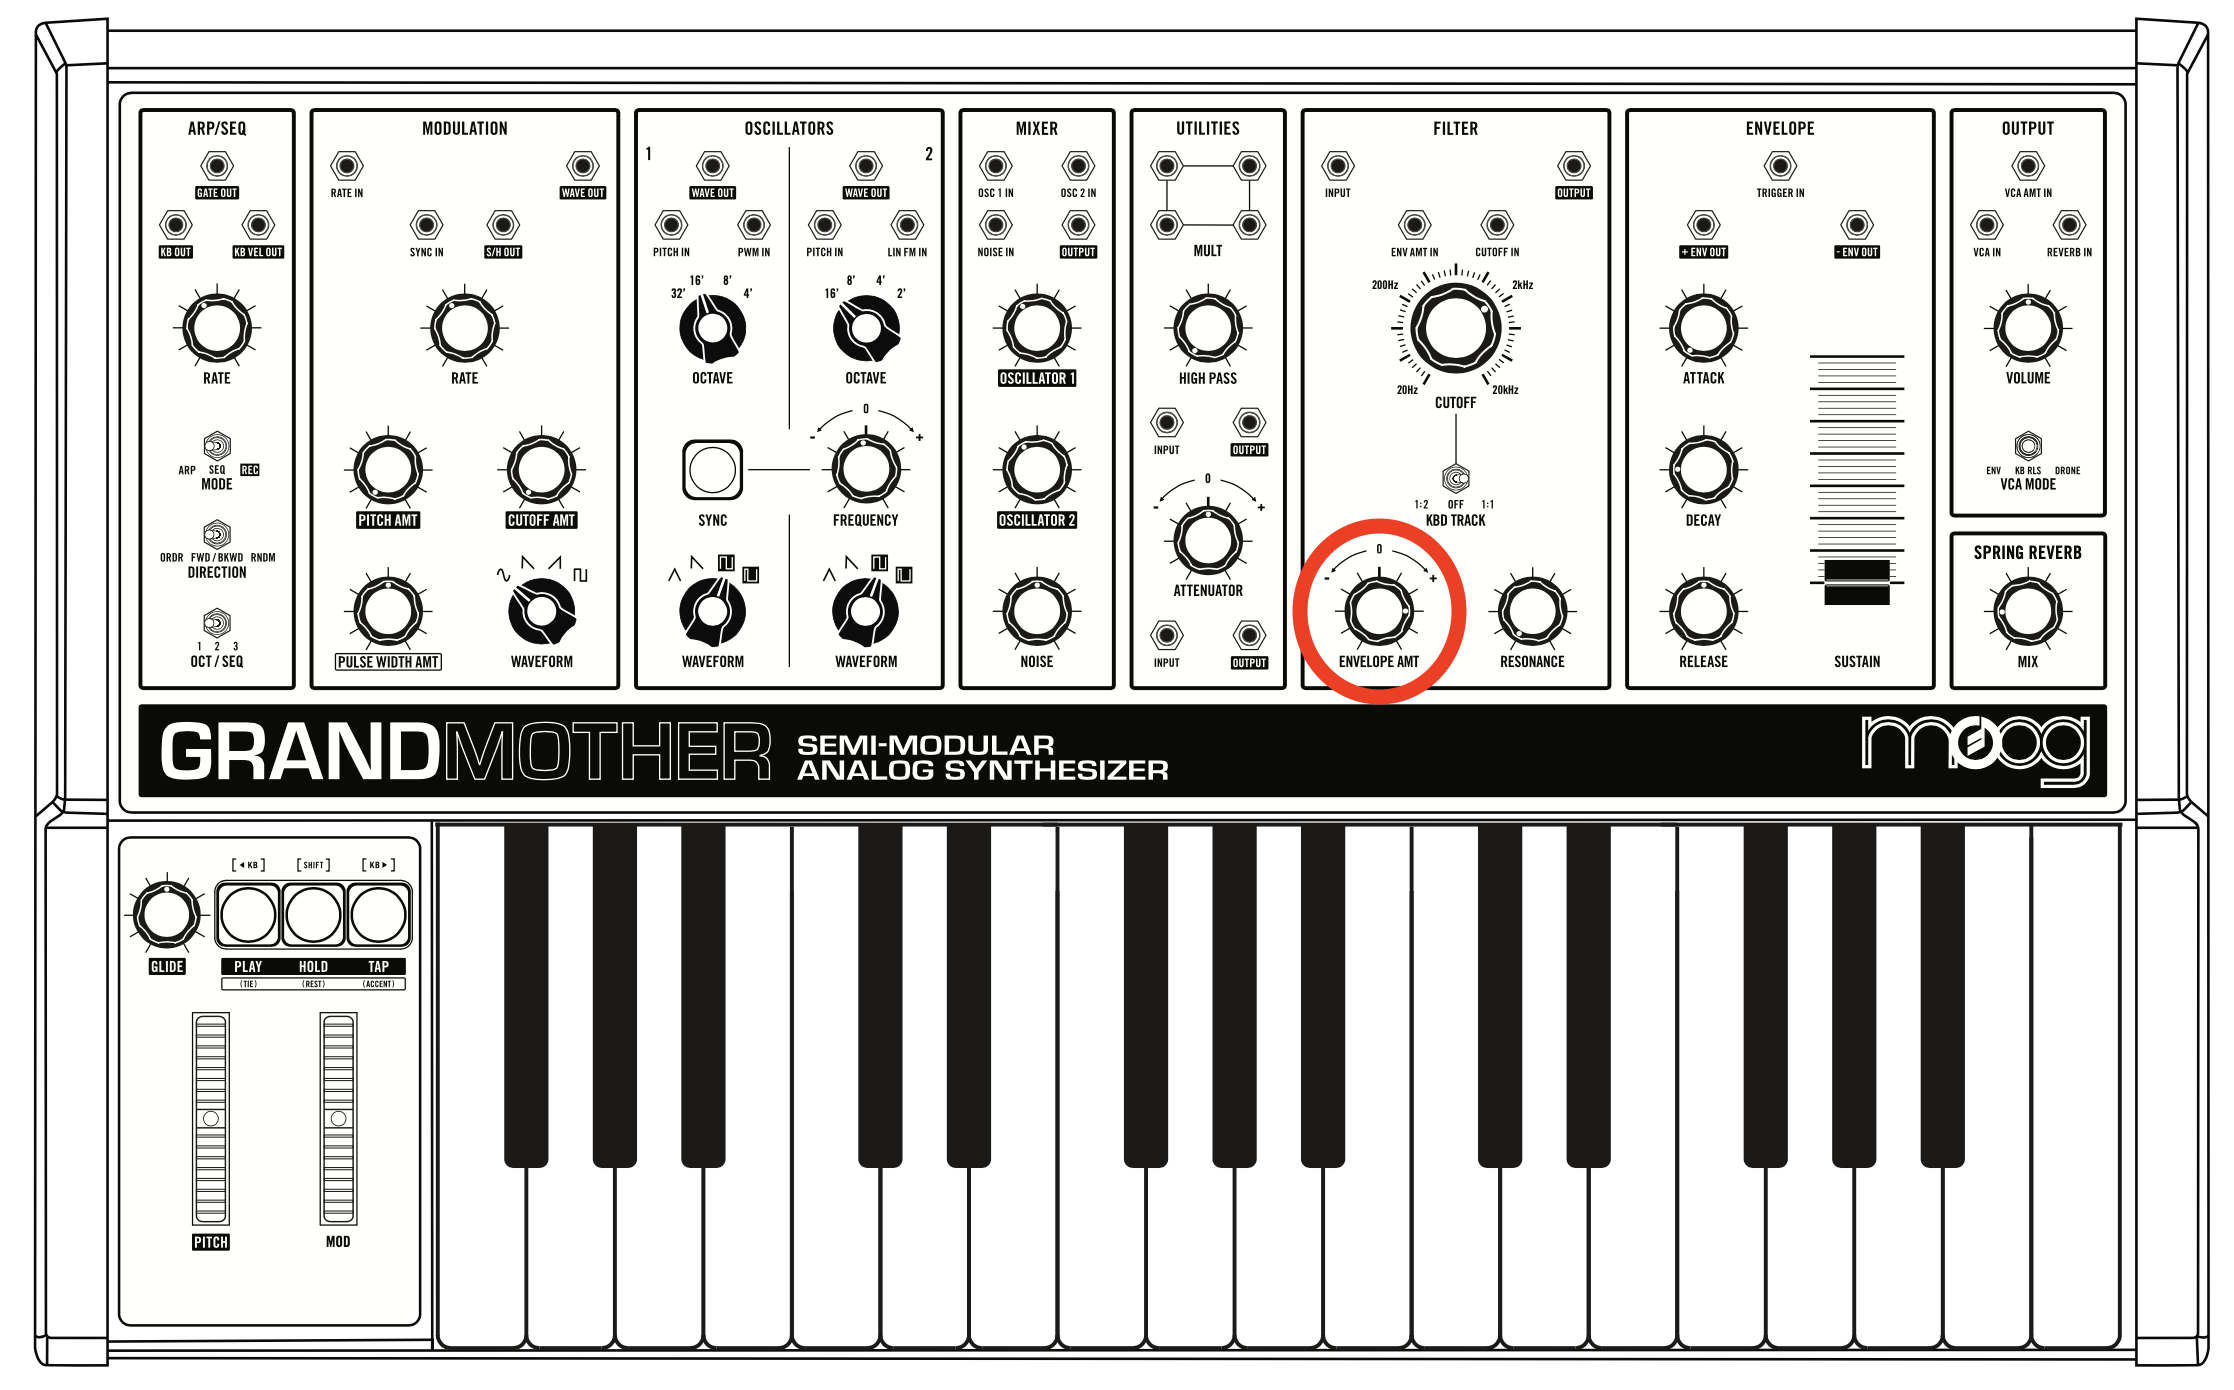
• (NOT SEEN IN CLASS) What does the ENVELOP AMT dial do? (Hint: listen to the ADSR and the CUTOFF)
Modulation
• Bring up the MOD wheel up to max, then, in the MODULATION section, bring up the RATE to about 9 o'clock. Experiment with the PITCH AMT and CUTOFF AMT (AMT is short for "amount"). What does each do?
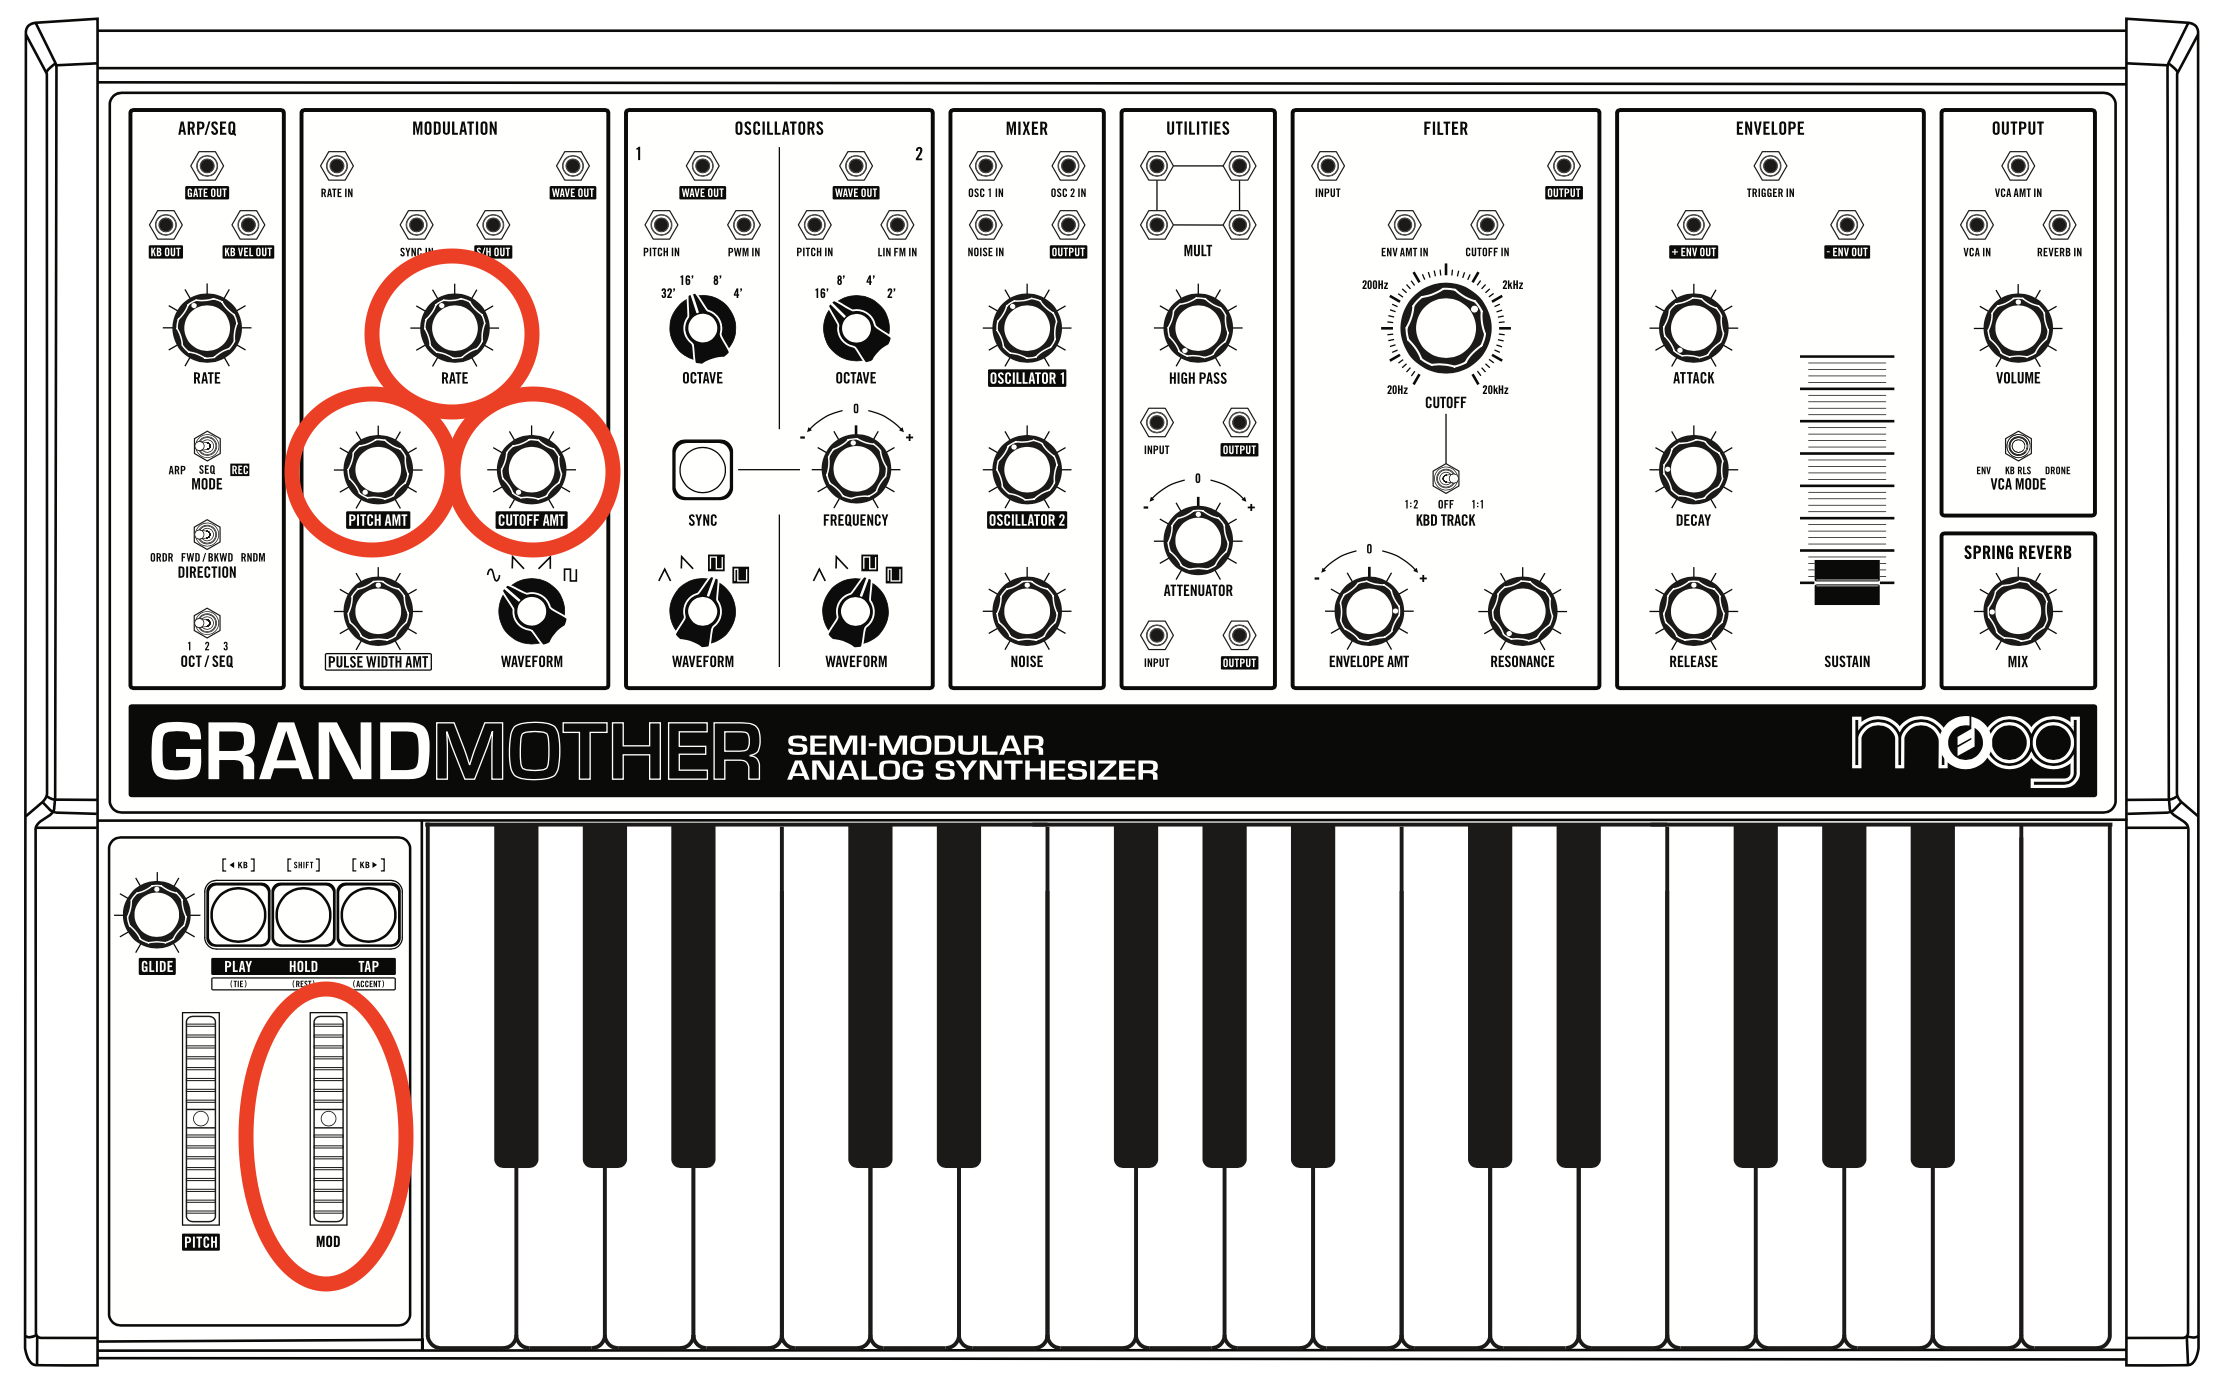
• Try changing the WAVEFORM dial (in the MODULATION section). As you experiment with the CUTOFF AMT, also change the CUTOFF and RESONANCE dials (in the FILTER section).
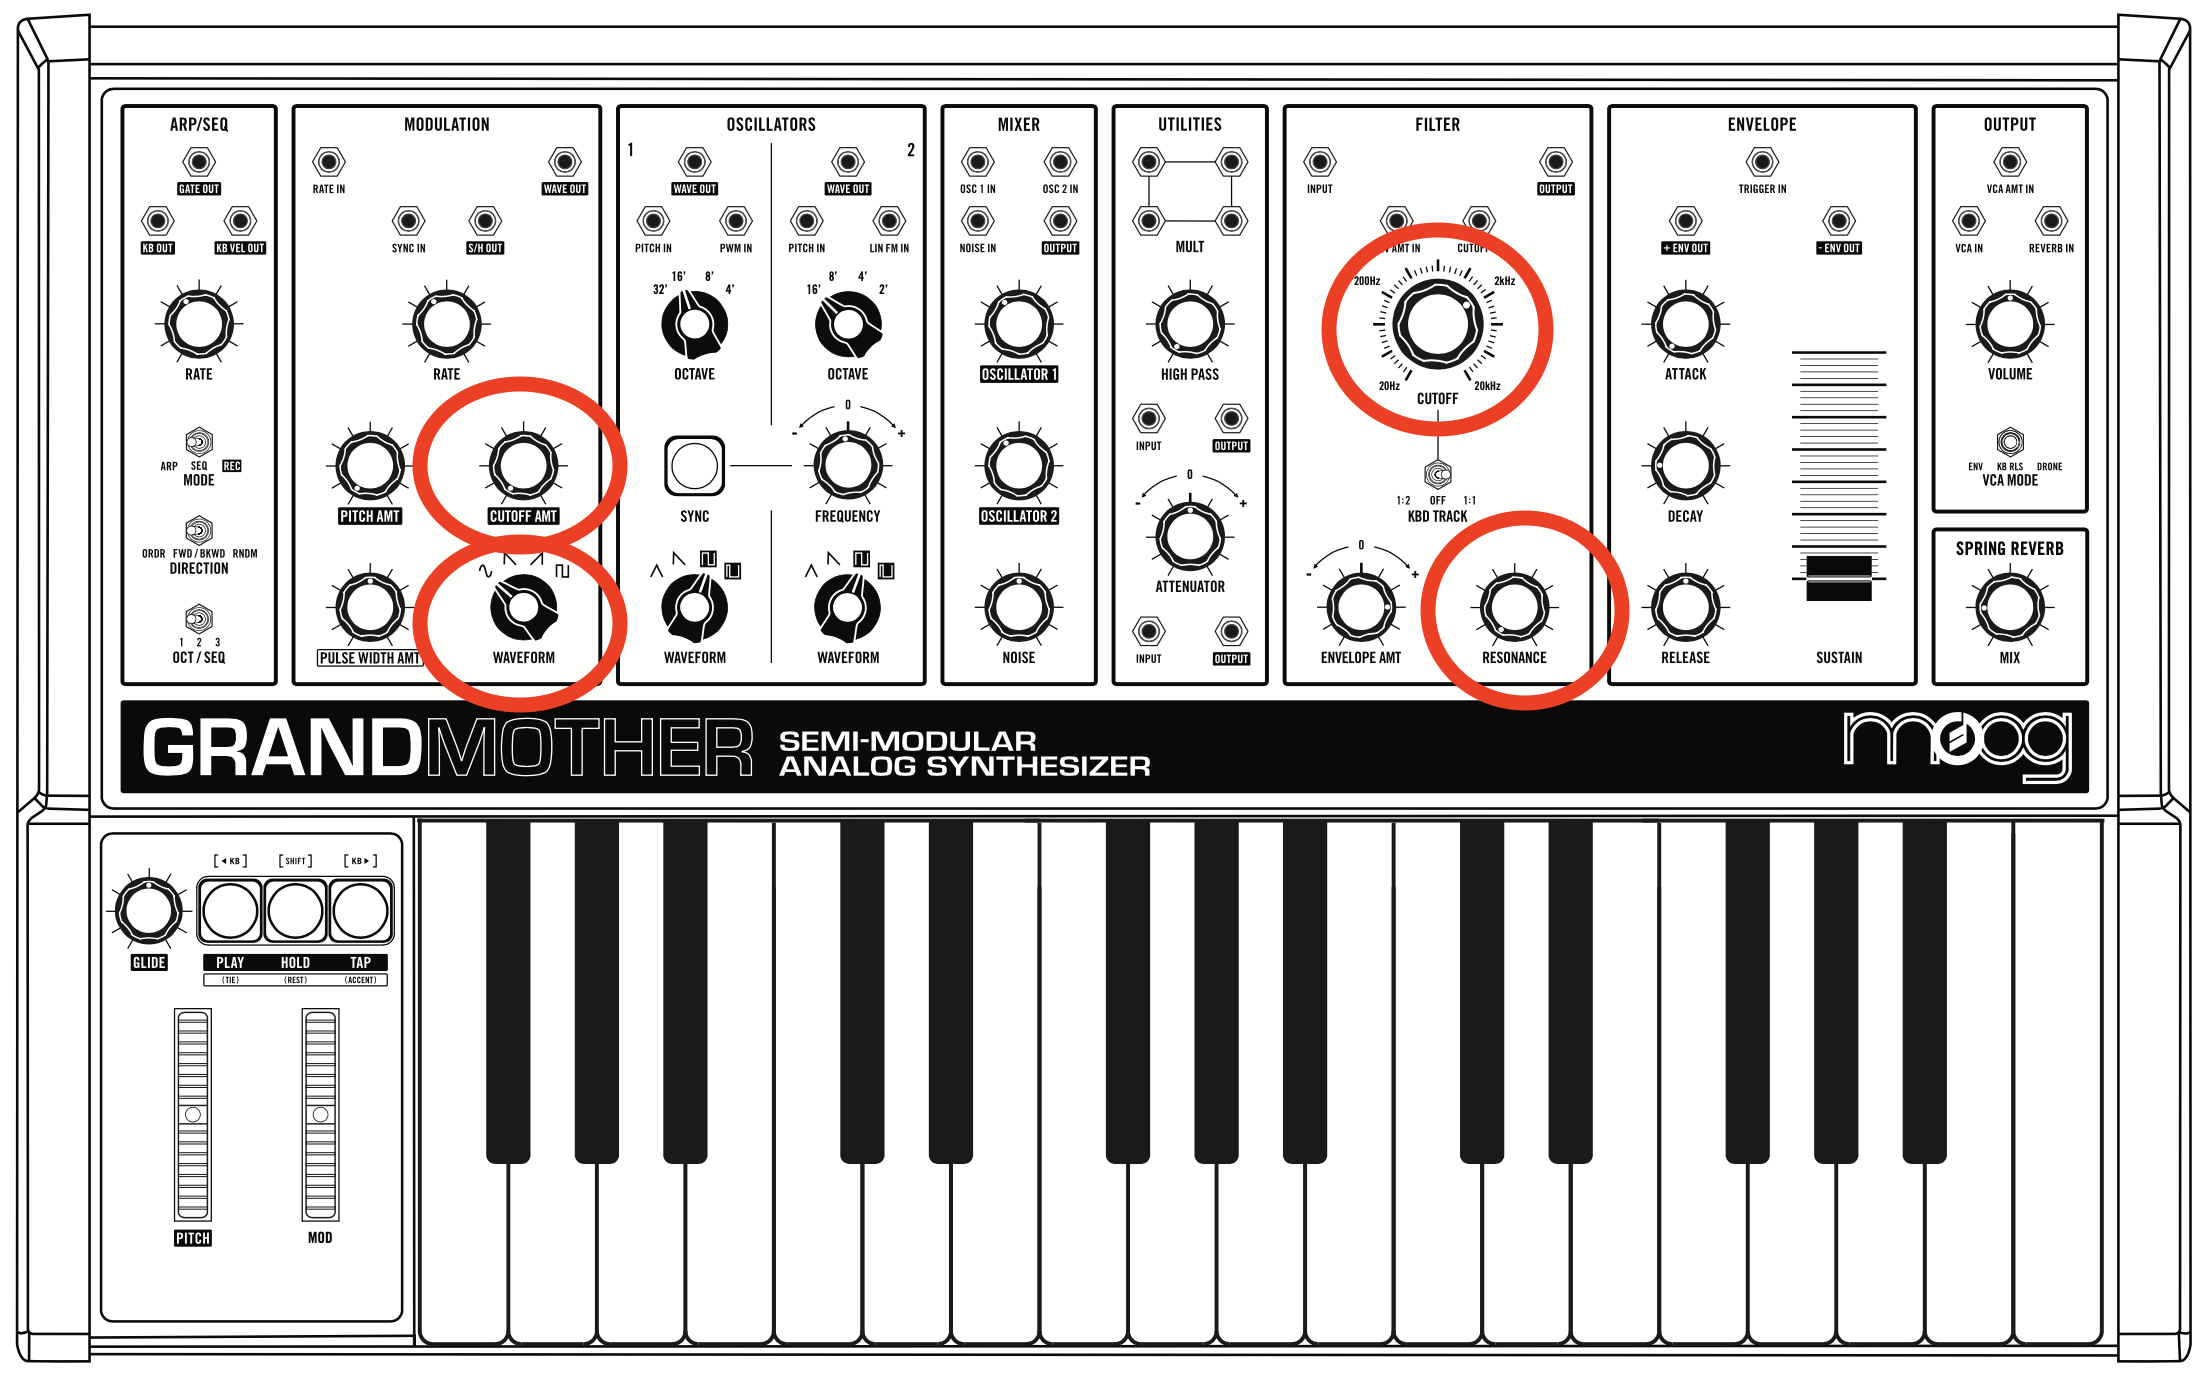
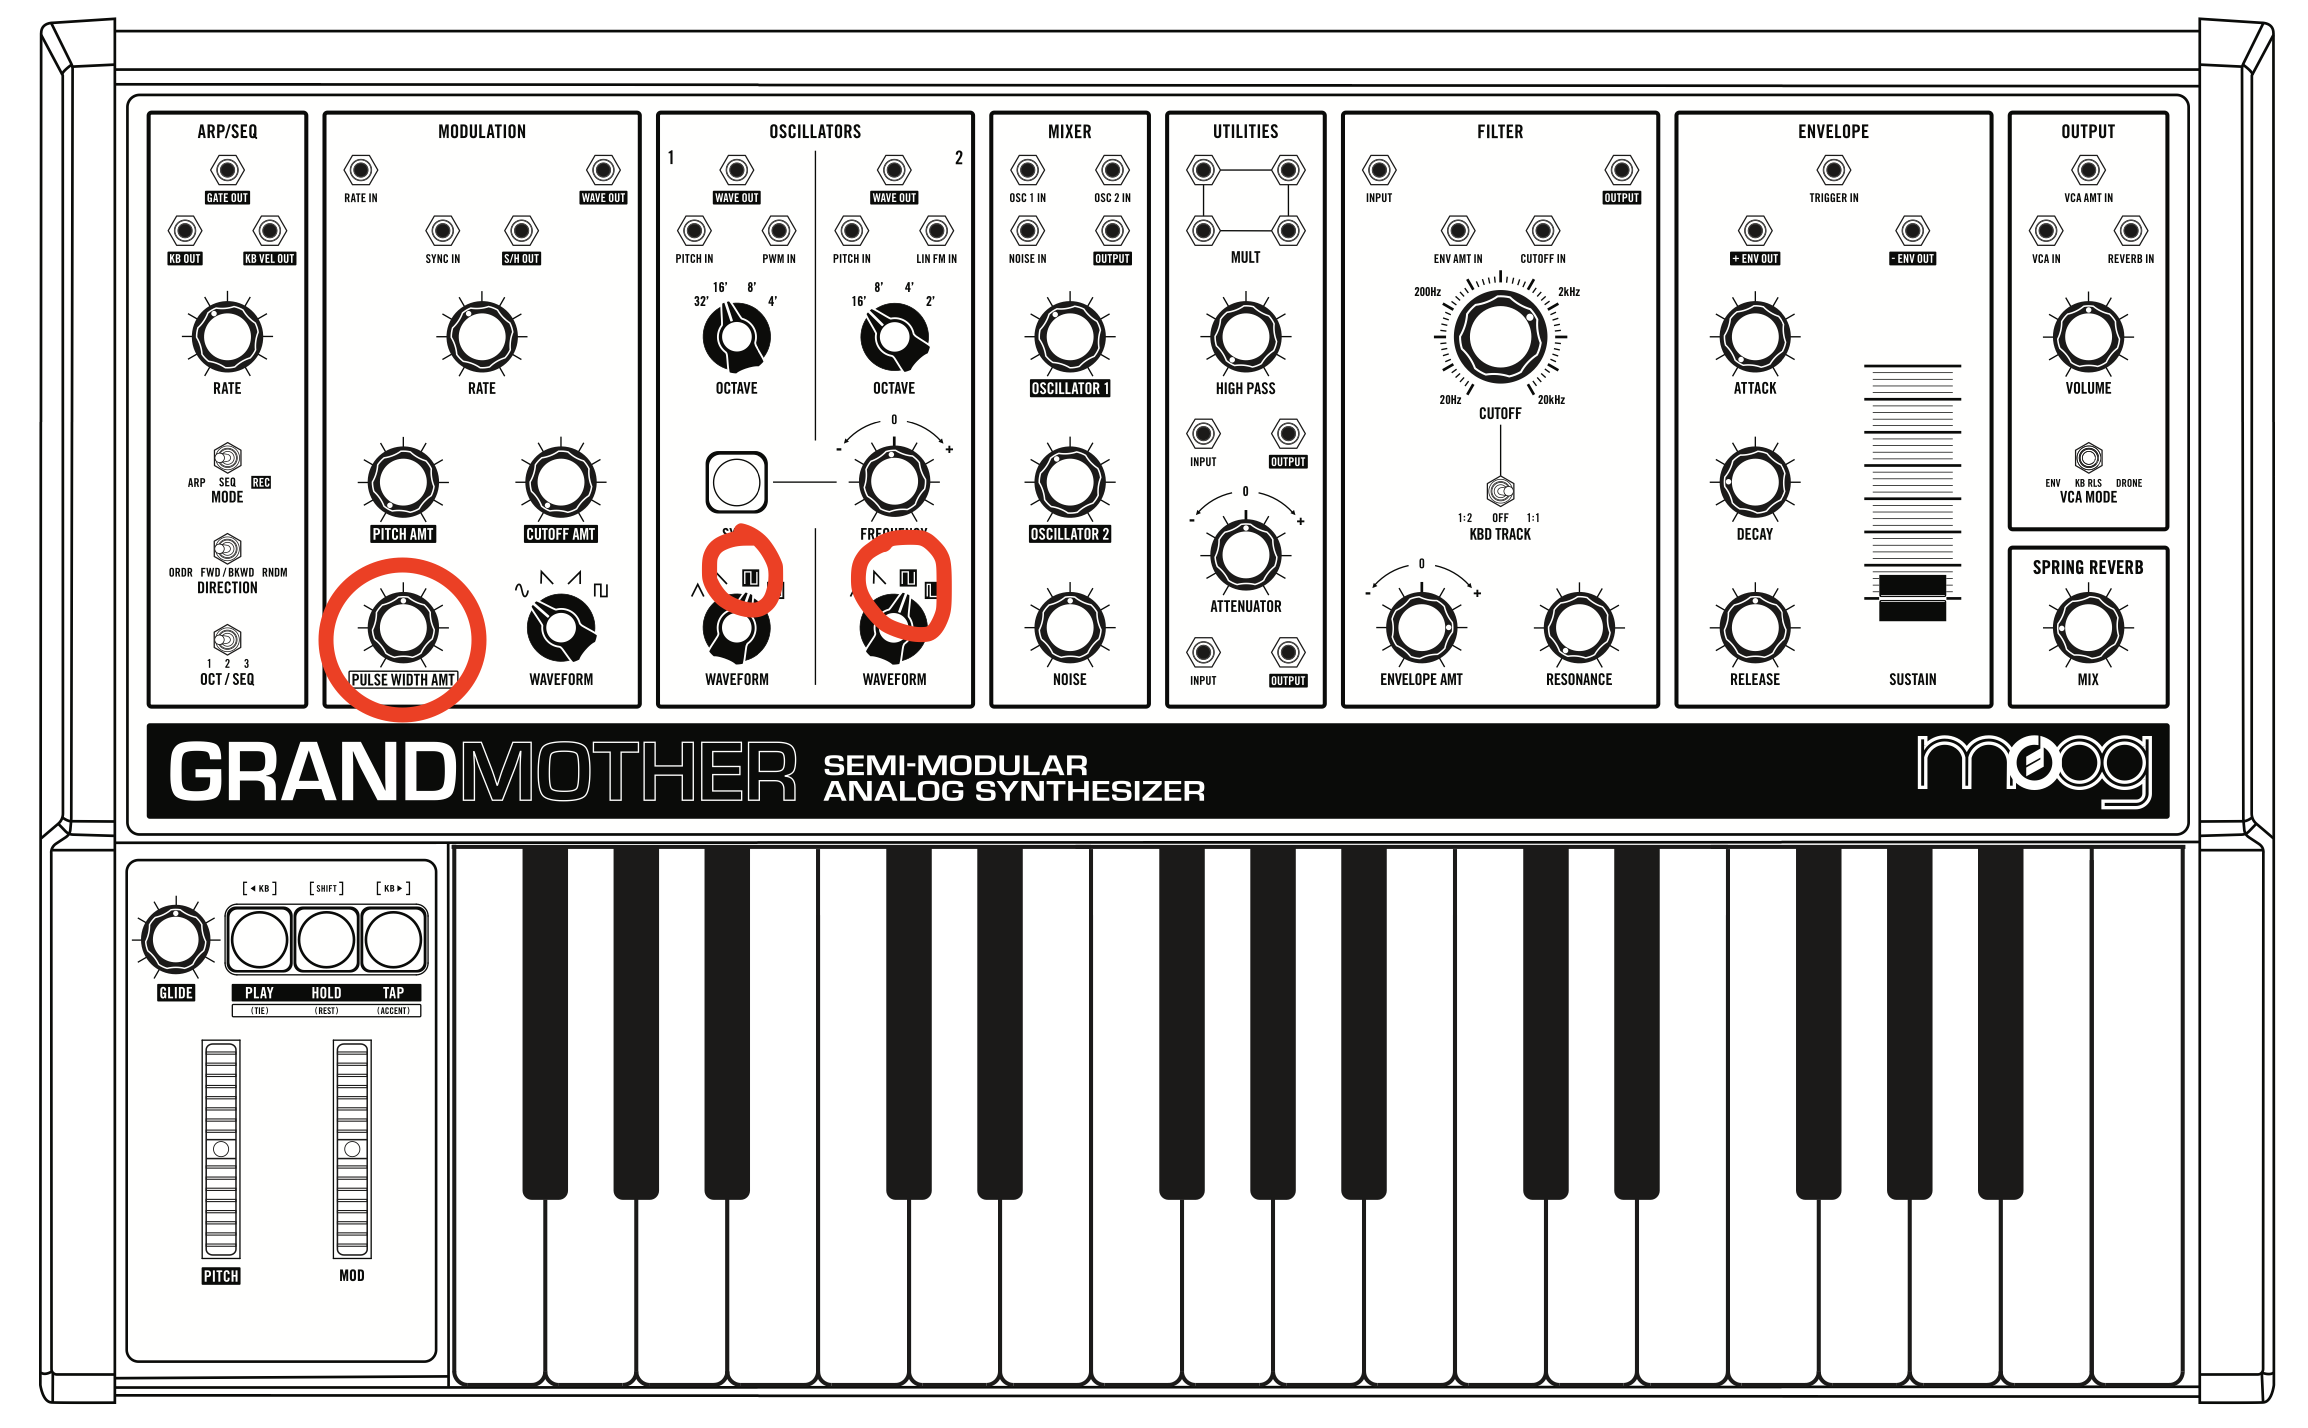
• (NOT SEEN IN CLASS) Change the WAVEFORM of Oscillator 1 to a SQUARE wave (either one), and change the PULSE WIDTH AMT dial. Can you guess what this is doing?
• How does the MOD wheel affect the settings in the MODULATION section?
Arpeggiation
The arpeggiator simply arpeggiates the notes you play at a given rate.
• In the ARP/SEQ section, set the MODE switch to ARP, the DIRECTION switch to ORDER, and the OCT/SEQ to 1. Furthermore, set the RATE dial to about 9 o'clock.
• Press the PLAY button (yellow light turns ON)
• Play and hold one note on the keyboard, and listen to the effect of the arpeggiation. Then change the OCT/SEQ switch to 2, and listen to the difference. Set the OCT/SEQ to 3 and listen. NOTE that for this to work properly, the ATTACK, DECAY, and RELEASE dials should be set to minimum.
• Play and hold a chord. What is happening to the arpeggiation? Try the different OCT/SEQ settings. Also, try the different DIRECTION settings, and changing the RATE.
• Press the HOLD button, then play a chord. What does it do?
• Press the PLAY button to turn off arpeggiation (yellow light turns OFF)
Sequencer
The sequencer allows you to record a sequence of notes and rests and then loop that sequence back. You can think of a sequence as a series of 16th notes (or 16th rests), where each 16th is called a "step". This Moog synth allows you to record up to 256 steps.
• In the ARP/SEQ section, set the MODE switch to REC, the DIRECTION switch to ORDER, and the OCT/SEQ to 1. Furthermore, set the RATE dial to about 9 o'clock.
• To keep things simple and clear, let's create 4 step sequence: play a C note, then hit the HOLD button, then play a D note, and finally hit the HOLD button again. You just created this sequence:
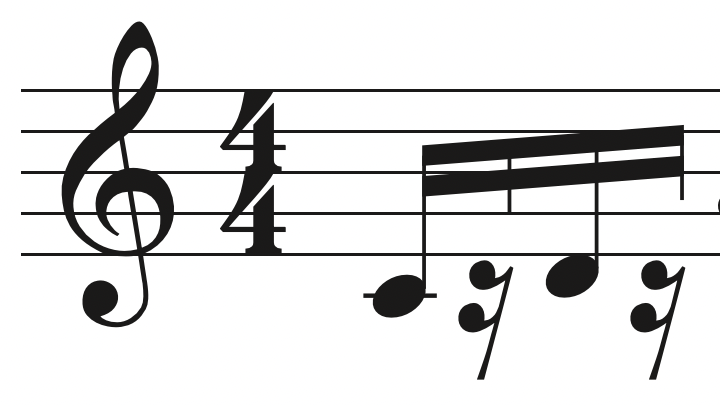
Note that pressing the HOLD button while making sequence creates a REST.
• Set the MODE switch to SEQ.
• Press the PLAY button (yellow light turns ON).
• Play and hold a C note on the keyboard: this will loop your 4 note sequence over and over. Play and hold another note; the sequence will transpose to that note. NOTE: for this to work properly, the ATTACK, and DECAY dials should be set to minimum.
• Try the HOLD button (only after creating the sequence).
• Try the different DIRECTION settings, and also change the RATE.
• You can create another sequence by moving the OCT/SEQ to 2 (and then later 3) and repeating the steps above. Once you have two or three sequences, you can flip from one to the other with the OCT/SEQ switch.
• See the manual for how to edit the sequence, and how to make tied notes.
• Press the PLAY button again (yellow light turns OFF) to stop the sequencer.
Moog Patching
• If at any point you're having issues getting sound, reset the synth as shown at the top of this assignment.
A) Amplitude Modulation: here we will use the LFO to control the main output volume to create a beating sound.
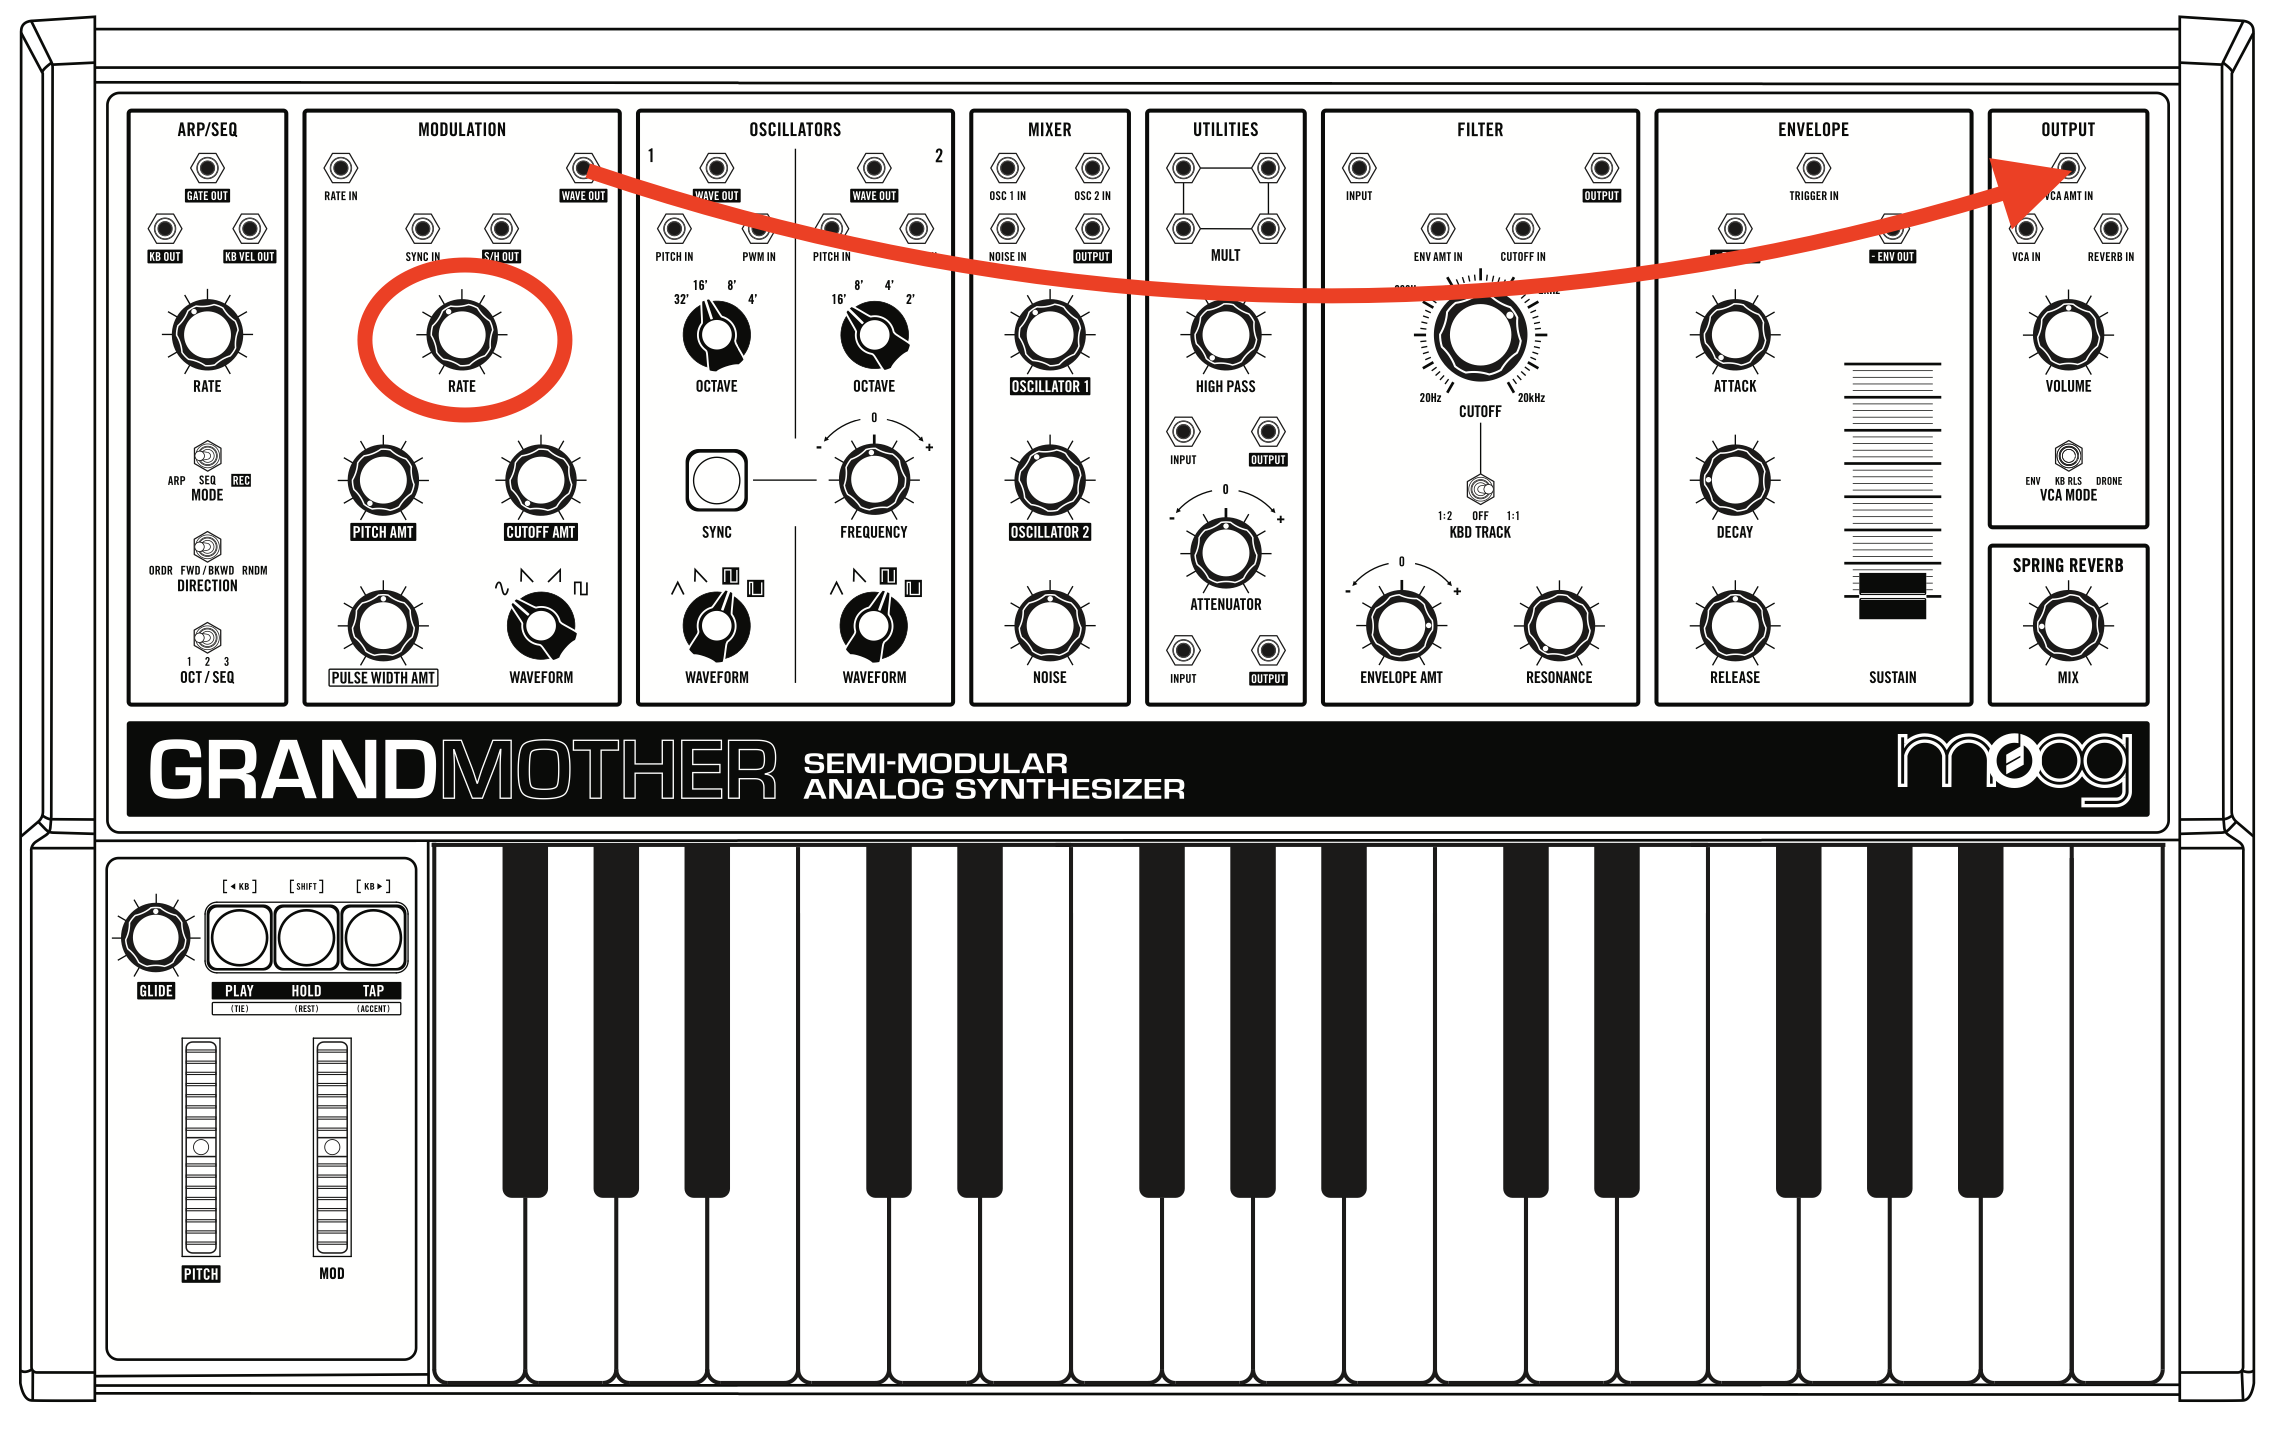
• Take a long patching cable (from the black bag on the desk), and connect it from WAVE OUT in the MODULATION section, to VCA AMT in the OUPUT section. Turn the RATE dial in the MODULATION section to 10 o'clock. Play some notes; you should hear a pulse in the sound. Try increasing the RATE to increase the speed of the pulse (try to turn the RATE way up to create an entirely new sound).
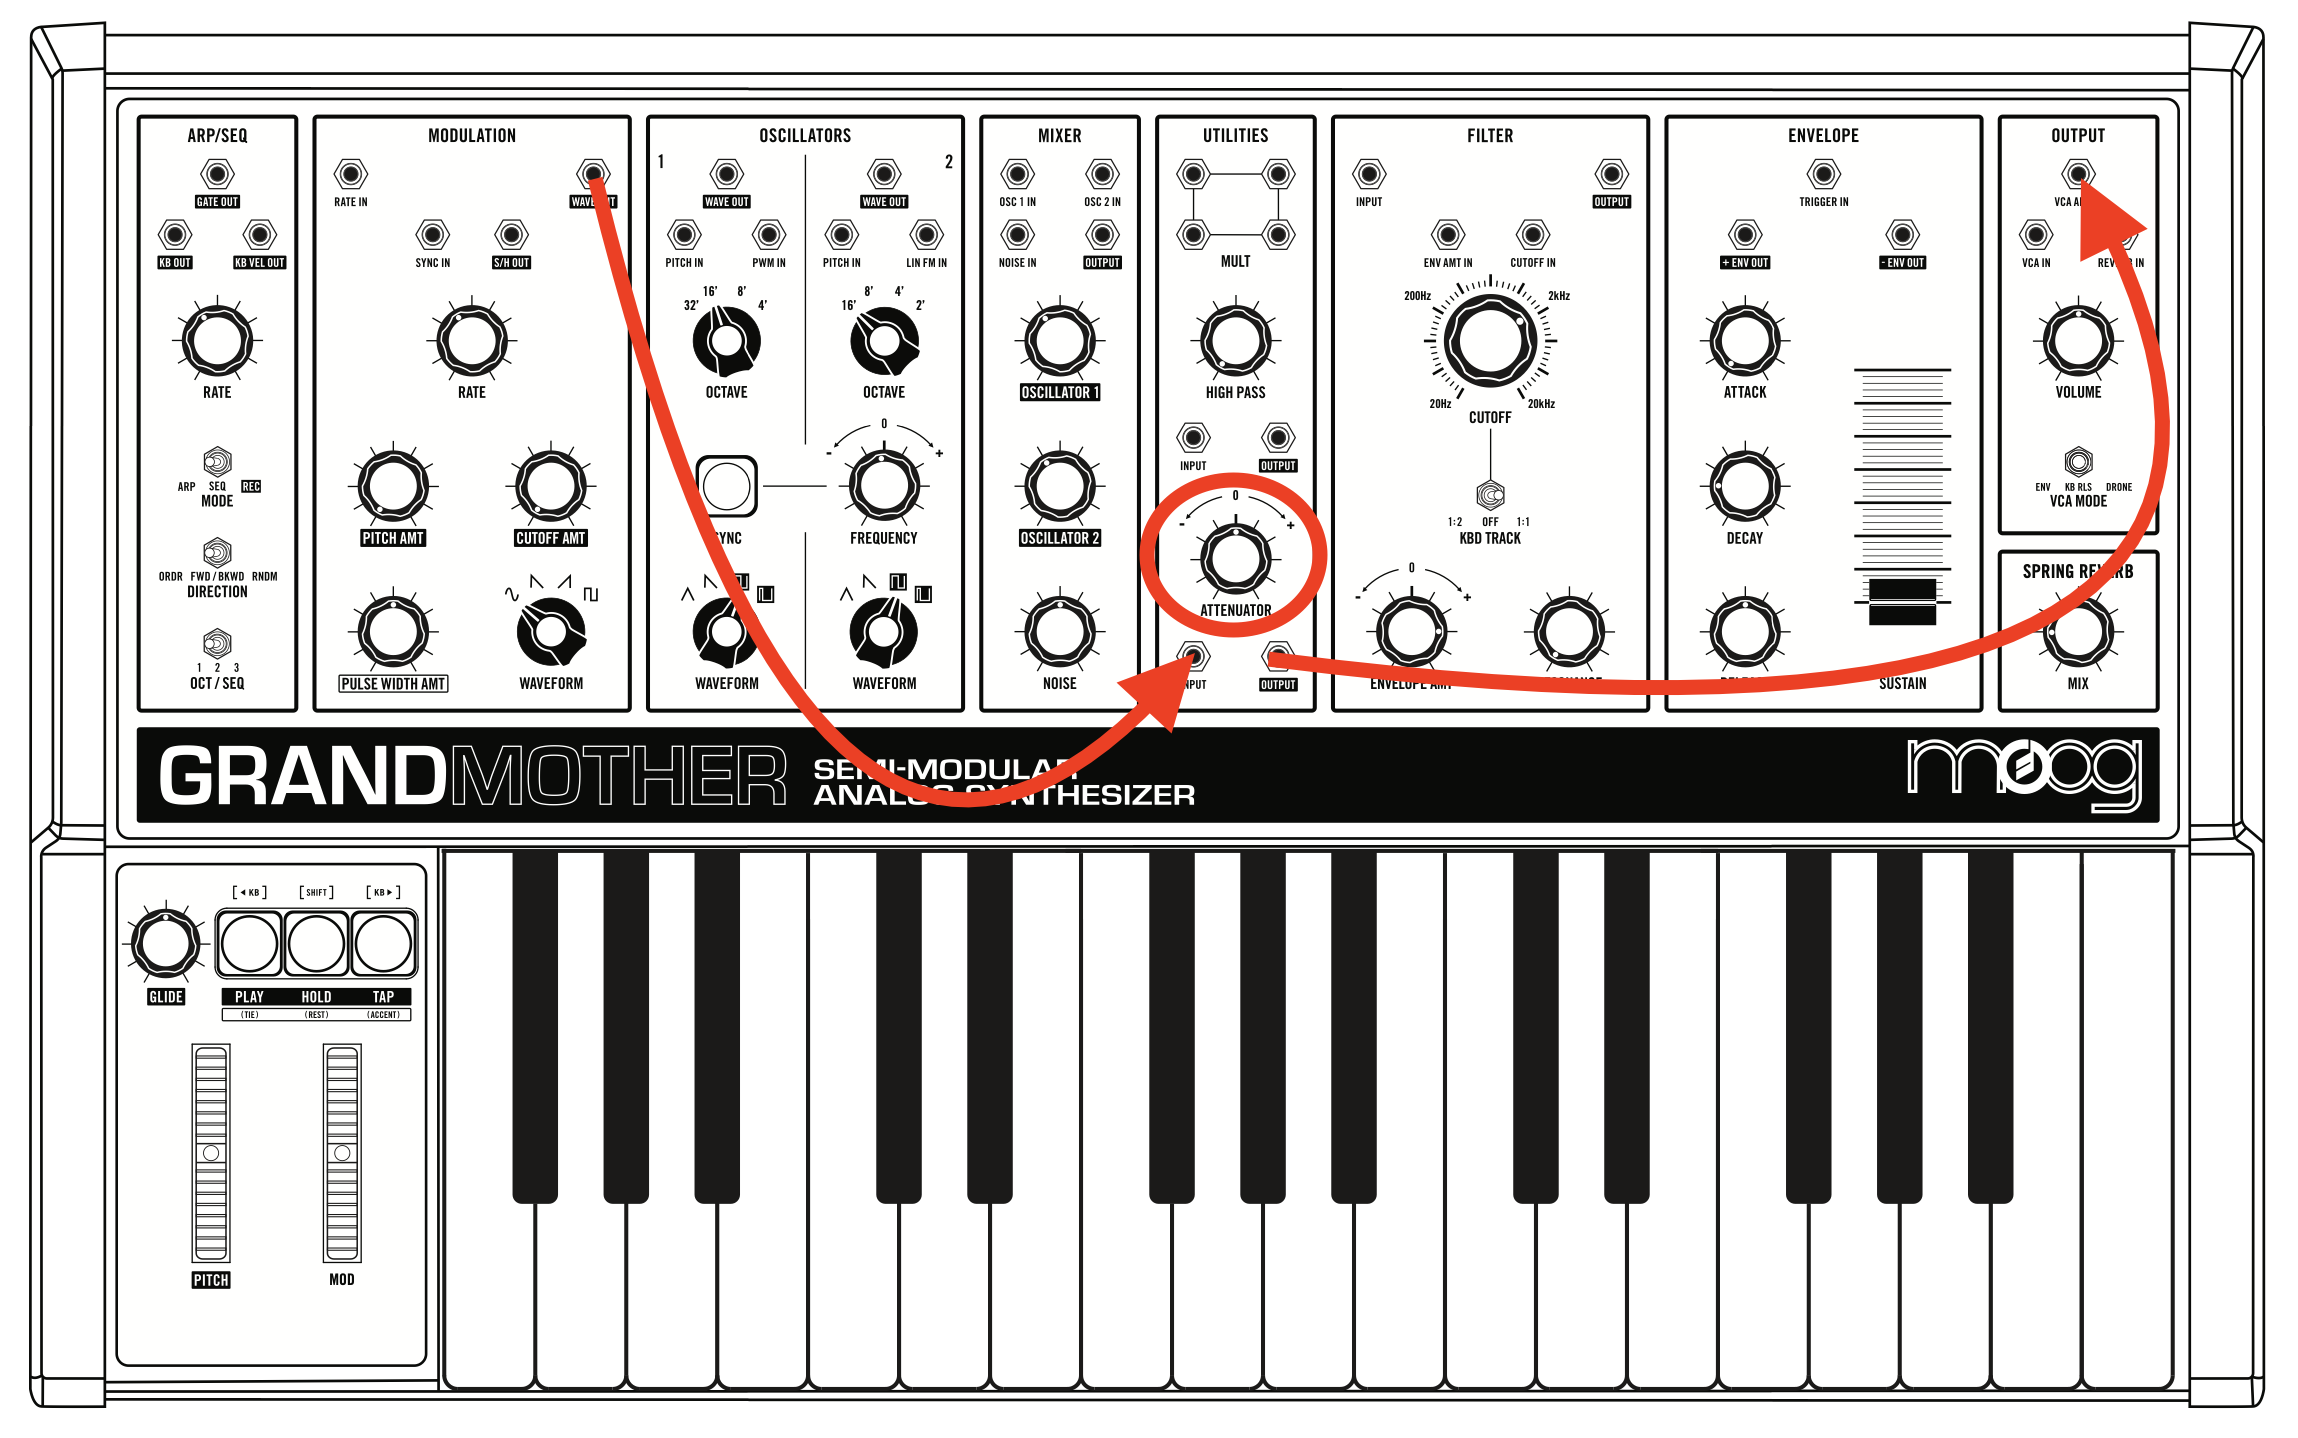
• Disconnect the patch cable from VCA AMT and reconnect it to the ATTENUATOR INPUT in the UTILITIES section. Then connect another patch cable from the ATTENUATOR OUTPUT to the VCA AMT. Now move the ATTENUATOR dial to the right. This is basically the same as above, except that now you can control the intensity of the pulse with the ATTENUATOR dial.
B) Frequency modulation: here we will use the LFO to control the frequency of oscillator 1.
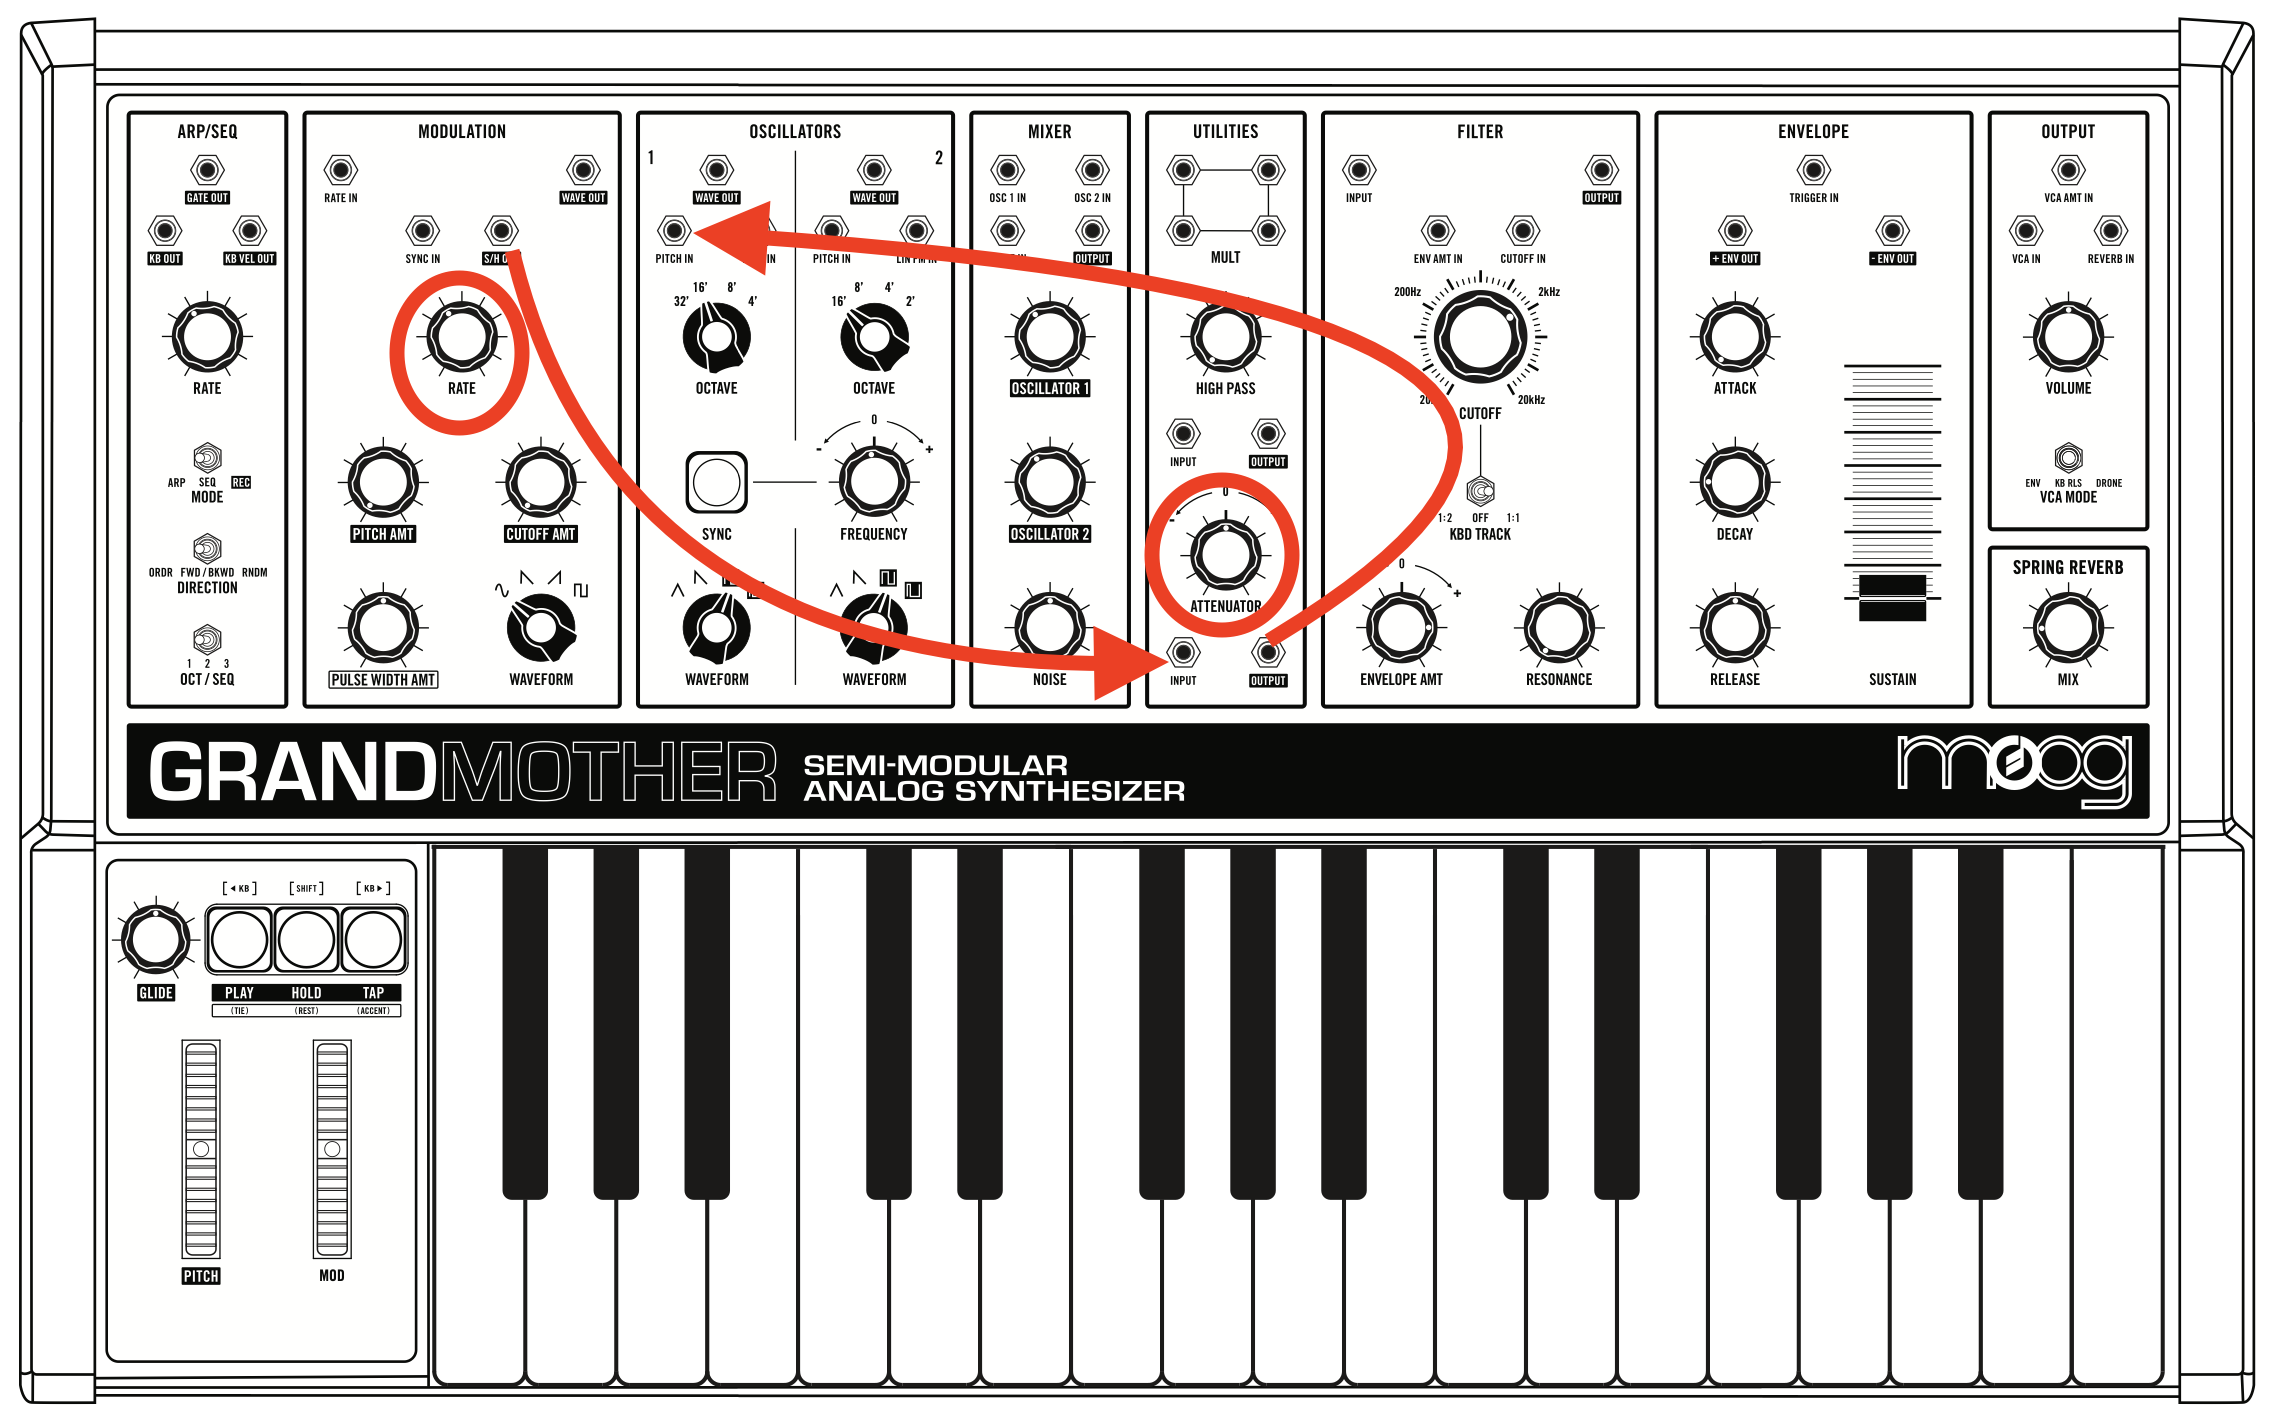
• Disconnect the VCA AMT cable and re-connect it to PITCH IN of OSCILLATOR 1. Play some notes; you should hear a strong vibrato sound. Try increasing the RATE in the MODULATION section to increase the speed of the vibrato; as you go to the fastest RATE, the sound will become more bell-like.

• How is this different from modulating the frequency with the PITCH AMT dial?
C) Random modulation: here we will use "sample and hold" to create random pitches. The sample and hold function (S/H OUT in the MODULATION section) samples (i.e., measures) at a given RATE the voltage of an internal noise generator. The result is a stream of random voltages that can be used to control various parameters.
• Disconnect all the cables. Connect a patch cable from S/H OUT to ATTENUATOR INPUT, then connect a cable from ATTENUATOR OUTPUT to PITCH IN of OSCILLATOR 1. Play some notes; you should hear a stream of random pitches.
• Try increasing the ATTENUATOR dial to expand the range of the random pitches.
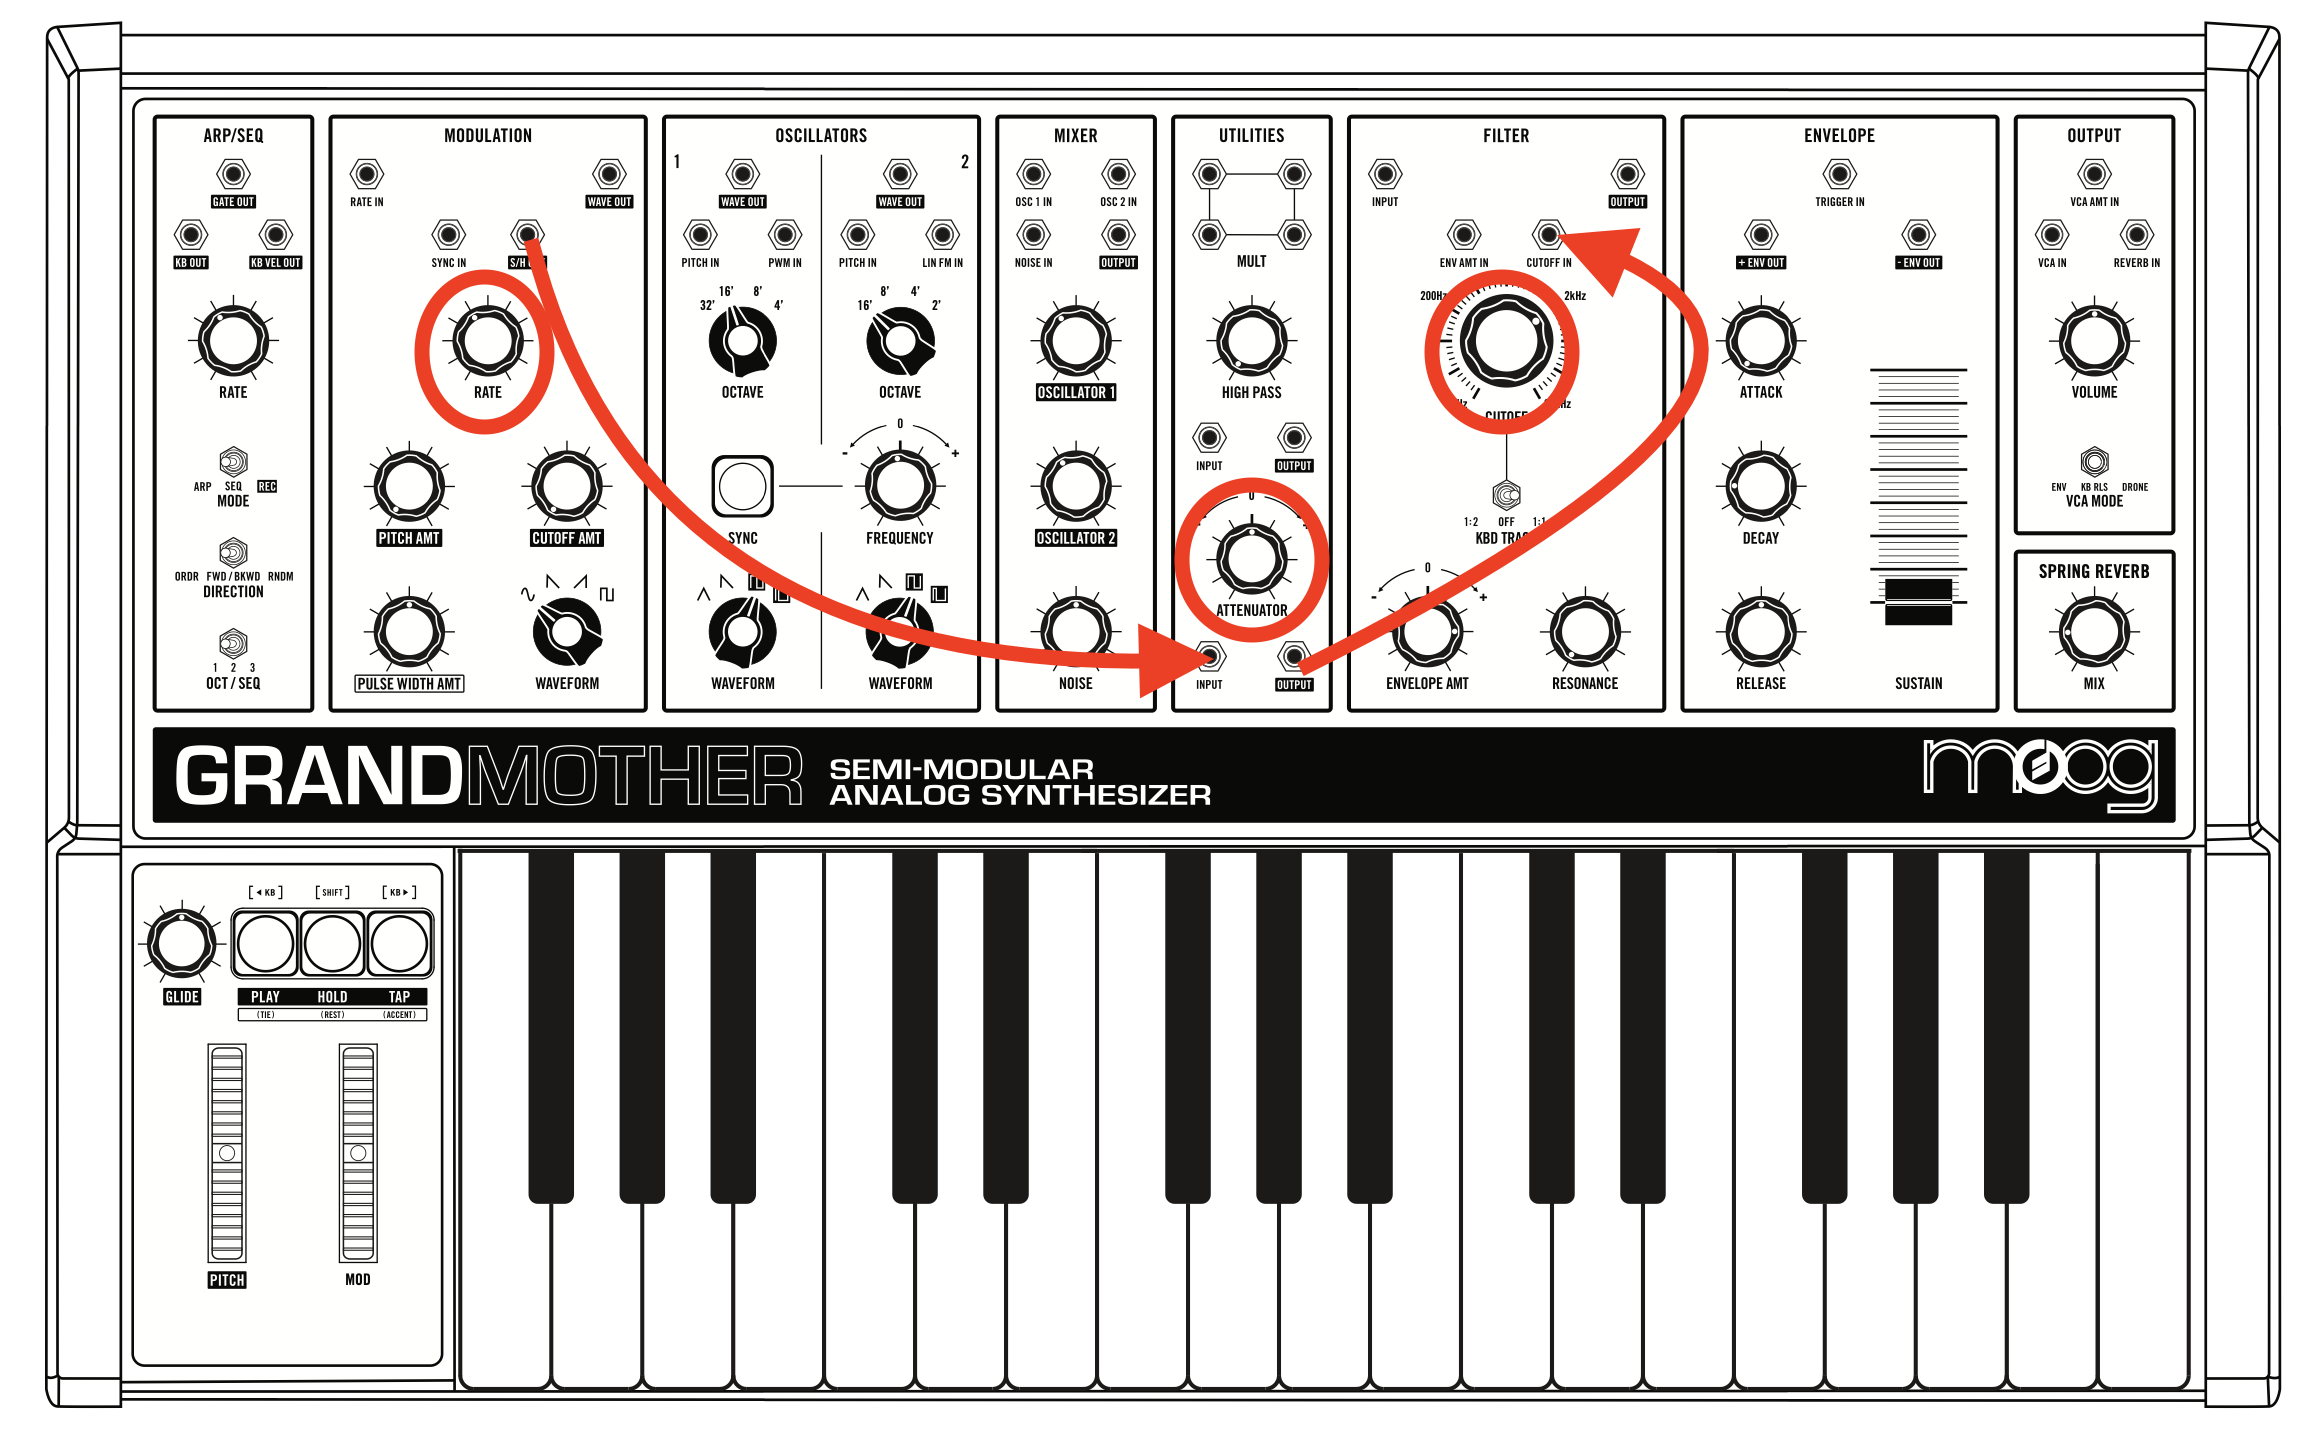
• Disconnect the PITCH IN cable and reconnect it to CUTOFF IN. Play some notes, you will now hear random CUTOFF frequency in the filter (try increasing the ATTENUATOR and/or RESONANCE if it's too subtle)
• Does the WAVEFORM (MODULATION section) dial have an impact on S/H OUT?
Improvisation
Create and record a ~2-3 min improvisation on the Moog using the arpeggiator. Use of the Nemesis is optional, but highly recommended.
As a reference, you can base your improv on Hélène Vogelsinger's Patch Notes , but you may also choose any other style, as long as you are using the arpeggiator.
• To record your improv, create a new Logic project, and save it in your student folder as yourname_ArpImprov.
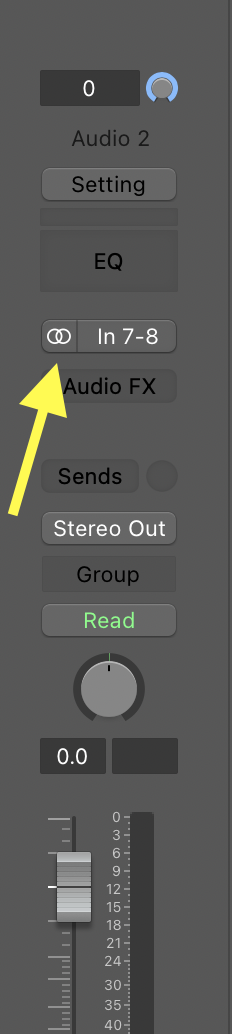
• Create a new STEREO track in Logic (click the little circle button the input number) and set the input to 7-8. Record enable the track; you should now see signal coming from the synths into Logic.
• Push the MONITOR button to mute the Apollo. Remember: you will have to unmute the Apollo when you're done to hear what you recorded.
• Keep an eye on the meters in Logic to make sure you are recording a strong signal. Adjust the level of the synths with the VOLUME knob on the Moog. Avoid touching the Yamaha faders.
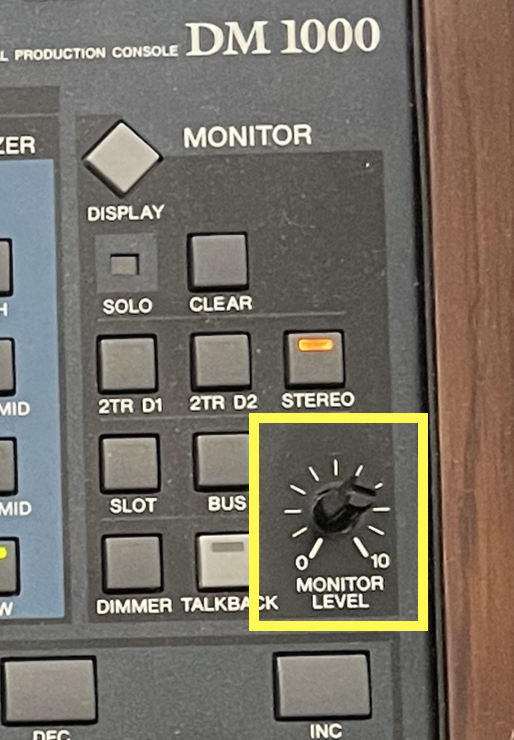
• If you're getting a good level in Logic, but it's starting to get loud for your ears, turn down the MONITOR knob on the Yamaha mixer.
• Hit "Record" in Logic, have FUN!!
Power Off
• Turn down the MOOG dial on the mixer next to the iMac, and turn off the MOOG power.