
Please complete all previous assignment before starting this assignment.
The following task is to build a complete drum patch on the modular synth. You're essentially going to be re-doing what we did in class. For each step, make sure you understand how each dial is changing the sound, and take note of any questions I can answer in class next week.
If you want more info on each module, please see this 618 Resources site, and scroll down to "All 618 Synthesizer Manuals".
Please refer to the Synthesis Notes shown in class.
Getting Started
1) Make sure the "Modular" faders on the Yamaha mixer are down, then power-on the Modular (black button, top left), then bring the Yamaha faders up to "0".
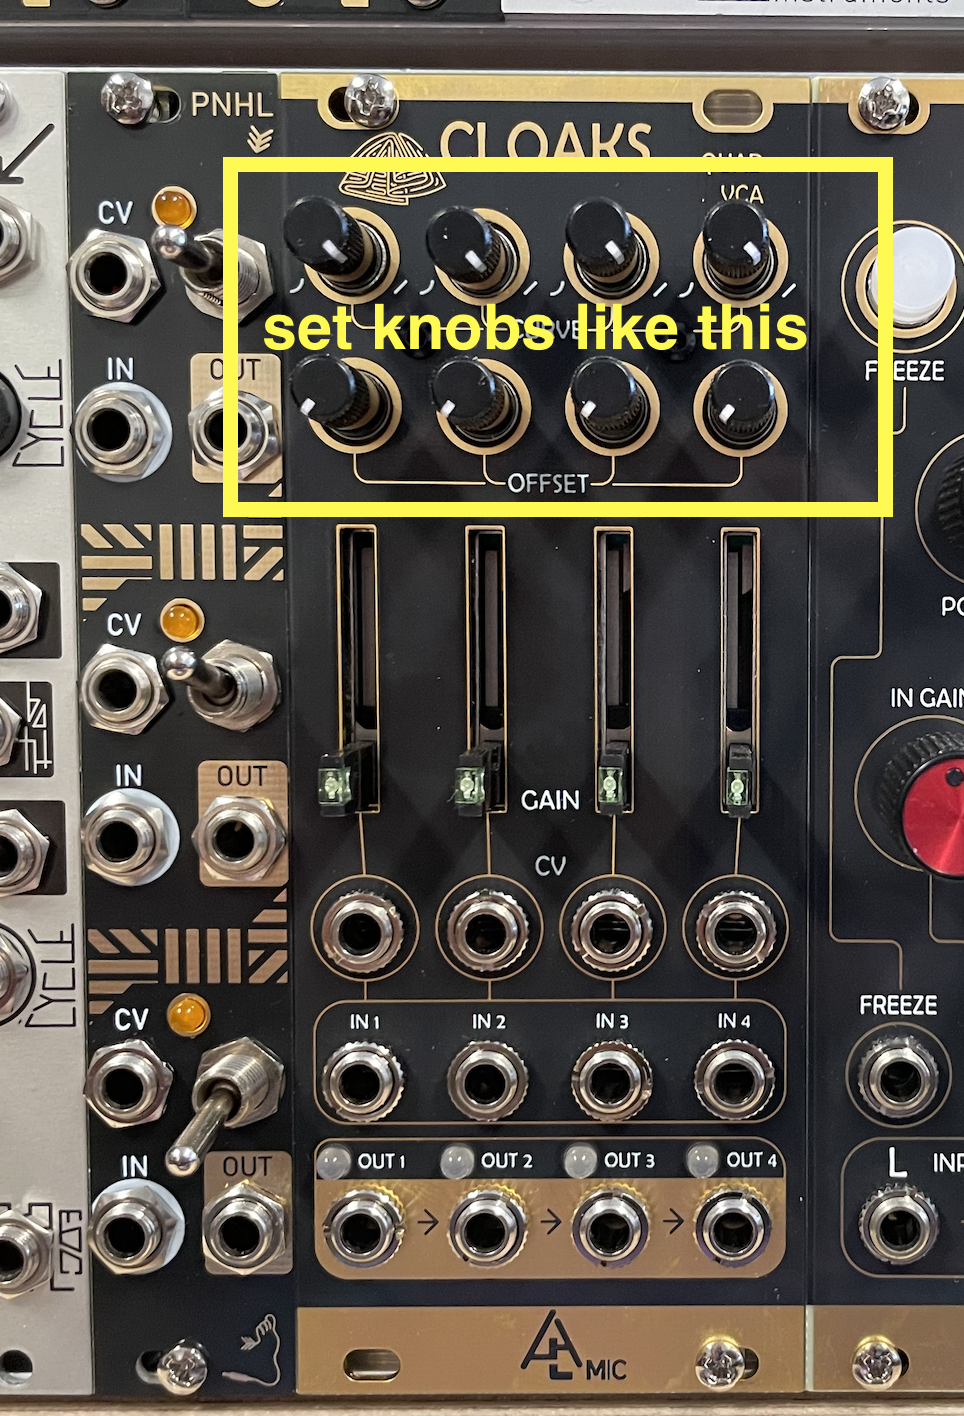
2) Reset the modular. There are too many things to reset, so you just need to make sure that the CURVE knobs at the top of the CLOAKS module are all the way to the right, and that the OFFSET knobs (just below the CURVE knobs) are all the way to the left.
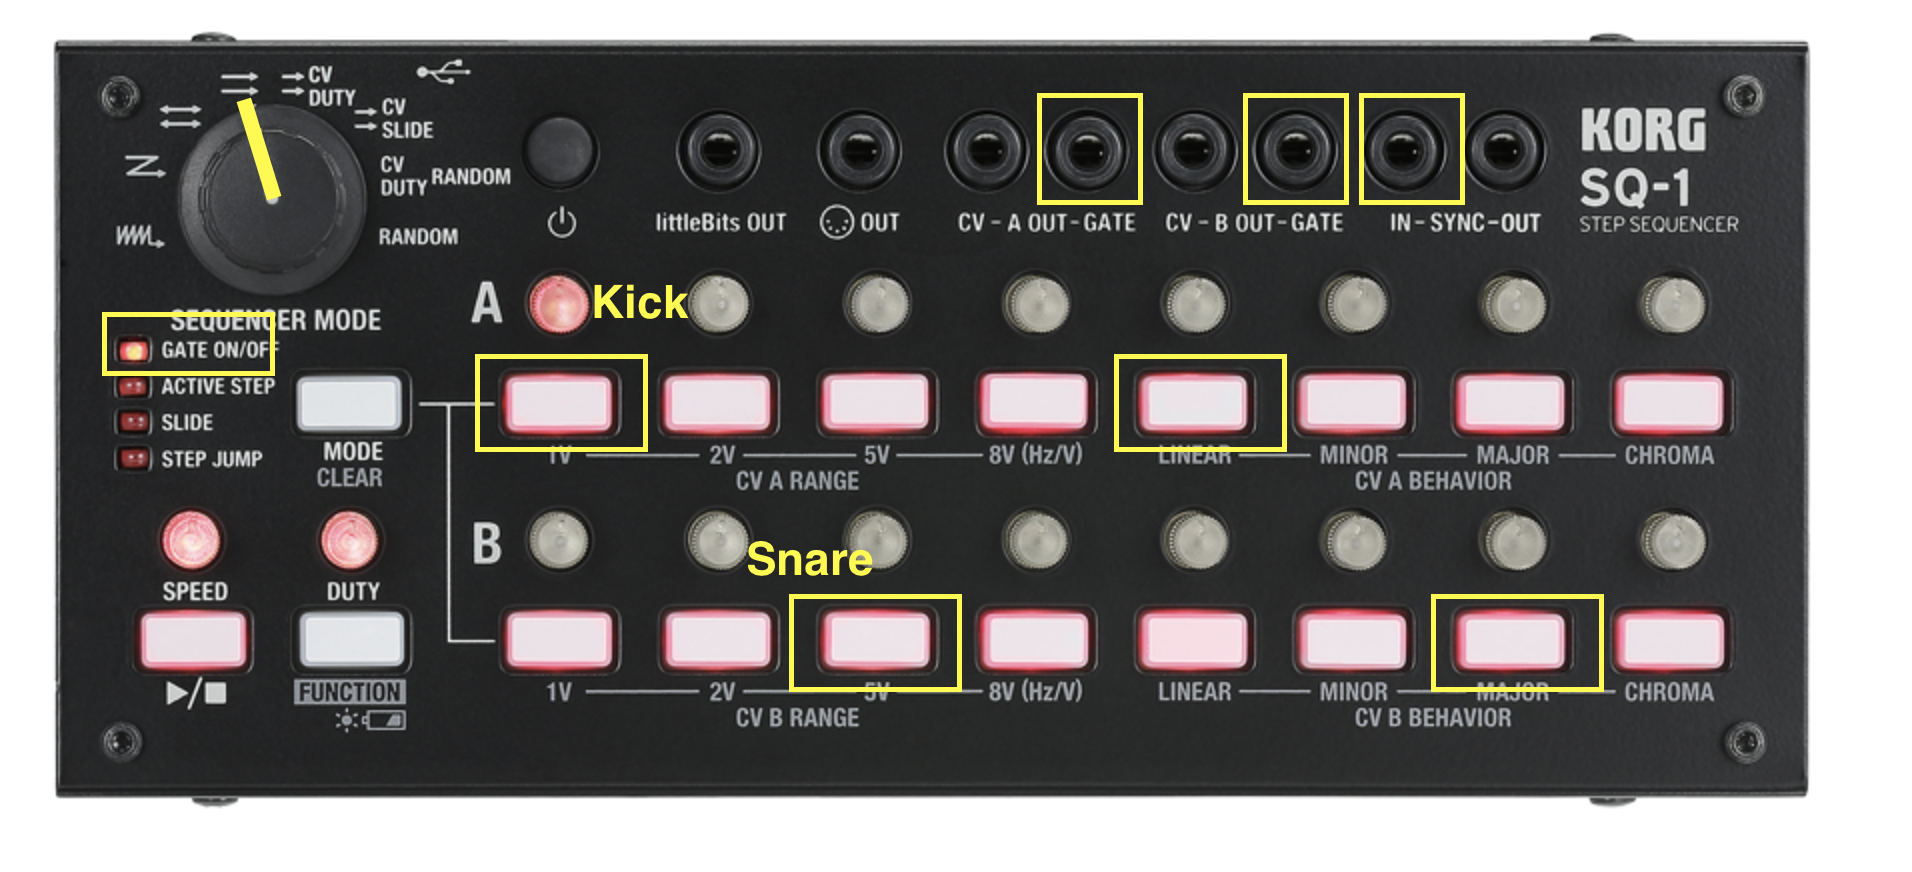
3) Turn on the SQ-1 sequencer (the small black box in front of the modular with the white buttons). Set the main knob to the two parallel arrows mode, and the mode to "Gate ON/OFF". Turn off all the buttons NOT in yellow in the picture.
4) Connect Output 1 of PAMs to the SYNC IN on the SQ-1. This connects a clock signal from PAMs to the SQ-1 so that PAMs can control the overall tempo.
5) Press START on PAMs. And set the tempo to 120ish (whatever you want, doesn't really matter).
6) Press play button on the SQ-1 (bottom left corner). You'll see the sequencer lights move from left to right at the tempo set by PAMs.
7) Turn up the HEADPHONE volume on the modular to about 12' o'clock.
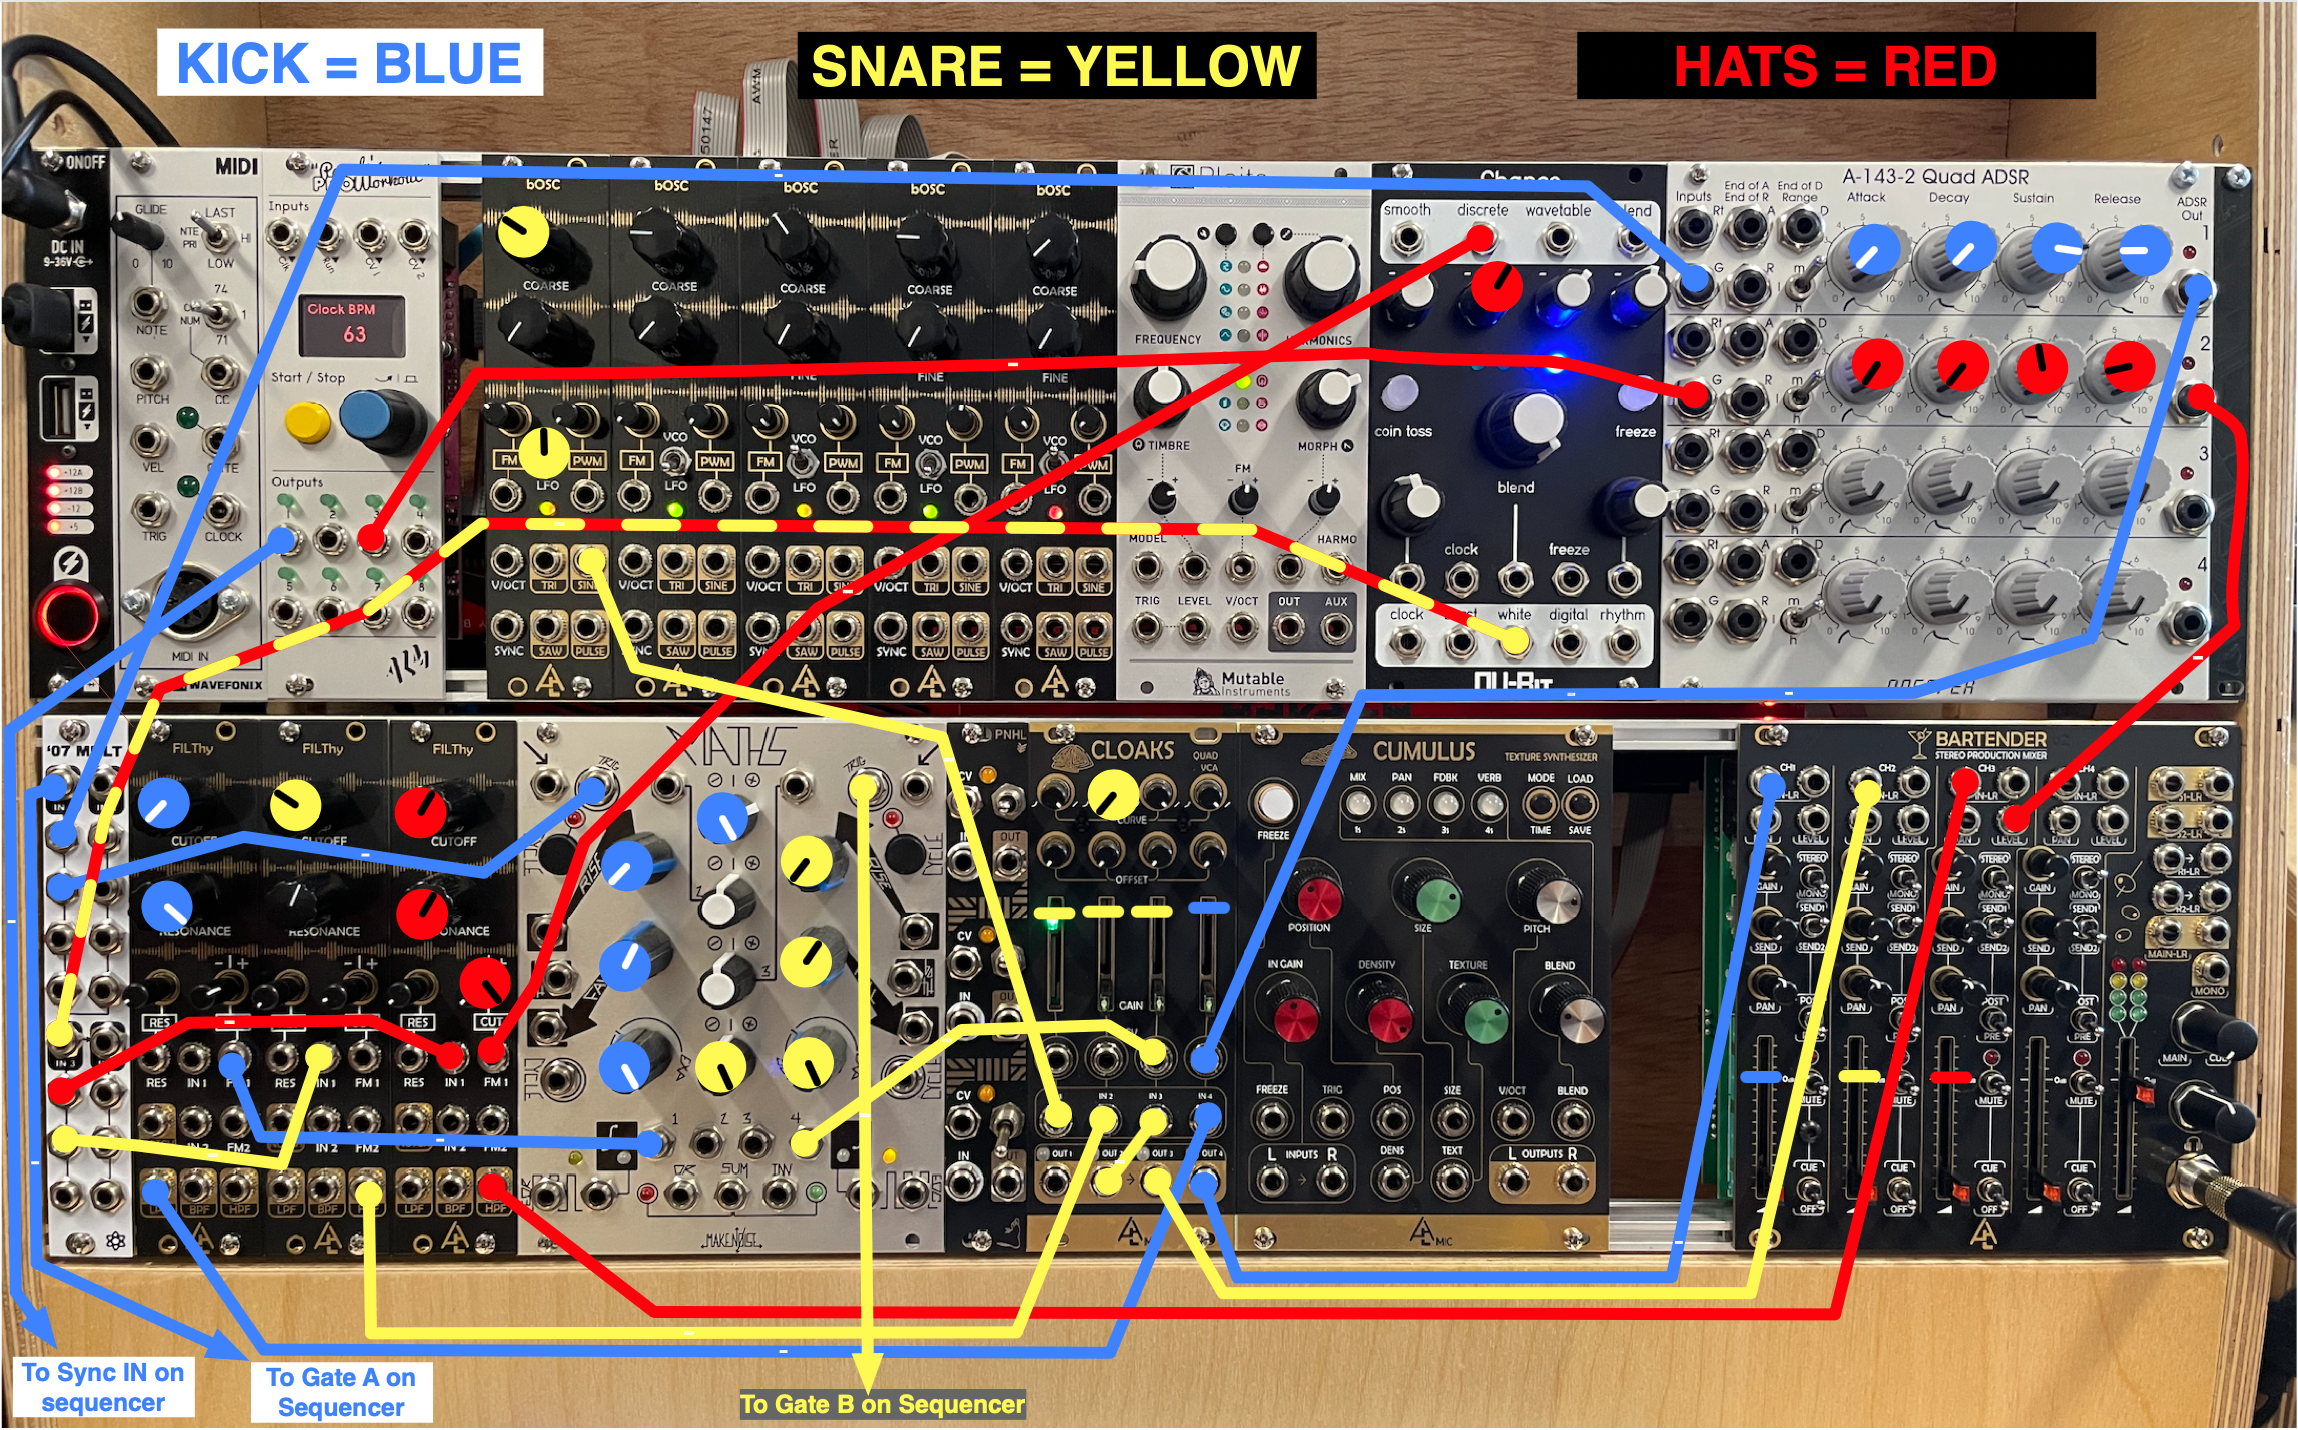
Kick Patch
Click on the image below; it will open in a new tab. Toggle between tabs to look at the patch and follow the instructions.
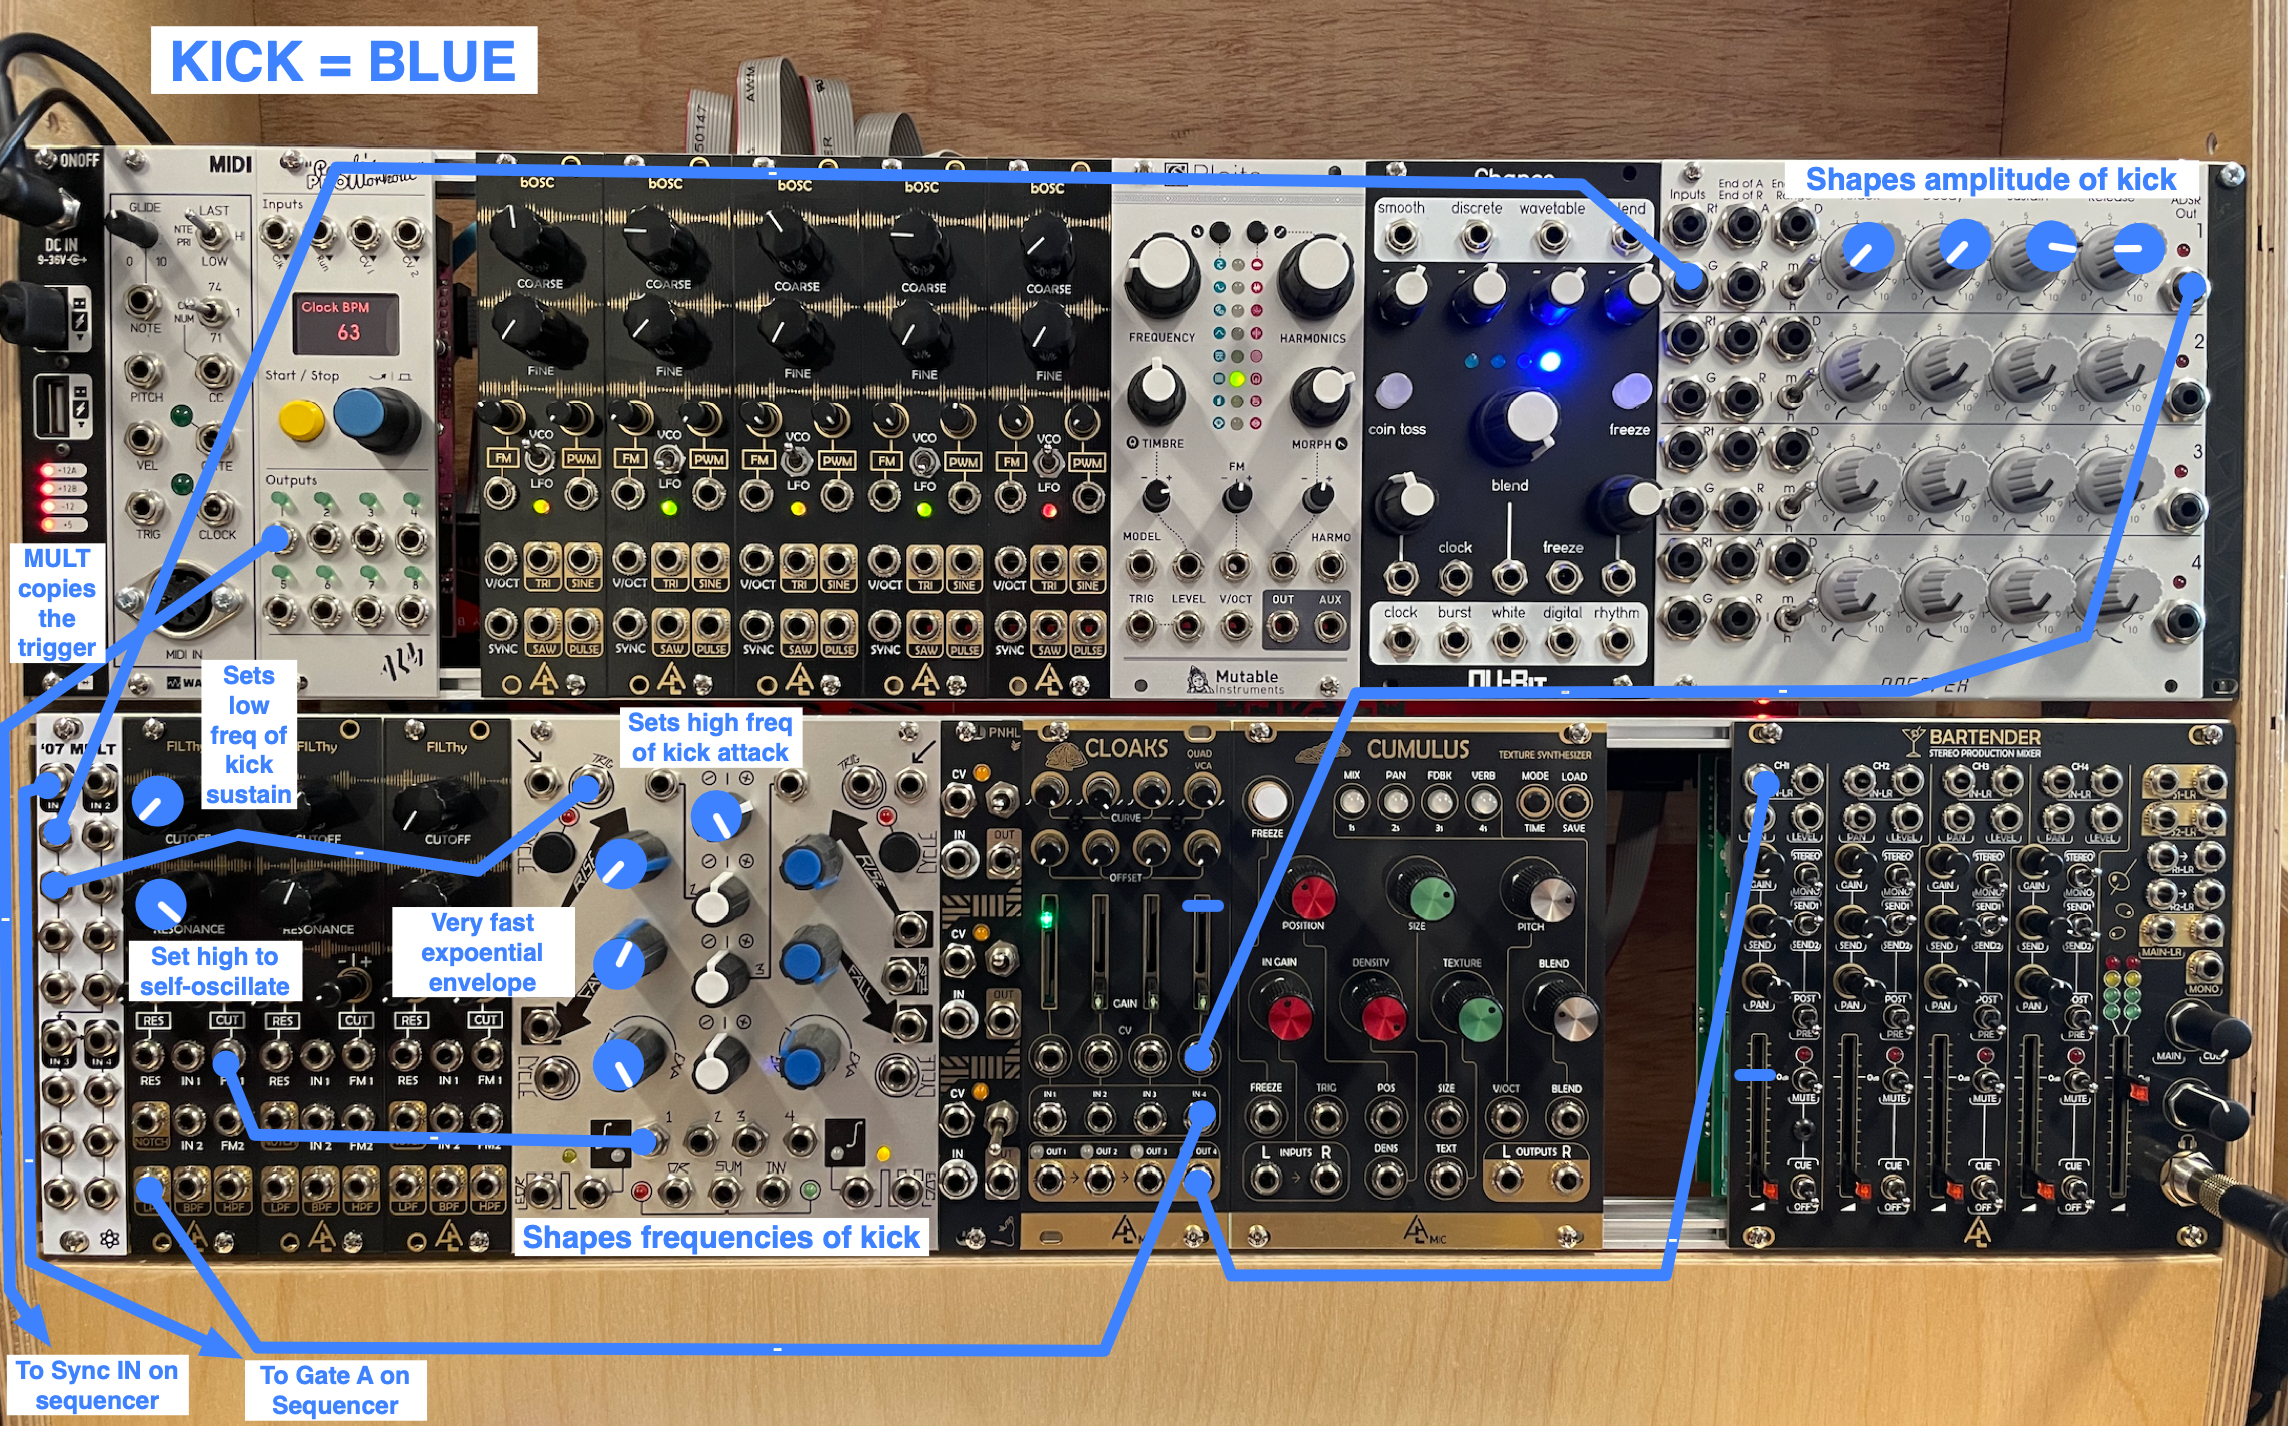
1) Triggers: connect the GATE A on the SQ-1 to the IN1 on the MULT module. Then, on the MULT module, connect the two outputs just below the IN1 to the G1 on the ADSR and the left TRIG input on MATHS, respectively.
What's going on: the SQ-1 will send gate signals (essentially square waves) to the ADSR and MATHS, each of which will then trigger a CV (control voltage) envelope that goes up and down. We will use these CV signals to control the frequency and amplitude of the kick sound.
2) Envelopes: connect the OUT1 of MATHS to the CUTOFF of the first FILThy filter. Connect the OUT1 of the ADSR to the CV4 of the CLOAKS (remember CLOAKS is a VCA, which is needed when we want to control the amplitude of a signal).
• Adjust the knobs on the ADSR and MATHS as per the image.
3) Connect the LPF out of the first FILThy filter to the IN4 of CLOAKS. Bring up the FADER4 of CLOAKS.
• Adjust the knobs on the FILThy as per the image. Important: make sure the RESONANCE knob on the filter is all the way up.
4) Connect the OUT4 of CLOAKS to the IN1 of the MIXER, and bring up the fader to 0. You should now hear the kick sound.
5) Play around with all the knobs in blue on the patch image.
Q1: In this case, how is the FALL knob on MATHS different from the RELEASE knob on the ADSR?
Q2: Why does the RESONANCE knob have to be all the way up on the filter?
Q3: Why does MATHS affect the frequency of the attack of the kick, and the filter affects the low frequency of the kick?
6) Lower the volume of CH1 on the MIXER; let's start another patch.
High Hat Patch
Click on the image below; it will open in a new tab. Toggle between tabs to look at the patch and follow the instructions.
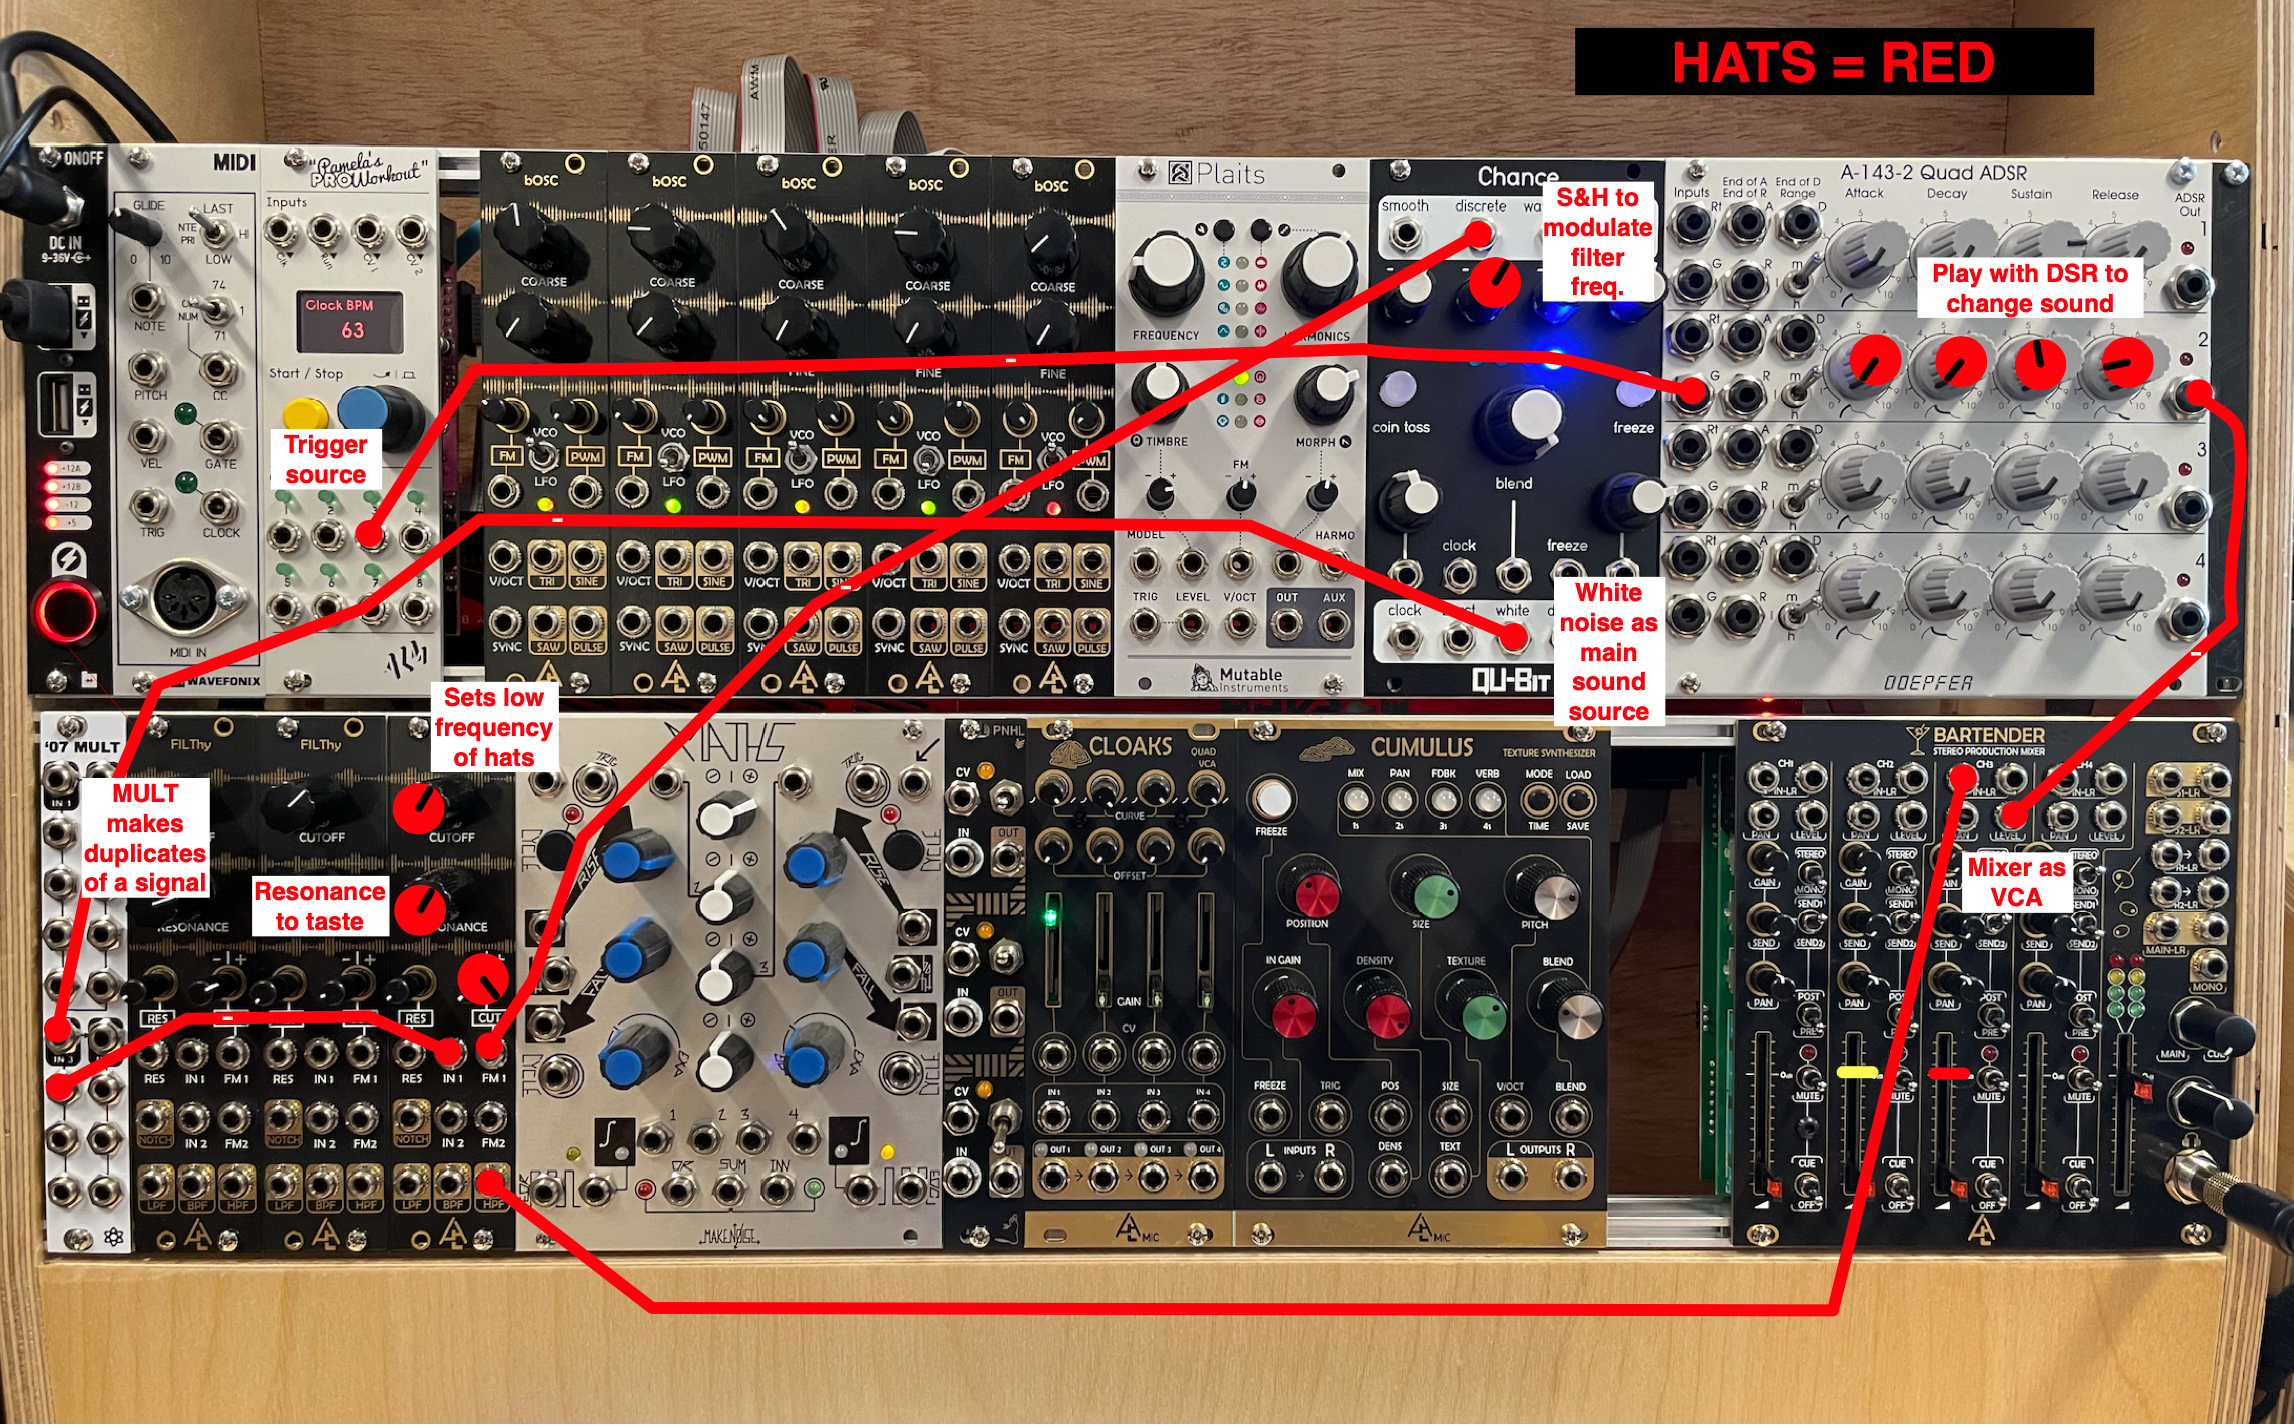
1) Connect the OUT3 of PAMs to the G2 of the ADSR. Adjust the knobs on the ADSR as per the patch image.
What's going on: here, PAMs will control the triggers of the high hat sound, not the SQ-1.
• Turn the knob of PAMs and make sure OUT3 is set to x4. If it isn't. press on the blue knob and turn to set to x4. Push the button again, and turn the knob back to the tempo control.
2) Connect the OUT2 of the ADSR to the LEVEL input of CH3 on the MIXER.
What's going on: because the snare patch below will use up all the remaining VCA inputs, we will use the MIXER as a VCA instead.
3) Connect the WHITE output of the CHANCE module to the IN3 of the MULT, and connect the output just below it to the IN of the third FILThy filter.
• Adjust the knobs of the filter as per the patch image.
4) Connect the DISCRETE output of CHANCE to the FM input of the third FILThy.
• Adjust the knob of CHANCE as the patch image.
5) Connect the HPF output of the filter to the IN3 of the MIXER, and bring up the fader. You should hear the hats sound.
6) Play around with all the knobs in red on the patch image.
Q4: What is the DISCRETE knob on the CHANCE module doing?
Q5: Why use the HPF output of the filter and not the LPF? Try changing to the BPF and NOTCH outputs. What's different?
7) Lower the volume of CH3 on the MIXER; let's start another patch.
Snare Patch
Click on the image below; it will open in a new tab. Toggle between tabs to look at the patch and follow the instructions.
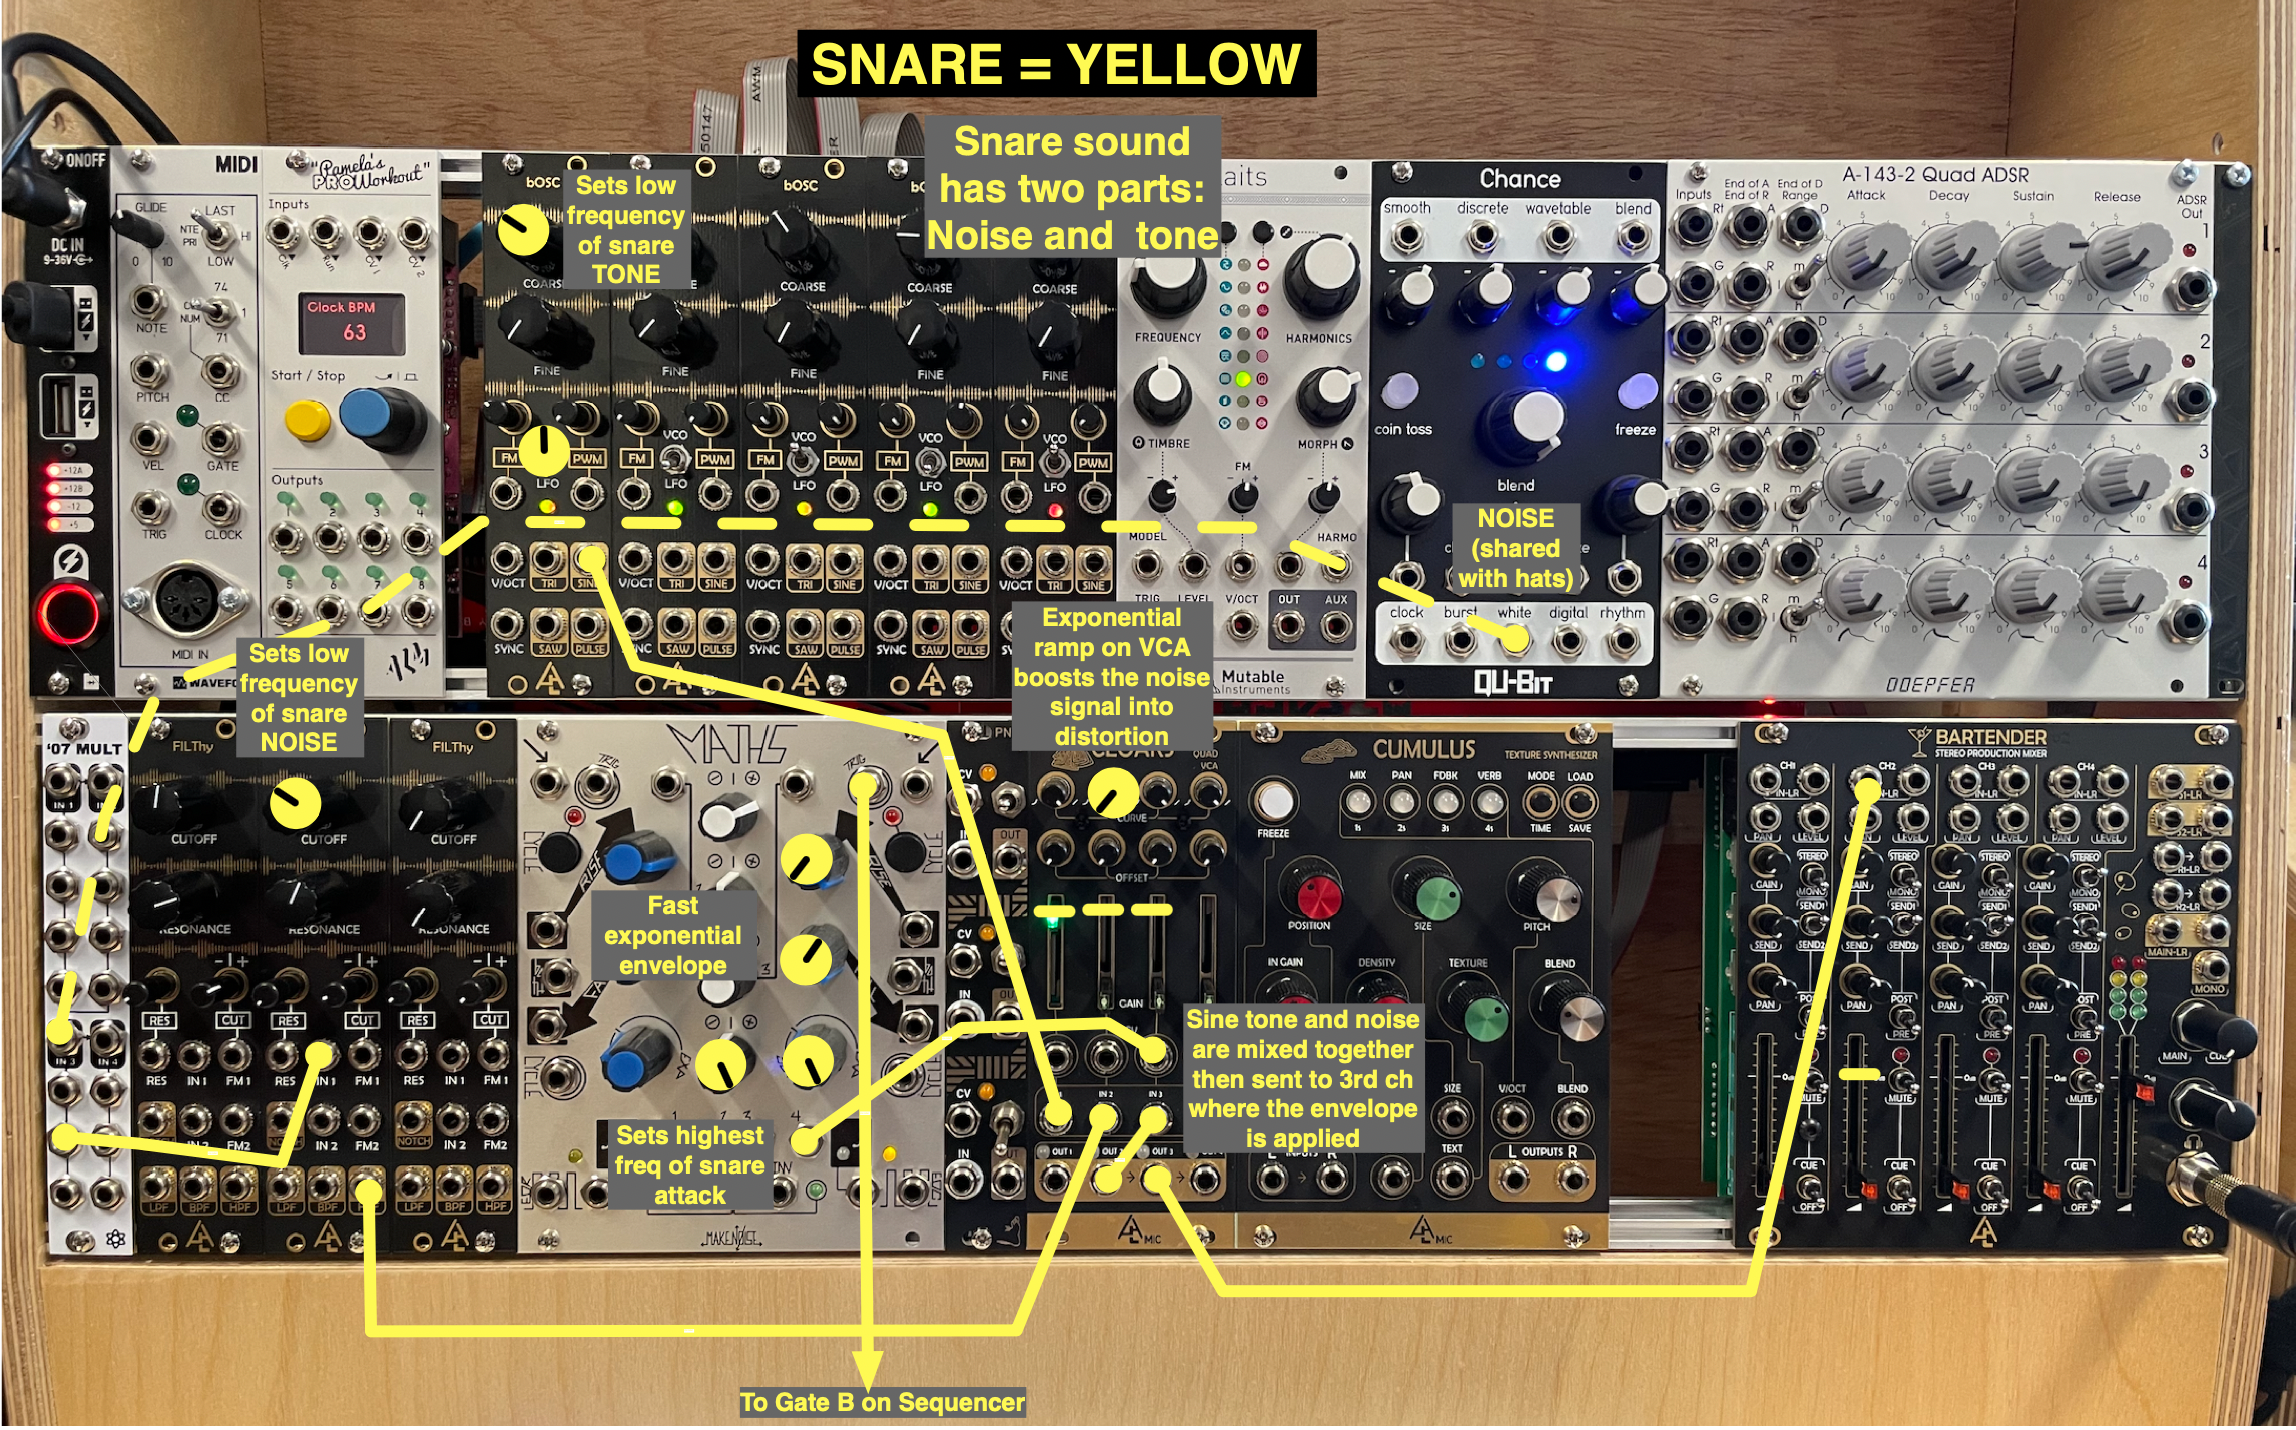
NOTE: Snares have two components: noise, from the snare on the bottom head of the drum; and pitch, from the actual resonance of the drum heads and body. To synthesize this, here we'll use white noise, and a sine tone oscillator. Many variants on this method exist, though most also use white noise and oscillators.
1) Connect the GATE B of the SQ-1 to the right TRIG input of MATHS.
What's going on: the B sequence from the SQ-1 will control the snare, so the SQ-1 will send square pulses to MATHS to trigger an envelope that will shape the snare's sound.
2) Connect the SINE output of first bOSC oscillator to the IN1 of CLOAKS.
• Set the knobs as per the patch image. This is the tone of the snare.
3) Connect the second output of the MULT you used for the high hat noise to the IN of second FILThy filter, and then connect the HPF output to the IN2 of CLOAKS.
4) Connect the fourth output of MATHS to the CV3 of CLOAKS, and connect the OUT2 of CLOAKS to the IN3 of CLAOKS.
What's going on: because we're not connecting anything to CV1 and CV2 of CLOAKS, the module, for those channels, just acts like a mixer, with the outputs cascading to the right. So OUT2 on CLOAKS has a mix of the noise and the sine tone, which we're then sending to the IN3 of CLOAKS so it can be modulated by the MATHS' envelope connected to CV3.
5) Connect OUT3 of CLOAKS to IN2 of the MIXER, and raise the fader. You should hear the snare sound.
6) Play around with all the knobs in yellow on the patch image.
Q6: What do you need to change in order to adjust the balance between tone and noise?
Q7: What does the CH2 curve knob on the CLOAKS do?
Experimentation
• MUTE THE APOLLO (press the MONITOR knob, it will turn red). VERY IMPORTANT!! You will get feedback if you don't do this.
• Then, open Logic on the iMac, create a track with INPUT 7-8, and click record enable.
• Hit record.
• Experiment by playing around with blue, red, or yellow knobs on the overall patch picture. Remember that you can use the mixer MUTES (not shown in picture) to temporarily remove one of the three sounds. As always, this is an instrument, meant to be played; turn those knobs!
• Also, on the SQ-1, change the mode to STEP JUMP, and try pressing the various white A or B buttons to change the beat. Feel free to explore the various other functions, the manual is in the 618 Resources site, and you can watch the YouTube below for a complete demo, if you want. The goal, for now, is just to try out the device, not get a full understanding of it. Note that if you change a bunch of settings on the SQ-1 it might be hard to get back to where you started; in this case, just turn it OFF/ON and restart as described at the beginning of this assignment.
YOUTUBE
• Lastly, for creative alternatives to the snare we just made, try disconnecting the cable that's in the right TRIG input of MATHS (used for the snare sound), and connect it to the TRIG input of PLAITS. Then disconnect the cable from the OUT3 of CLOAKS and connect it into the OUT of PLAITS. Try the various waveforms on PLAITS, including the percussive ones (top button on the right).
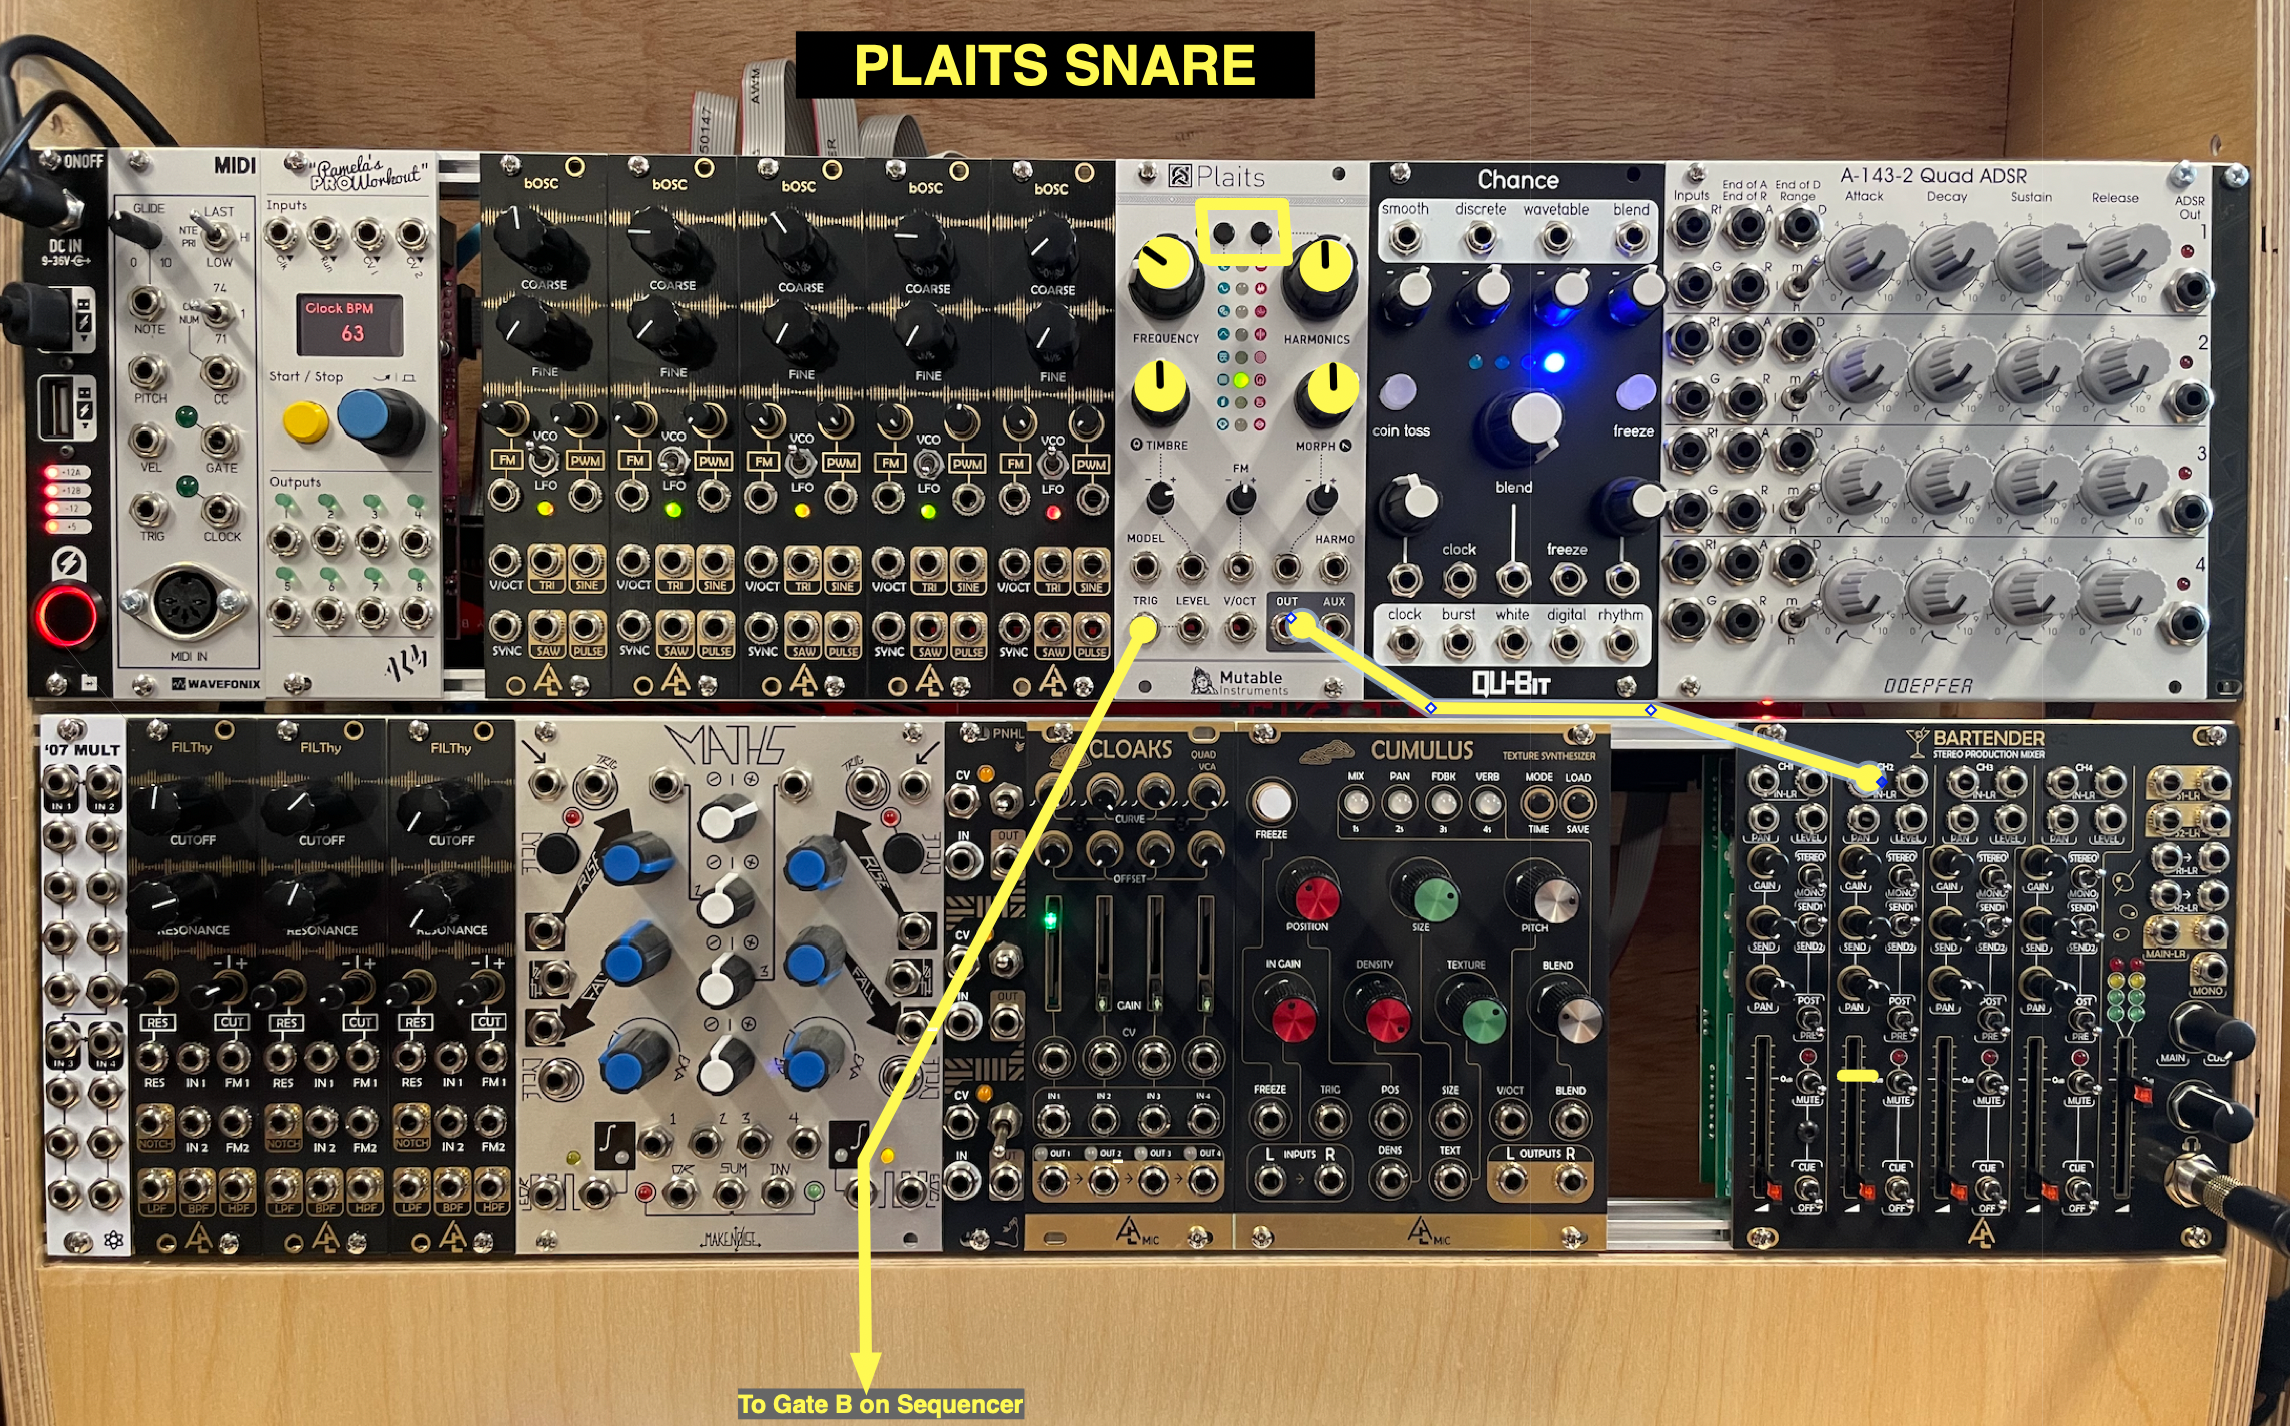
• Again, please only change the tempo in PAMs, nothing else.
• Have fun, and do not fear mistakes.
Finally…
• Save your Logic project.
• Turn down the faders on the YAMAHA mixer.
• Turn down the headphone volume on the modular.
• Remove all patch cables and place them on the table in front of the modular.